Introduction
The Facebook Pixel is used for acquisition campaigns and it allows advertisers to track visitors’ actions on their website. It can be modified to track different actions according to the website content.
Each tracked action on the website is called “event”.
There are four main Facebook events used for traditional conversion campaigns
- Page view – general event added to all website pages, it helps advertisers regroup audiences of website visitors for retargeting campaigns.
- View content – track users who have seen a specific content promoted by the campaign
- Add to cart – track visitors who have added a product to their basket
- Purchase confirmation – track purchased products
Other pixel events can be added according to the client’s objectives ex: add payment info, lead, complete registration and so on.
What is a custom conversion and how to use it
Some advertisers need more specific information about the actions taken on their website. To answer their needs Facebook pixel has given them the chance to personalize the events of the pixel so that they can track the important information for them.
Step-By-Step
To create a Custom Conversion on the Marin Social platform, please follow the steps below:
- In the Config section in the top right-hand corner of the platform, select Tracking from the drop-down menu
- Click on Custom Conversion
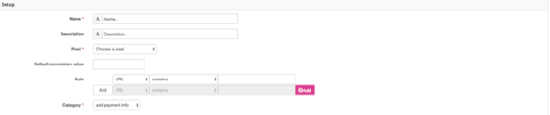
- To create a new custom event select the Pixel that is already placed on your website and then chose the URL that you want to use to track with the new event. You can name it as you wish.
Advanced Settings
- Select an optimization rule (choose to apply it automatically or not). Please note that if you configure a rule at both the Media Plan and Campaign level, the Campaign level rule will override the rule set at the Media Plan level.
- Select “Reallocate paused ad set budget” to better optimize your budget allocation.
- Set up a daily/weekly/monthly or a cumulative auto-pause based on clicks, impressions, spend, Main KPI.
- Specify the campaign status
- Choose the number of ads per ad set.
Additional Notes
Only the name, budget and date range are mandatory fields. All other fields are optional.
