Introduction
Marin Social offers full support for Facebook's Dynamic Ads. This ad type helps you promote highly relevant products to the users browsing the product catalog on your website or mobile app using remarketing.
Dynamic Ads themselves look identical to single image or carousel ads on Facebook, but rather than individually creating an ad for each of your products, you instead create an ad template that automatically uses images and details from your product feed. Dynamic Ads use your Facebook remarketing pixel to target ads towards users who have already shown interest in your business by taking actions on your website. They work across all devices, regardless of which device a user was using when they initially interacted with your business. Facebook will dynamically show these ads to past visitors of your products and -- if all goes to plan -- convert them into paying customers. That's what we call a win-win!
Now you know what Dynamic Ads are, let's learn how to set them up in Marin Social.
The Config Page
The Dynamic Ads configuration page was created because, previously, you could only manage product sets and creative templates from within the Dynamic Ads Wizard -- which was cumbersome at best. The previous method also didn't allow you to create sets or templates for future campaigns, or to manage everything in a single place outside of creating ads. The Dynamic Ads configuration page solves all of this -- and here's how you can use it.
From the Dynamic Ads configuration page, you'll be able to manage all aspects of your feeds, product sets and creative templates. Upon entering the Dynamic Ads configuration page, you'll be able to use the drop-down menus to select your Facebook Account, Business Manager, and the Product Catalog you wish to create, and manage the applicable Product Sets. Note: If you only want to make changes to your creative templates, you only need to select your Facebook Account.
From the Dynamic Ads configuration page, you can carry out the following actions:
- Create new catalogs for commerce, hotels, and destination and upload the relevant feeds.
- Create new product sets.
- Delete product sets.
- Carry out a refresh which will sync any catalogs, feeds, or sets which were created on Facebook.
- Access all of your Catalogs and Feeds from one page.
- Create new Catalogs for Commerce, Hotels, and Destination -- and upload the relevant feeds too.
Ready to access the config page? You can do so by following the steps below.
- In the upper-right corner of Marin Social, click the Config button and a drop-down menu will appear.
- Next, simply click on the Dynamic Ads button at the bottom of the drop-down menu.
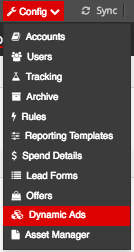
- You'll now be looking at the Facebook Dynamic Ads configuration page. Simply use the grid at the bottom of the screen along with the checkboxes and buttons to make the changes we described above.
Step-By-Step
Use the following step-by-step guide to get started with Facebook Dynamic Ads in Marin Social.
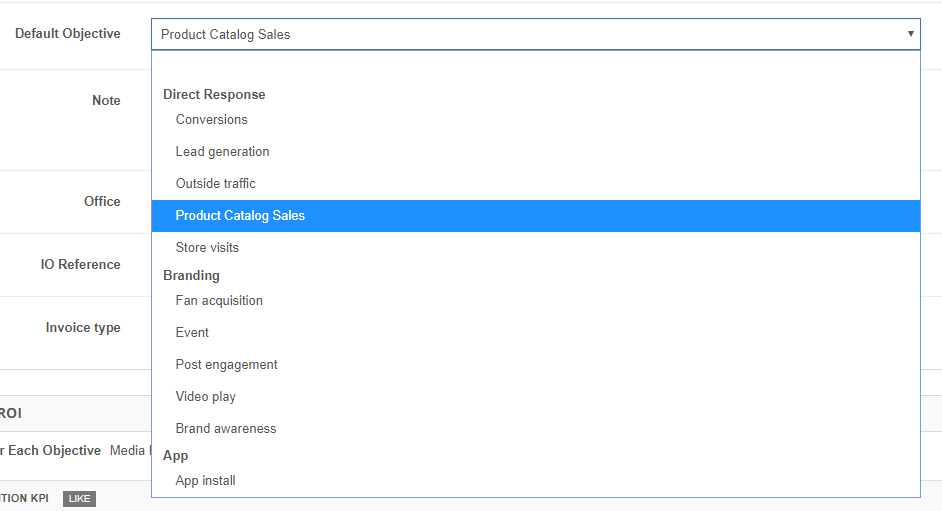
- First, create a Direct Response > Product Catalog Sales media plan in the usual way. You'll also need to make sure your media plan has at least one campaign.
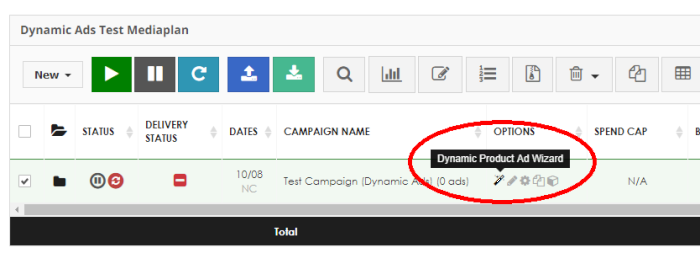
- Once your media plan is ready to go, look at your Campaigns grid and locate the row for the campaign to which you'd like to add Dynamic Ads.
- Next, look at the Options column and click the Dynamic Product Ad Wizard button ('magic wand' icon).
- After the wizard has launched, you'll have the opportunity to select the various products from your catalog that you'd like to promote to Facebook users. You'll also be able to select a Mode for these products from the following options: Retargeting, Prospecting, Cross Sell, and Up Sell. Here's a brief summary of what each of these options means:
- Retargeting: Promotes relevant products to users who have already browsed the product catalog on your website or mobile app.
- Prospecting: This mode is essentially broad audience targeting, meaning that Facebook will identify users similar to your customers who are most likely to purchase your products.
- Cross Sell: When someone purchases an item from one product set of items, this option allows you to cross-sell related items from another set. For example, you could choose to suggest luxury purses to people who have recently purchased luxury shoes.
-
Up Sell: This option allows you to up-sell a different product within the same category to potentially increase the sale value. For example, if a user views a name-brand handbag, you could instead show related handbags from your own-label brand which has a higher profit margin.
To begin setting up your product sets, ensure the relevant campaign is selected, then click into the Mode drop-down menu. When you choose a specific mode for your product sets, the available drop-down boxes will change depending on your selection. Below we'll explain the selections you'll need to make for each mode:- Retargeting is the most basic form of dynamic retargeting, and requires only that you select a Promoted Product Set from the drop-down menu. Once that's done, click the 'plus' + icon to add this product set to the grid.
- Prospecting is essentially a form of broad audience targeting, and requires only that you select a Promoted Product Set from the drop-down menu. When this field is filled out, click the 'plus' + icon to add this product set to the grid.
-
Cross Sell and Up Sell require both a Promoted Product Set and an Engaged Product Set, and these fields will appear when you select one of these modes. The difference between these fields is that a Promoted Product Set contains 'new' products which you'd like to advertise on Facebook, whereas an Engaged Product Set is comprised of products which a user has already engaged with on your website.
As an example of these two modes, if a user purchases a pair of jeans, you could use Cross Sell to show them shirts (which they may naturally be interested in now having just bought jeans). Alternatively, if a user looks at own-brand jeans on your website, you could use Up Sell to show them a product set containing a higher-ticket branded pair of jeans to tempt them to buy that product instead.
Once you've made your selections, click the 'plus' + icon to add this product set to the grid. Once you're happy with your product set grid, click Next in the bottom-right corner of the wizard to continue.
- The next step of the wizard is the Audiences screen. Here, you'll create a new product audience to whom you'd like to target your products. You can target users based on their behavior; for example, you could target a user who recently added something to their cart but didn't completed the purchase. In this section, you can choose multiple audiences to promote your products to. When selecting an audience to target, you can hover over the name of the target and see a preview of the audience. If you don't see an audience that you want to target, you can also create a new audience by clicking on the Create Audience button.
When you're done configuring your audiences, click Save.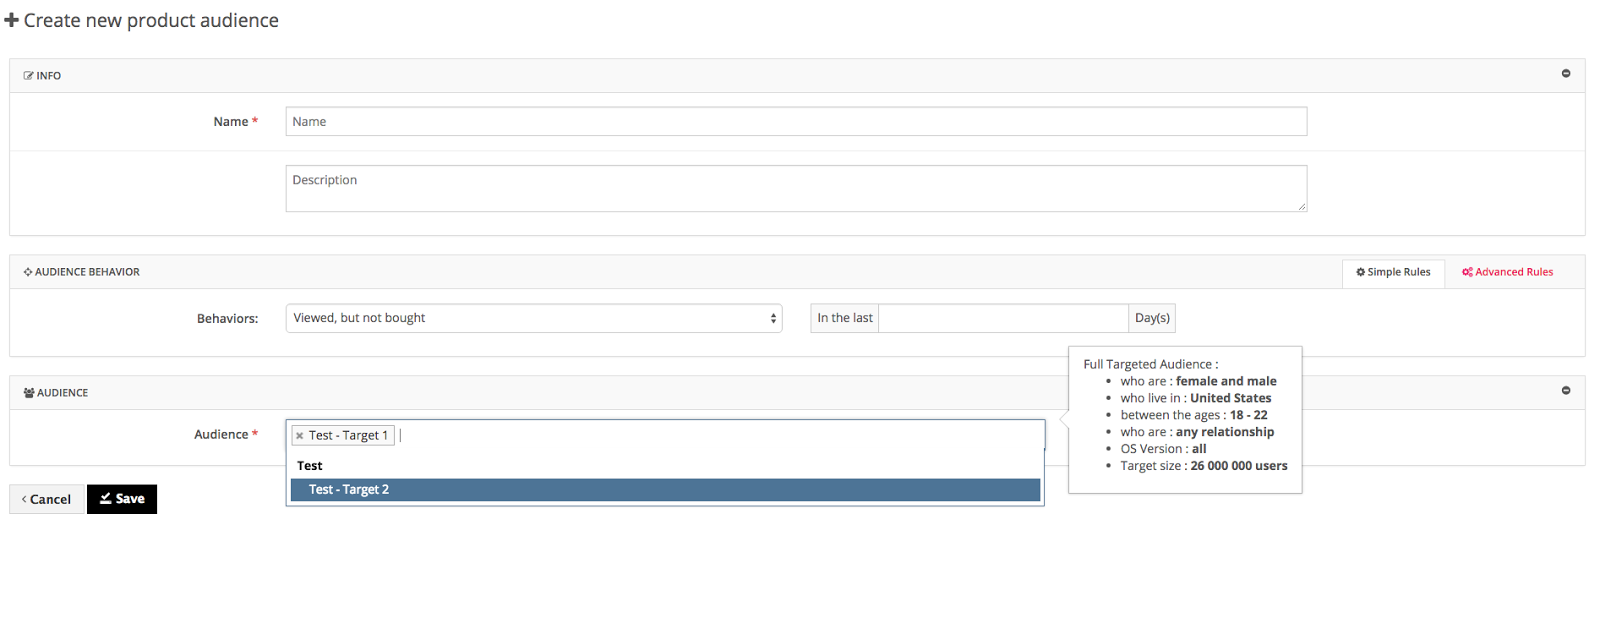
Back on the main screen of the wizard, you'll be able to see a list of product audiences that you've created. On the right of the grid, the Audience column will show the number of targets within the product audience. Want more detail? Just click the 'magnifying glass' icon and you'll see the estimated reach for each target.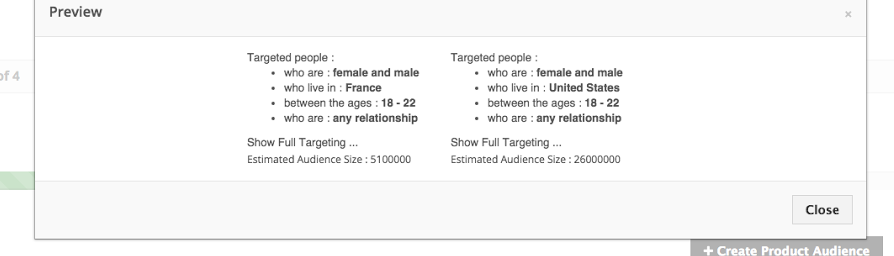 Note: The number of targets for a product audience acts as a multiplier for platform objects (i.e. ad sets) when generating your dynamic ad campaigns and ad sets.
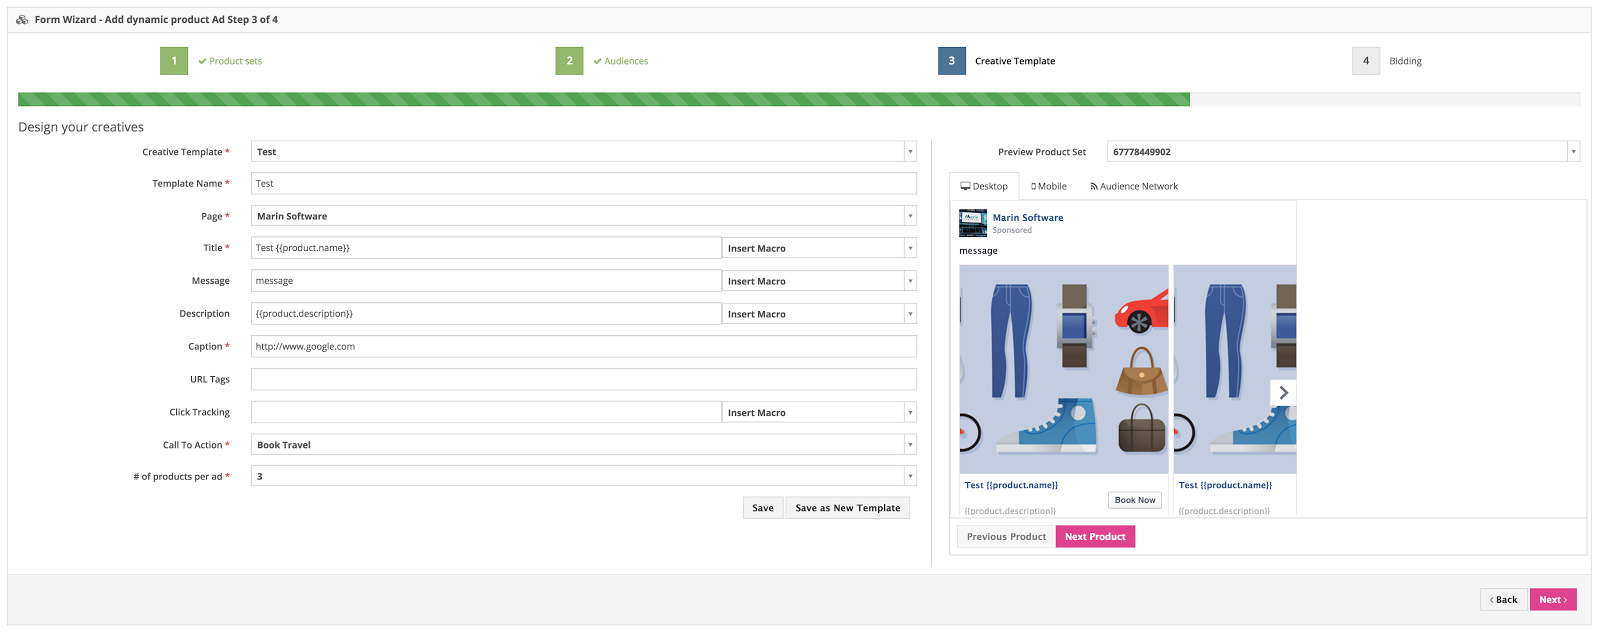
When you're ready to move on to the next step of the wizard, simply click Next in the lower-right corner of the wizard. - The next step of the Dynamic Ads setup process is configuring your creative template. From the Creative Template section, you can specify certain macros which map to the columns of your product feed, such as price, brand, description, and product name. Facebook will dynamically populate these macros with the corresponding values of the product shown in the Dynamic Ad. We also provide a preview on the right-hand side, so you can get a good understanding of how the creative will look with these macros populated.
 Once you're all finished with your creative template, it's time to move on to the final step by clicking Next in the lower-right corner.
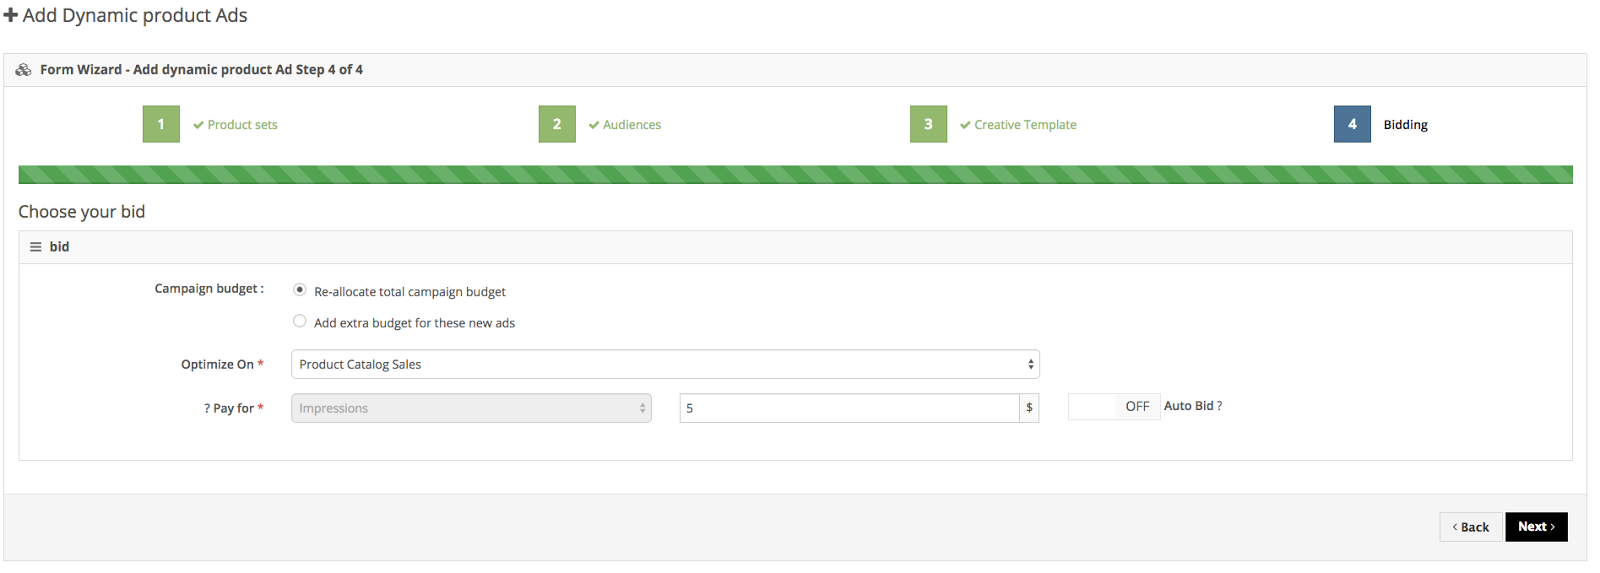
Note: View tags are not supported with Dynamic Product Ads. - Finally, you'll need to set your bidding strategy. For Dynamic Ads, we recommend that you optimize on Product Catalog Sales to gain the best possible results for conversions and revenue. Simply make your changes on the Bidding screen here and, when you're done, click Next in the lower-right corner of the wizard. And that's it! Your Dynamic Ads have now been set up and are ready to use in your social campaigns.
Mass Editor
Want to save time by working in bulk? If so, you'll be pleased to hear that you can also make changes to your Dynamic Ad campaign with Marin Social's Mass Editor. This is especially useful for certain attributes such as the creative template or the product audience behaviors.
Note: You are also able to edit the message or title of an ad after it has launched. You can use the Mass Editor to do this without the need to edit the creative template.
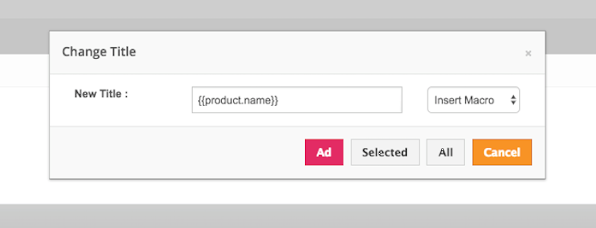
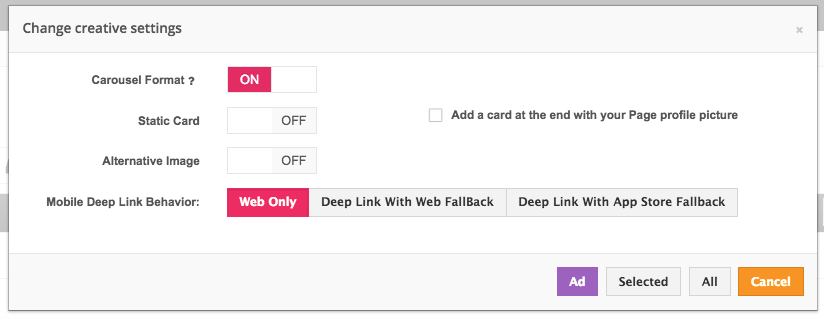
In order to change the product audience behaviors click on Mass Editor > Target > Behaviors & Interests > Product Audience Behaviors. In order to change the creative template, simply click on Mass Editor > Creative > Creative Template.
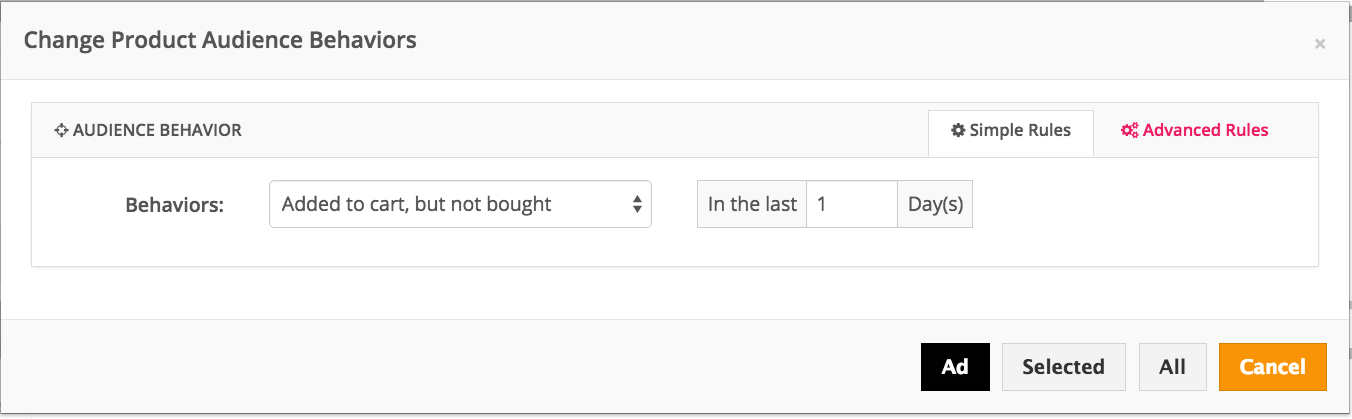
You can also click on the Settings column when creating your Dynamic Ads in the Mass Editor to make changes to settings such as Carousel Format, Static Card, Mobile Deep Link Behavior, and so on. Once you've made your changes in the pop-up, simply click the relevant button to apply them to either the Selected ad or All ads in the Mass Editor.
Duplicating Dynamic Ads
You can also duplicate any of your active Dynamic Ad campaigns, or make changes to them in double-quick time. To duplicate a Dynamic Ads campaign, all you need to do is click on the Duplicate icon in the Options column of the campaign grid. You'll then be presented with a pop-up within which you can configure various options for your duplicate campaign.
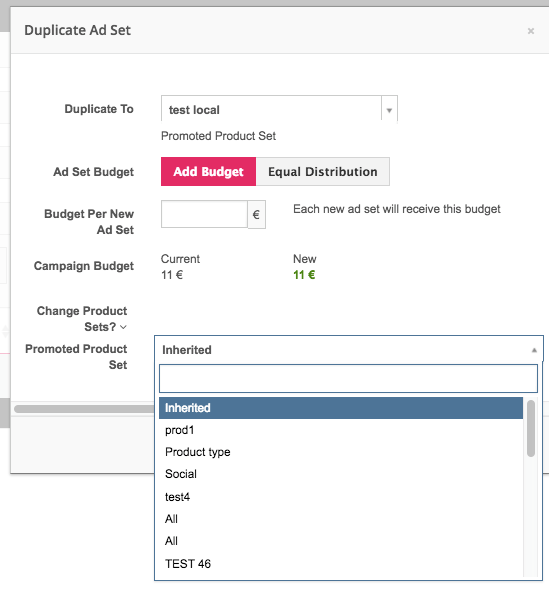
From the Duplicate Ad Set form, you'll be able to edit the Promoted Product Set and/or Engaged Product Set, depending on which Mode is selected for the ad set. When duplicating, please bear in mind the following conditions:
- If the Ad Set is a Retargeting or Prospecting mode ad set, then in the duplication form the user will be able to change the Promoted Product Set.
- If the Ad Set is a Cross Sell or Up Sell mode ad set, then the user will be able to change both the Promoted and Engaged Product Sets.
By default the product set will be inherited from the parent ad set. If a change is made here, it will apply to all of the ad sets which you have selected. For example, if you select four ad sets, each of which has a different product set, when you open up the Change Product Set? drop-down menu, you will see Inherited. If you select a different product set, it will apply to all four ad sets.
There are a couple of limitations to this which you should be aware of:
- The option to change product sets will not appear if the ad sets selected belong to campaigns with different objectives.
- The option will also be hidden if the ad sets selected use different catalogs. The ad sets must use the same catalog.
Reporting
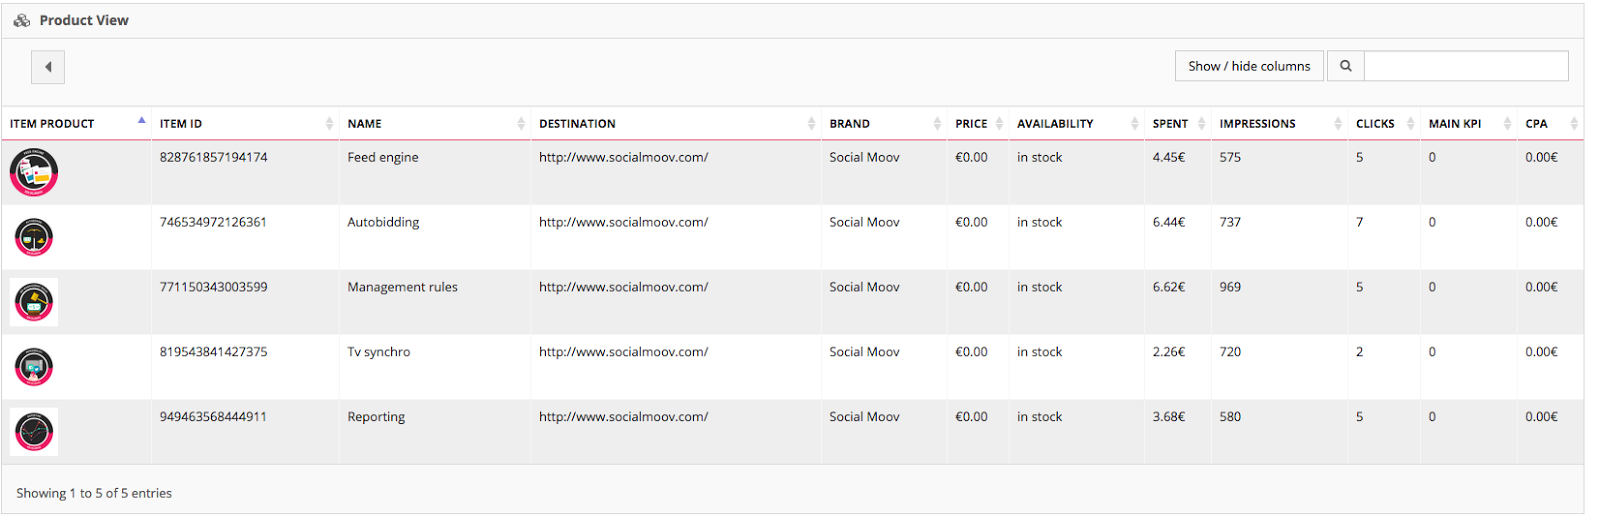
You'll already know how important it is to understand the performance and return-on-investment (ROI) of a product in the market. Having this knowledge can give you valuable insights into where to direct your advertising budget. You can access the product statistics view in the Campaign, Group, and Creative tabs and also via Reporting > Product Stats, which provides a global mediaplan-level product stats view.

In the Marin Social, we provide these granular performance statistics per-product in a grid that helps you to quickly identify high-performing products, then adjust your campaigns accordingly. Pretty neat, right?
Want to know more? Please contact your platform representative today for more information.
Travel & Auto Ads
Under Facebook's Dynamic Ads, there are several specific types of ads, including Facebook Travel Ads (formerly known as Dynamic Ads for Travel) and Dynamic Ads for Auto.
If you'd like to learn more about either ad type, check out our dedicated articles below.
