Introduction
With Scheduled Actions for Marin Social, you can set your Facebook ads to play or pause at a specific date or time in the future.
For example, let's imagine you're running a promotion which requires a set of ads to go live at 1am Monday morning, then be paused again at 10pm the following Sunday. With Scheduled Actions, you can set your ads to "play" on Monday and "pause" on Sunday – no need for any manual intervention... or late-night reminders.
Handy Tip
Scheduled Actions can be applied to multiple ads at once, and you can schedule a maximum of two actions per ad.
How To Add Scheduled Actions
To get started with Scheduled Actions in Marin Social now, just follow these steps:
- First, log in to Marin Social as usual, then navigate to the relevant Media Plan.
- Next, click into the ADS tab.
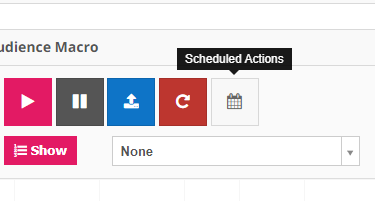
- Using the checkboxes on the left of the grid, select the ads for which you'd like to create Scheduled Actions, then click the Scheduled Actions button above the grid.
- In the drop-down box that appears, choose to Add Scheduled Action, then select the option to either Play or Pause a Scheduled Action. Use the date selector and drop-down box to pick the date and time your Scheduled Action should be triggered.
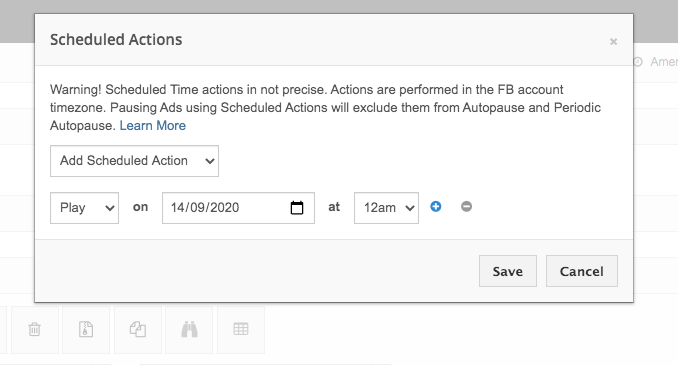
- To add more Scheduled Actions, use the + and – buttons.
- When you've finished creating your Scheduled Actions, click Save.
Important Notes
- Scheduled Actions will be performed as per the time zone of your Facebook account.
- Scheduled Actions will be triggered within hour-long blocks. For example, a Scheduled Action for 12pm will actually be performed between 12pm and 1pm.
- To avoid unexpected issues when syncing new ads to Facebook, we recommend syncing new ads to the publisher in the Paused status before setting up Scheduled Actions.
How To Remove Scheduled Actions
- Once created, you can remove any Scheduled Action by following these steps:
- First, log in to Marin Social as usual, then navigate to the relevant Media Plan.
- Next, click into the ADS tab.
- Using the checkboxes on the left of the grid, select the ads for which you'd like to remove Scheduled Actions, then click the Scheduled Actions button above the grid.
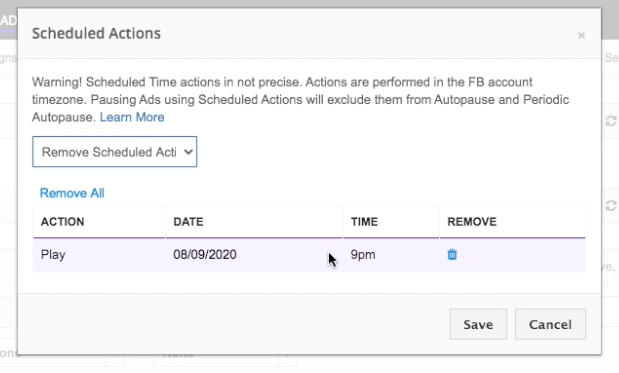
- You should now see a list of your existing Scheduled Actions. Simply click the Remove button ('trash can' icon) to delete any individual action. You can also remove all actions in the list by clicking the Remove All button.
- Once removed, click Save and you're all set.
