Introduction
Message Booster streamlines Community Management (CM) processes by allowing for quick and easy boosting of organic content. It provides the following key features:
- Fast and simple interface
- Community engagement data & insights
- Management of several pages / accounts on a single interface
- Budget capping and other security safeguards
- Audience management with pre-programming
- Automated content promotion (“auto-boost”) rules
Message Booster has been specifically tailored to answer the following needs:
- Externalizing CM tasks (advertisers and/or agencies)
- Managing several access levels (CM, User, Admin)
- Adding a layer of security to media budgets managed externally
- Media buying for non-experts and small budgets in general (SMB)
- Automating content promotion based on engagement stats
- Improving average engagement performance
Note: When working with Facebook, Message Booster only boosts Facebook posts and can then push them to either the Facebook platform and/or the Instagram platform.
1. Activation & Setup
The first step in working with Message Booster is the activation and setup process.
+ Read More
Advertiser / Media Plan Creation
Message Booster can be activated for any Facebook or Twitter account linked with the Marin Social platform (see: linking an account with the platform).
Once your account is linked with the platform, you will first need to create an Advertiser (see: creating an Advertiser). We advise to give it a customer- or brand-specific name.
You will then need to create a dedicated Media Plan (see: creating a Media Plan) that will harbor all your Message Booster campaigns.
Note: it is important that you choose the right objective for your Media Plan. Post Engagement will be the right objective for most CM campaigns with a branding objective.
Capping, Restrictions & Default Bid
Note: The amount displayed in the Message Booster is the capping set in the Message Booster parameters. The capping will take into account the spend and the margin. For example, if the spend is 4000, the capping will take into account 4000 * 33% (the margin) = 5320.
Click on the Message Booster tab to unfold it and activate capping, choosing between the 3 options: per message, per month, and global.
Note: When a margin is set in the Advanced configuration of the Parameters section of a Media Plan, the formula for lifetime budget for Message Booster campaigns is :
Budget / ((margin / 100) + 1)
The Marin Social platform is designed this way to let agencies apply their margin when their clients use the Message Booster directly. Please make sure to take this formula into account when setting your budget. Note: Capping doesn’t apply to Admin or User roles, so if one of these users boost a post manually, they can result in capping being exceeded. Note: Budget capping is only applied to users defined as Community Manager in the UI (see User access creation). The chosen capping is applied on each page or handle separately.

While logged in as an Admin (see: Roles), access the Config > Users menu at the top.
As you select Community Manager in the list of roles (drop-down menu), you will see the restrictions at the bottom.
Note: Only people using Message Booster with a Community Manager role will be affected by these restrictions. Admins will still be able to access all disabled features.
Activation
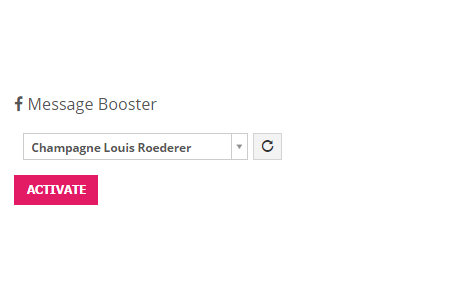
Once an Advertiser / Media Plan have been created, budget capping is in place, roles are defined and restrictions enabled, Message Booster can be activated at the Media Plan level.
On the right-hand panel: click on Message Booster, then Activate.

- You will be able to activate budget capping while creating your Media Plan (see next section: Capping & Restrictions).
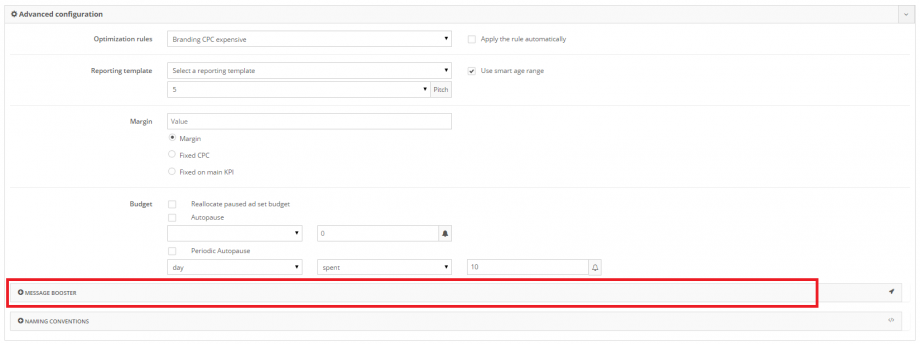
- Budget capping can be set at the bottom of the Media Plan creation form, in the Advanced Configuration > Message Booster section:
- Capping per message will ensure anyone with Community Manager access won’t be able to allocate more than the selected value per sponsored post.
- Note: In addition to the message capping described above, you will be able to set specific budget caps in the Message Booster Manage Rules Section.
-
Capping per month will parse all potential spending (posts with allocated budget that haven’t reached their end date yet) and actual spending (budget spent so far) over the current calendar month to determine whether a new post promotion is permitted.
- Example: If the monthly capping is €1000, if there is €500 actual spent so far + €400 allocated to posts currently running, it won’t be possible to allocate more than €100 to a new sponsored post.
- Global capping is applied at the Media Plan level and is the maximum amount a community user can boost for each handle or page. Marin Social analyzes the cap, the spend that has already occurred, and the budget for the boost you're trying to apply. If the spend plus the potential spend is less than the cap, the boost will succeed. If not, the boost will not succeed.
-
Frequency caps set a limit on the number of times an ad is a displayed to a unique Facebook user in a given time period. Frequency caps are only supported for campaigns using the Reach objective and can be set up at the Media Plan level for automated boosts, or in the manual boost pop-up.
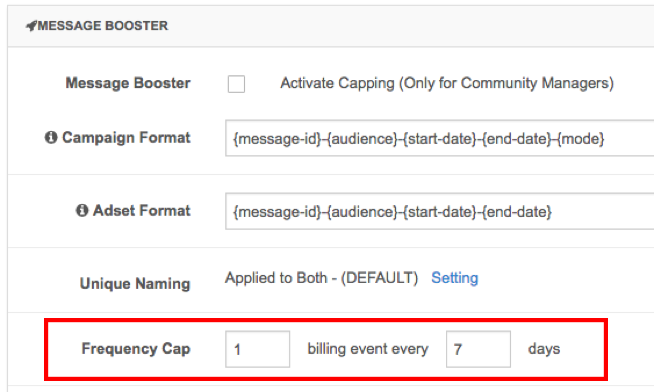

The Frequency Cap set at the Media Plan level in the Message Booster settings.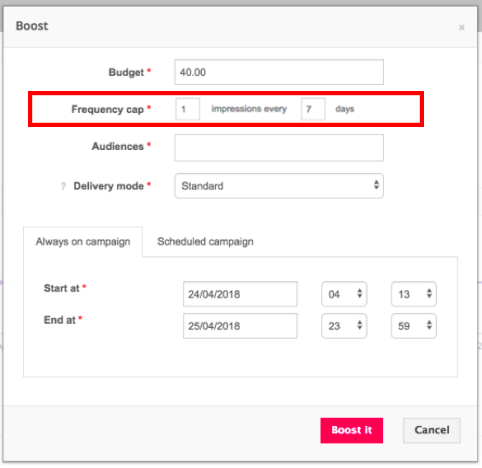
The Frequency Cap set in the manual boost pop-up window. - Restrictions are activated through the User Access creation form. From the agency list, click Create a user. Then, select a role for the community manager and you can restrict the access of that user.
- Default Value of the Bid will allow you to set your bid value for your Message Booster campaigns.
- Note: If a Default Value of the Bid is not defined in the Media Plan parameters, the default value will be 10 in your account currency.
- Note: By default, you will optimize based on the default optimization goal, and you will pay for Impressions. As you use Message Booster on Post Engagement Objectives, you will optimize on Post Engagement. By default, Message Booster uses Facebook Autobidding. These default values apply only for Facebook. If you’d like to change the bid used by the Message Booster, you can change it in the Media Plan Form by heading to Advanced Configuration > Message Booster.
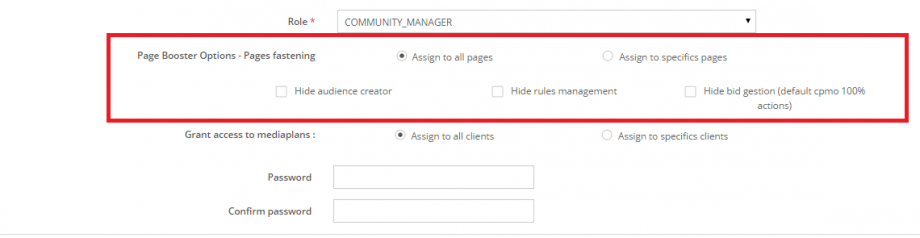
- Hide Audience Creator: Activate if Audiences are to be pre-created by Admins only (agency role, externalized Community Manager).
- Hide Rules Management: Activate if using automated rules isn’t planned / is deemed the responsibility of Admins only (recommended) / to get rid of a layer of complexity by disabling that option in the interface.
- Hide Bid Gestion: Activate if bid management should be done by Admins only or if precise bidding optimization on specific metrics is unnecessary.
2. Interface And Features
Now, let's walk you through some of the basics of the interface and the available features.
+ Read More
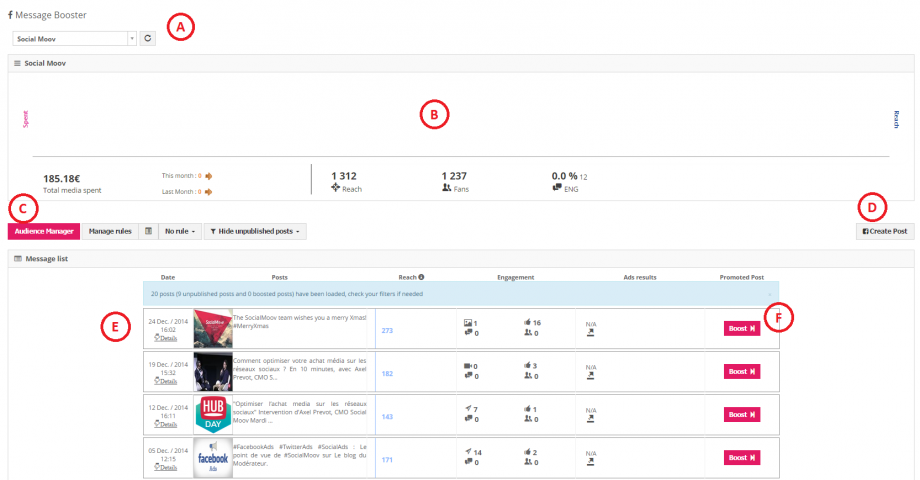
- A. Page Selector
- B. Page Metrics
- C. Audience / Rules / Display options
- D. Create Post / Tweet
- E. Post / Tweet List
- F. Boost Button
A. Page Selector
The page selector drop-down menu will let you choose between any pages linked with the advertiser account used during for the Media Plan creation.
It lets you work on several Facebook Pages or Twitter accounts from the same interface.
B. Page Metrics
This section gives you key insights on the selected page / account:
- Line graph with timeline of reach and spent
- Total media spent on the advertising account
- Number of fans / followers
- Average engagement rate on posts / tweets
C. Audiences / Rules / Display Options
This section lets you create and manage rules, audiences, as well as display options.
- The Audience Manager is the only clickable button once a Message Booster access has been activated (since boosting content requires at least one existing targeting audience). It will let you create targeting audiences that can then be used to promote content. See: Audience Manager section
- The Manage Rules menu will let you create auto-boost rules that can then be applied to an entire page or account. As many rules as needed can be applied at the same time (provided they don’t conflict with one another). It is important to note that the rule conditions are case-sensitive while the URL and captions are considered lowercase even if they are typed or show in the preview mode as uppercase.
Note: If more than one condition for a rule has been selected, the Marin Social platform will scan the conditions starting with the first one. If the first condition is met, the post will be boosted and the Marin Social platform won't take into account any further conditions of the rule. In case the first condition of the rule isn't met, then the Marin Social platform will move on to scan the next condition etc.
- The Display Options essentially lets you hide or display posts / tweets in the main feed, based on specific criteria:
- Hide unpublished posts to only display published content (ticked by default, meaning you need to un-tick this option to display Dark Posts or Tweets).
- Show only boosted posts trims down the post / tweet feed to promoted content only (useful to have a quick look at campaigns currently running).
- Show only posts +50 likes (Facebook-only) lets you view posts with over 50 likes only, ensuring you only see content with significant organic engagement.
D. Create Post / Tweet
Lets you create content straight from the Message Booster interface.
On Facebook, the following post types can be created (published or unpublished):
- Link Page Posts (traffic / direct response)
- Image Posts (branding)
- Video Posts (branding)
- Offers Posts (engagement)
- Multi-Product Posts (traffic / direct response)
On Twitter, you can create Promoted Tweets (with image or not), in regular published mode or unpublished (Dark Tweet).
E. Post / Tweet List
Feed containing all the posts / tweets that can be found on a given page, with the most recent item listed first.
It will only display the most recent items by default, but you can load more posts / tweets (batches of 20) by clicking on the Load next 20 messages button at the bottom of the feed.
Each item on the list will display key info and metrics by default:
- Date & hour
- Content preview (ad copy + image)
- Impressions
- Facebook: Number of clicks, comments, likes, shares
- Twitter: Number of favorites, retweets, followers, clicks
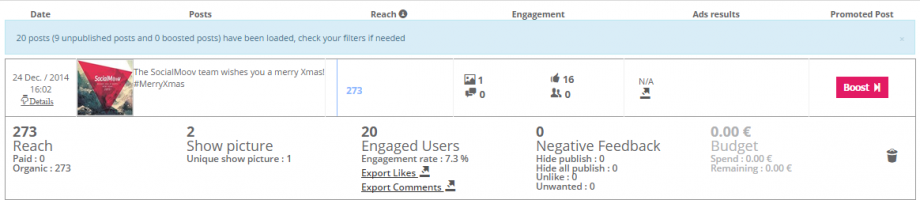
Clicking on Details will unfold a tab with additional information (Facebook only) such as:
- Reach (organic and paid)
- Engaged users + engagement rate
- Negative feedback
- Budget spent + remaining budget (if a campaign is active)
- Ability to delete a post (trash bin icon)
Note that for both Facebook and Twitter, there is an Export icon (arrow icon) that will allow you to export all post / tweet data into an Excel .CSV file.
F. Boost Button
The Boost Button lets you promote your content at will. Simply select which post or tweet should be sponsored and hit Boost. On the main interface, you will be able to define key criteria such as a budget, selecting one or several audience(s) and pick a bid optimization metric.
Both Facebook and Twitter will also let you choose a diffusion mode: Standard or Accelerated.
On top of these standard criteria, the system lets you pick a campaign type among 2 options, fitting various objectives:
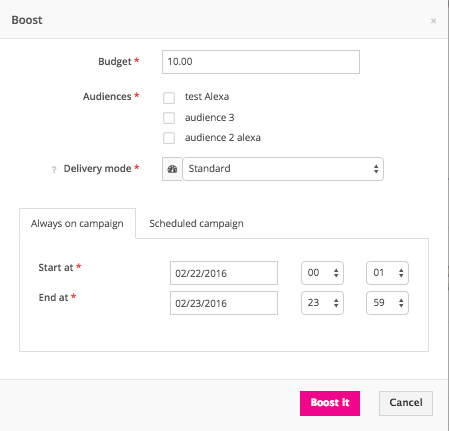
1. Always-on campaign
This is the most standard campaign type. You campaign will run between the defined start date and hour (immediate or in the future) and the end date.
The Facebook / Twitter algorithms will try to spend the budget you defined within the chosen timeframe, provided it’s long enough (at least 45 minutes) and your Audience has enough Reach (we advise it to be over 100K at least).
2. Scheduled campaign
Define triggers by hour/day on a timeline. Your content will be played/paused as many times as needed to match the selected diffusion periods.

- X-axis = 24 hours of a given day (one block = one hour). Note: you can drag your mouse over several blocks to select a longer period at once.
- Y-axis = Days (only dates for the current month + next month are proposed)
