The URL Builder allows you to create, apply, and manage Tracking Templates, Custom Parameters, Redirects and more across publishers and tracking solutions in Marin.
In this article, we'll show you how the URL Builder works in Marin and how you can use it to streamline your tracking across publishers.
Supported Publishers
Currently, the Marin URL Builder supports the follow publishers:
- Microsoft
- Yahoo! Japan
Navigating To The URL Builder
You can navigate to the URL Builder in Marin by following the instructions below.
- Click on Settings in the top right corner of the platform.
- Then, click on the Revenue & Tracking.
- From here, click on either the URL Templates tab or the Custom Parameters tab. We'll be walking through both of these in this article.

How To Set Up The URL Builder
Though your precise settings may vary from one Marin Client Account to the next, in general, you will set up the URL Builder as follows:
- Select the publisher for which you want to define tracking settings.
- Define revenue integration parameters and any redirect settings
- Select specific objects to which you want the URL Builder to add tracking information (e.g. build account-level tracking templates, as well as campaign, keyword, creative-level custom parameters, campaign- and account-level Final URL Suffix, and more).
Once these steps are complete, new objects and objects that you edit will automatically have these URL Builder settings applied.
Tracking Templates
Think of your URL Tracking Templates as the building blocks of a tracking template. Typical integrations see one Tracking Template for one set of query string parameters. If redirects are used, the redirect can also be part of Tracking Templates.
For more information from Google on Tracking Templates, check out this Google Help Article.
Selecting The Object Level For Your Tracking Template
The default tracking template level is Account, but you can add or edit tracking templates at any object level.
You can see all object levels where tracking templates have been set up from the same grid in the URL Templates tab.

If you have defined templates at different levels, the template from the lower hierarchy level will apply. For example, If a template is set both at the Account and Creative level, if a user clicks on the creative, the keyword which triggered the creative will inherit the creative-level template.
List Of Supported Object Levels
- Account Template: Defines a PCA tracking template. Applies to all PCAs.
- Campaign Template: Defines a campaign tracking template. Applies to all campaigns.
- Group Template: Defines a group tracking template. Applies to all ad groups.
- Keyword Template: Defines a keyword tracking template. Applies to all keywords.
- Creative Template: Defines a creative tracking template. Applies to all creatives.
- Product Target Template: Defines a product target tracking template. Applies to all product targets.
- Placement Template: Defines a placement tracking template. Applies to all placements.
- Sitelink Template: Defines a sitelink tracking template. Applies to all sitelinks.
Creating A New Tracking Template
You can create a new Tracking Template by following the instructions below.
- From the URL Templates tab, click on the Create button ('+' plus sign icon) above the grid.
- To create a new Tracking Template, select the level at which you'd like to place your new template. You can set your template at any of the object levels listed in the List of Supported Object Levels section above.
- From your desired Tracking Template, you can add redirects and Landing Page Parameters as needed. Toggle the Redirect Level buttons to None, Single, or Double.
- You can click directly into the text box to apply any parameters needed.
- The Final Template field will help you to see the structure your Tracking Template will use.
- Once you've finished making edits to your Tracking Template, have applied your changes, and are happy with the Final URL at the bottom of the page, click Create.
Editing A Tracking Template
You can edit an existing Tracking Template by following the instructions below.
- From the URL Templates tab, select the check-box next to the template you would like to edit, then select the Edit button above the grid.
- Next, go ahead and make any necessary updates to your redirects, parameters, and encoding.
- Should you change your mind in the middle of applying edits to your Tracking Template, prior to clicking Save, you can click Cancel in the bottom right-hand corner of the edit pane to revert your Tracking Template to the previously-saved version.
- Once you've finished making edits to your Tracking Template and are happy with the Final Template, click Save.

Deleting A Tracking Template
You can delete an existing Tracking Template by following the instructions listed below.
- From the URL Templates tab, select the check-box next to the template you would like to delete, then select the Delete button above the grid.
- From the confirmation pop-up, select Confirm.
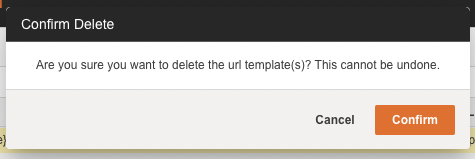
Note: Use caution when deleting Tracking Templates, as there is not currently a way to restore previously-deleted templates.
Applying The Tracking Template
When creating new objects (Campaigns, Groups etc.), if a Tracking Template exists at the level of that object, it will be applied right away during the creation process. The URL Builder value will override Tracking Template settings established during the creation process, even if left blank. If no Tracking Template exists at the level of the new object, a template will not be applied.
The same is not true for existing objects -- saving the URL Builder will not apply the Tracking Template to existing objects. To apply the saved URL Builder settings, you will need to perform a single edit or multi-edit in the platform. You can learn how it's done in the steps below.
- Click on the tab associated with the level of the Tracking Template you wish to apply. For example, if you'd like to apply an account-level Tracking Template, click on the Publishers tab. If you'd like to apply a campaign-level Tracking Template, click on the Campaigns tab, etc.
- Next, select the check boxes next to one or more objects where you wish to apply your Tracking Template.
- Click on the Edit button and kick off any single or multi-edit you wish. This could be a small adjustment to the Search Bid or Daily Budget -- any single or multi-edit on the selected objects will do the trick.
Note: It is not currently possible to edit your Tracking Template directly from a single or multi-edit, however, kicking off any single or multi-edit on the objects where you wish to apply your Tracking Template will trigger the URL Builder to run and the Tracking Template to be applied.
- Then, hit Apply.
- Once you've applied your changes, check the Activity Log, find and select the corresponding activity, and post the Tracking Template to Google. If you do not manually post this activity to the publisher, not to worry -- it will post automatically during the nightly sync.
Redirect Levels
The Redirect Panel allows you customize your URL setup in your Tracking Templates by specifying whether or not you have URL redirects enabled as well as the precise redirect you plan to use. If you are using redirects, you can also specify the encoding level of your redirect URLs and landing page.
The available redirect settings are:
- None: Select this option if no redirects are needed.
- Single: For URLs with a single redirect.
- Double: For URLs with a double redirect.
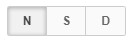
If you select Single or Double, a corresponding redirect field will show up in your Tracking Template along with the encoding options. You will see encoding buttons for N (None), S (Single), and D (Double) next to your redirect settings.
Enabling Redirects
To enable redirects, follow the instructions below.
- From the URL Templates tab, follow the instructions above in the Creating a New Tracking Template section of this article.
- Select whether you are using Single or Double redirects and click the corresponding button.

- Enter the Redirect URL you are using For example, if you're using Marin Tracker, your redirect might be: tracker.marinsm.com/rd? but the precise redirect you use will vary depending on the type of tracking you're using.
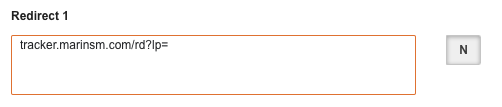
- Input the necessary Connector Parameter (i.e. lp= ) directly into your redirect text box or boxes.
- Next to the Tracking Template field, select the necessary encoding using the N (None), S (Single), and D (Double) boxes.
- Fill in the remaining Tracking Template settings as needed and then click Create to save your template.
The Final Template (Preview Field)
As you build out your landing page, redirects, and custom parameters, you will see your Final Template start to build out at the bottom of your Tracking Template.
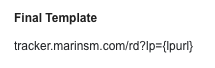
This template is a combination of three things:
- Redirect URL (if used)
- Landing Page
- Landing Page parameters
Custom Parameters
Google Custom Parameters allow a user to specify URL snippets (in the form of key/value pairs) that can be substituted by Google when the ad is served on Google properties. Custom parameters will not be substituted into a Tracking Template unless they are explicitly referenced.
For example, if your Tracking Template is defined as:
http://www.example.com?mkwid={_mkwid}
and your keyword custom parameter is defined as: {_mkwid}=abc123, when Google Ads serves an ad on that keyword, the URL will contain the resolved custom parameter:
http://www.example.com?mkwid=abc123
where the specific object (Keyword, Placement, Product Group, etc.) is defined by the string abc123.
Custom Parameters can be set by Bulk Upload for any Google objects, however, by defining them in the URL Builder, you can let Marin add them automatically. Because Custom Parameters are used to contain URL snippets that differ across objects, most custom parameters defined in the URL Builder will have values that are Marin Macros. Read more about these macros here: platform URL Parameters
To set up the URL Builder so that all keywords are given a custom parameter containing Marin’s unique tracking parameter, you would define: {_mkwid}=[uniq_id] in the URL Builder and the appropriate value will then be substituted into each keyword when the URL Builder settings are applied. In the case above, the example keyword’s [uniq_id] resolved to “abc123”.
Navigating To Custom Parameters
You can navigate to your existing Custom Parameters by following the instructions below.
- Click on the Settings at the top right corner of the platform.
- Then, click on the Revenue & Tracking.
- From here, click on the Custom Parameters tab in the top navigation.
- This will show you the Custom Parameters that have been set up at all Tracking Template levels.
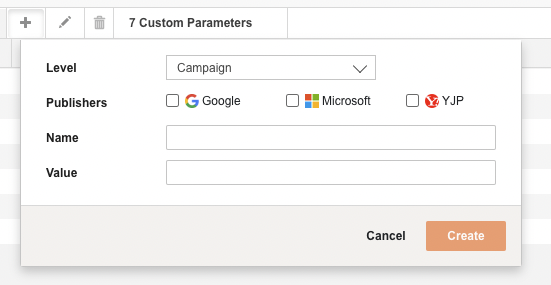
Creating A New Custom Parameter
You can create a new Custom Parameter by following the instructions below.
- From the Custom Parameters tab, click on the Create button ('+' plus sign icon) above the grid.
- Define your Custom Parameter's level, select the relevant publishers, and give it a Name. Then, you can set up your Custom Parameter based on your specific needs.
- Using the example we saw earlier in this article:
http://www.example.com?mkwid={_mkwid}
In this example, give your Custom Parameter the name mkwid=[uniq_id]. Then, the appropriate value will then be substituted into each keyword's URL when the URL Builder settings are applied at the specific object level.
Note: Due to a Google limitation, you can create a maximum of three custom parameters per object level. This means three at the campaign level, three at the group level, and so forth down the account hierarchy.
- When all of the appropriate information has been filled in for your new Custom Parameter, click Create.
Editing A Custom Parameter
You can edit an existing Custom Parameter by following the instructions below.
- From the Custom Parameters tab, select the check-box next to the custom parameter you would like to edit, then select the Edit button above the grid.
- From here, you can make any changes that you need to make to your Custom Parameter.
- When your changes are complete, click Save.
Deleting A Custom Parameter
You can delete an existing Custom Parameter by following the instructions below.
- From the URL Templates tab, select the check-box next to the template you would like to delete, then select the Delete button above the grid.
- From the confirmation pop-up, select Confirm.
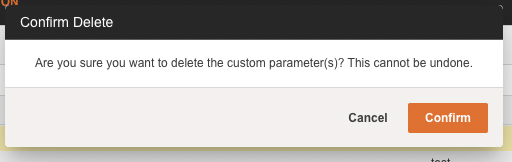
Note: Use caution when deleting Custom Parameters, as there is not currently a way to restore previously-deleted Custom Parameters.
Applying Custom Parameters
When creating new objects (Campaigns, Groups, etc.), if Custom Parameters exist at the level of that object, they will be applied right away during the creation process. The URL Builder value will override Custom Parameter settings established during the creation process, even if left blank. If no Custom Parameters exist at the level of the new object, no Custom Parameter settings will be applied.
The same is not true for existing objects -- saving the URL Builder will not apply Custom Parameters to existing objects. To apply the saved URL Builder settings, you will need to perform a single edit or multi-edit in the platform. You can learn how it's done in the steps below.
- Click on the tab associated with the level of Custom Parameter you wish to apply. For example, if you'd like to apply a campaign-level Custom Parameter, click on the Campaigns tab. If you'd like to apply a group-level Custom Parameter, click on the Groups tab, etc.
Note: Custom Parameters do not exist at the account level.
- Next, select the check boxes next to one or more objects where you wish to apply your Custom Parameters.
- Click on the Edit button and kick off any single or multi-edit you wish. This could be a small adjustment to the Search Bid or Daily Budget -- any edit on the selected objects will do the trick.
Note: It it not currently possible to edit your Custom Parameters directly from a single or multi-edit, however, kicking off any single or multi-edit on the objects where you wish to apply your Custom Parameters will trigger the URL Builder to run and the Custom Parameters to be applied.
- Then, hit Apply.
- Once you've applied your changes, check the Activity Log, find and select the corresponding activity, and post it to Google. If you do not manually post this activity to the publisher, not to worry -- it will post automatically during the nightly sync.
Autocorrect
The URL Builder can apply URL settings to objects every time they are synced into Marin. To learn more about URL Autocorrect, check out our dedicated article.
How To Enable Autocorrect
From the URL Templates tab, in the top-right corner of the page you can set your Autocorrect preferences to On, Off, or Warn. Your Autocorrect settings will apply to your entire Marin Client Account.

