Strategy rules are applied to the bids calculated by Marin’s automated bidding algorithms in order to control or restrain bids based on your own business needs. They can be used to create a bid cap, a bid floor, a maximum bid change percentage and more, in order to make certain your Strategy meets your business' unique needs.
Before you begin: Rules can be an incredibly valuable part of your optimization, however, since they can interfere with the algorithm's ability to make bidding decisions, it's important to validate the purpose of each rule and carefully consider its expected impact prior to implementation.
If in doubt, opt for using fewer rules, instead of more rules, to give the bidding algorithm freedom to increase or decrease your bids without running into restrictions. And if you're ever uncertain what a rule does or if it's right for your business, don't hesitate to reach out to a platform representative or our Customer Support team to discuss how each rule fits as part of your overall bidding strategy.
Summary Of Rules
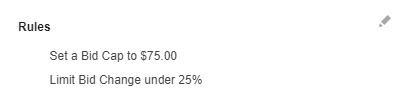
Set a Bid Cap is the maximum allowable bid. For example, a bid cap of $100 means the bidding algorithm is not allowed to increase your bid over $100.
Keep in mind that a Bid Cap ignores your Strategy-level targets by placing a cap on the allowable bid. If your Strategy is performing well and Marin Bidding would like to increase keyword bids to reach your target, a Bid Cap can interfere with this optimization.
Set a Bid Floor is the minimum allowable bid. For example, a bid floor of $5 means the bidding algorithm is not allowed to decrease your bid below $5.
Keep in mind that a Bid Floor ignores your Strategy-level targets by placing a floor on the allowable bid. If your Strategy is not performing well and Marin Bidding would like to decrease keyword bids to reach your target, a Bid Floor can interfere with this optimization.
Keep above First Page Bid causes the minimum allowable bid for Google keywords to be equal to the First Page Minimum Bid determined by the publisher.
Keep in mind that the Google First Page bid does not take efficiency into consideration and may not result in a well-optimized Strategy.
Limit Bid/Target Changes to is the maximum percentage that bids/targets can change each day. For example, if Marin Bidding has determined that your current keyword bid is $1, but the ideal bid will eventually need to reach $5, then this rule will allow the change to take place incrementally. If your maximum bid change % is set to 25%, then Marin Bidding will make small increases of 25% over the course of several days or several weeks to meet your desired keyword bid, rather than making those changes all at once.
This rule controls the reactivity of a Strategy to market changes, often preventing the over-optimization of bids. It is strongly recommended to set this to a maximum of 25%. Consider lowering it if your keywords only generate 1 or 2 conversions per week on average.
Set a Search Impression Share Cap allows you to set an impression share cap on Strategies that are NOT bidding toward an Awareness Target. This means that even Strategies that are targeting a financial goal (CPL, ROAS) can have an impression share cap. For example, if you're bidding toward a CPL goal, an impression share cap will prevent the algorithm from increasing bids on keywords that are already sitting above the impression share cap.
Note: There are three different types of Impression Share Caps. To use, you will select the one that best fits your bidding needs. You can only use one type of Impression Share Cap at a time.
Set a Top Impression Share Cap allows you to set an impression share cap on Awareness Targeting Strategies that are bidding toward Top Imp % (Top Impression Percentage). This means your Strategy is targeting the top of the page (anything above the fold on the Search Engine Results Page).
Note: There are three different types of Impression Share Caps. To use, you will select the one that best fits your bidding needs. You can only use one type of Impression Share Cap at a time.
Set an Abs. Top Impression Share Cap allows you to set an impression share cap on Awareness Targeting Strategies that are bidding toward Abs. Top Imp. % (Absolute Top Impression Percentage). This means your Strategy is targeting the very first ad position on the Search Engine Results Page.
Note: There are three different types of Impression Share Caps. To use, you will select the one that best fits your bidding needs. You can only use one type of Impression Share Cap at a time.
A note on Microsoft Impression Share limitations
In Microsoft, you can set Impression Share Targets, but not caps. If you wish to set caps, this is only available in Marin and must be managed in the platform.
Budget Cap is the Maximum Daily Budget that Marin will recommend for a campaign. Settings this to $100 means no campaign in the strategy will have a recommended Daily Budget higher than $100.
Budget Floor is the minimum Daily Budget that Marin will recommend for a campaign. Setting this to $1 means no campaign in the strategy will get a recommended Daily Budget lower than $1. This can be a good way to maintain spend on campaigns.
Max Budget Change % is the maximum percentage change Marin will recommend to the Daily Budget of a campaign on a daily basis.
Recommended CPA Floor is the minimum Target CPA Marin will recommend. If this is set to $5, Marin will not recommend a Target CPA lower than $5.
Recommended CPA Cap is the maximum Target CPA Marin will recommended. If this is set to $10, Marin will not recommended a Target CPA greater than $10. Note the Recommended CPA Cap cannot be lower than the Recommended CPA Floor and vice versa.
Recommended ROAS Floor is the lowest numerical Target ROAS Marin will recommended for a campaign, corresponding to the highest level of spend. When set to 1, Marin will not recommend a Target ROAS below 1 for the campaigns in a strategy.
Recommended ROAS Cap is the highest numerical Target ROAS Marin will recommend for a campaign, corresponding to the lowest level of spend allowed. When set to 90, Marin will not recommend a Target ROAs greater than 90 even if performance to date/forecasted performance might justify a higher value.
Excluded Dates
Excluded Dates allow you to exclude click and conversion data for specified dates or date ranges from being used to calculate your bids . This is useful if there has been a period or day of unusual performance which would skew bid calculations (e.g. Black Friday sale), or if you have a data integrity issue such as unreliable or missing revenue data. This setting recognizes both past and future dates.
Boost
Boost is a bid multiplier applied to objects within a Strategy and can be used to control spend, volume, and efficiency. Adjusting Boost has the same effect as adjusting a Strategy efficiency target (e.g. increasing Boost by 10% is mathematically equivalent to increasing Target CPL from $1.00 to $1.10).
Boosts can be either Static or Scheduled. A static boost will be applied to your Strategy long-term, while a scheduled boost can be turned on and off based on a date range of your choosing. Scheduled boosts can be used for promotions, seasonality, or any other time when your bids need to be adjusted short-term.
Bid Overrides
Bid Overrides allow you to remove specific keywords from automated bidding even if their Campaign is mapped to an active Strategy. This rule is not recommended unless there is a specific business reason to use it. Settings include:
- Bid Override: On | Off
- Override Until (Bid Override End Date for bulk sheets): A keyword bid override will automatically remove itself on the specified date.
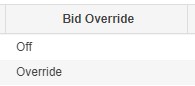
Note: In the grid, if your Bid Override is turned on, the column will display Override, rather than On.
How To Set Up Bidding Rules
- Click on the Optimize tab in the left-hand navigation.
- Next select Strategies.
- From there, double-click on the Strategy of your choice. This will launch the Strategy Side Panel, where you can adjust your targets, update settings, and apply Rules.
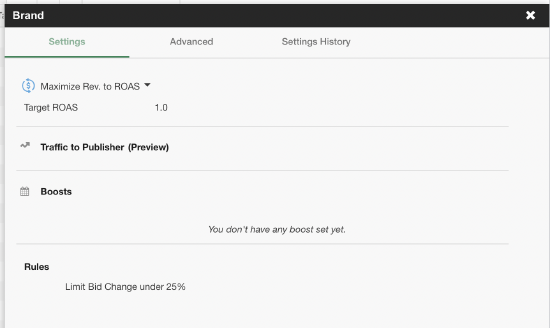
- Within the Side Panel (under the Settings tab), hover over the Rules section and click on the Edit button ('pencil' icon) when it appears.
- To add a new Rule, click Add.

- Here, you can browse the available rules. Use the information from the Summary section of this article to determine which rules are right for your Strategy.
When you see the Rule you would like to apply, simply select it.
- Once a Rule has been added to your list of active Rules, be sure to set the corresponding value, percentage, or threshold as-needed based on your Strategy's unique needs. For example, if you choose to enable a Bid Cap, be sure to also set the value of your cap (for example, $100).
Be certain you've reviewed the recommendations listed in this article and know the impact of a specific rule prior to enabling. Also, keep in mind that over-use of Rules can lower a Strategy's efficiency, so you should err on the side of adding fewer Rules, rather than more Rules. If ever in doubt, don't hesitate to reach out to a platform representative.
- To edit an existing Rule, simply follow the steps above and adjust the value, percentage, or threshold as-needed,based on your Strategy's unique needs.
- To remove a Rule from your list of active Rules, click the Delete button ('trash can' icon) next to the relevant Rule.

- When the desired rule thresholds have been established, click Save.

- That's all there is to it! The next time Marin's automated bidding runs, it will take your new rules into consideration and adjust your bids accordingly.
How To Set Up Excluded Dates
- Click on the Optimize tab in the left-hand navigation.
- Next select Strategies.
- From there, double-click on the Strategy of your choice. This will launch the Strategy Side Panel, where you can adjust your targets, update settings, and apply Excluded Dates.
- Within the Side Panel, navigate to the Advanced sub-tab.
- Hover over the Excluded Dates section and click on the Edit button ('pencil' icon) when it appears.

- Click + Add Excluded Dates. If you've previously entered Excluded Dates for this Strategy, the button will simply say + Add.

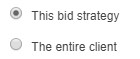
- Choose whether you would like to add Excluded Dates to This Strategy or The Entire Client, which will apply Excluded Dates to your entire Marin Client Account (Search accounts only, this does not apply to Marin Social accounts).
- Input your dates by selecting them from the calendar. For a single day, simply select the day from the calendar. It will appear as both the start and end date in your date range. If you'd like to enter a span of time, simply click once to select the first day of your range and click a second time to select the last day of your range.
- Click Add.

- If you would like to enter additional dates, simply click + Add again and repeat steps 7 - 9.

- When you've entered all of your Excluded Dates, click Save.
Note: You can enter Excluded Dates as far back as January 1, 2005.
- That's all there is to it! The next time Marin's automated bidding runs, it will take your new Excluded Dates into consideration and apply them to your Strategy (or Strategies) accordingly.
How To Apply Boosts
- Click on the Optimize tab in the left-hand navigation.
- Next select Strategies.
- From there, double-click on the Strategy of your choice. This will launch the Strategy Side Panel, where you can adjust your targets, update settings, and apply boost.
- Within the Side Panel (under the Settings tab), hover over the Boosts section and click on the Edit button ('pencil' icon) when it appears.

- Click Add a Boost.

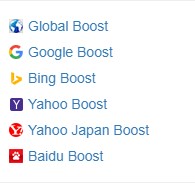
- From here, you have the option to apply your boost by publisher or apply a Global Boost that will apply to all Marin Search publishers. Select the option that best fits your needs.
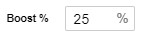
- Input your boost percentage.
- For Global Boosts, you can select either Static or Scheduled. A static boost will be applied to your Strategy long-term, while a scheduled boost can be turned on and off based on a date range of your choosing. Scheduled boosts can be used for promotions, seasonality, or any other time when your bids need to be adjusted short-term.
- If you selected a scheduled boost, input your dates by selecting them from the calendar. For a single day, simply select the day from the calendar. It will appear as both the start and end date in your date range. If you'd like to enter a span of time, simply click once to select the first day of your range and click a second time to select the last day of your range.
- If you would also like to also enable Excluded Dates for the same date range as your scheduled boost, select the Excluded Dates check-box.

- If, rather than a global boost, you instead choose to enter a boost for a specific publisher, you will have the option to enter separate boosts for Broad, Phrase, and Exact Match keywords.

- When you've entered all of your boost details, click Create.

- If you would like to enter additional scheduled boosts or additional boosts for other publishers, simply click + Add a boost again and repeat steps 6 - 12.
- When you're finished entering boosts, click Save.
- That's all there is to it! The next time Marin's automated bidding runs, it will take your new boost settings into consideration and apply them to your Strategy accordingly.
Important Notes About Boosts
- Typically, scheduled boosts that are set to run will go into effect next-day. For example, if you set up boosts on the 1st of the month, they will apply and be included in the bid calculation on the 2nd of the month. If you'd like your boosts to begin on the 1st, you should schedule them one day prior.
- If you rely heavily on scheduled boosts and need them be be applied same-day, reach out to a platform representative to discuss having your bidding time moved earlier in the day. Your platform representative will help determine if your account is eligible for having your bidding run time adjusted and will help you identify the best time of day for bidding to run.
How To Set Up Bid Overrides
Bid Overrides can be applied in single edit, multi-edit, or via a bulk upload. We'll explain how below.
Note: For Marin's automated bidding to work best, we recommend using Bid Overrides strategically and only when needed. If you're uncertain if Bid Overrides are the right choice for you bidding goals, please reach out to a platform representative.
- Click into the Accounts tab in the left-hand navigation.
- Next select Keywords.
- Select the check-boxes next to the keywords you would like to override and click the Edit button ('pencil' icon).
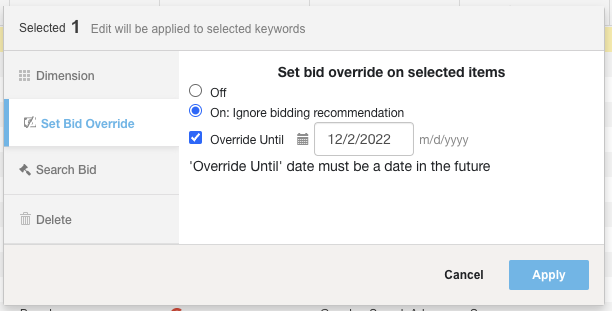
- From the edit pane, select Set Bid Override.
- From here, you will simply turn your bid override on or off, and set an optional end date.
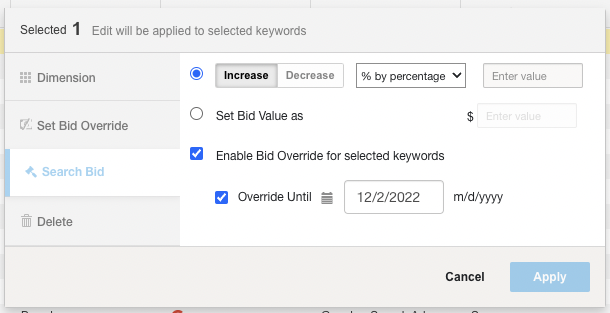
- If you would like to both set your Search Bid and enable a bid override at the same time, you can select Search Bid in the edit pane, set your bid, and click the check-box to enable bid override -- at the same time!
- You can also create a bulksheet with bid overrides. Simply click on the Upload button in the top-right. You can learn more about bulk uploads in Marin from our dedicated article.
In your bulksheet, you'll use the Bid Override column to enable/disable overrides and the Override Until column to set an end date for your override, if needed.
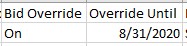
- To see which keywords are using a bid override, use the Column Selector to add the Bid Override column to the grid. The values in this column will display as "Override" or "Off."
- To see full settings history for a specific keyword, double-click on the keyword/row where you would like see additional details to launch the Side Panel.
- That's all there is to it! The next time Marin's automated bidding runs, it will take your new bid override settings into consideration and apply them to keywords accordingly.
