Multi-Client Reporting is a feature that allows users to run a report across multiple clients. The results are then rolled into a single report located in the All Clients view.
You can run multi-client queries on All Clients in the Customer or by using the custom client tags that you have defined (running a report on All Clients in the Line of Business, for example). You can learn more about custom client tags in our help article Understanding Client Tags.
What Is Multi-Client Reporting?
You should already be very familiar with the platform's View Builder as well as both single and recurring reports. If not, we'd recommend checking out those Training articles first. These are the tools that enable the platform's powerful multi-client reporting feature. In a nutshell, you are able to create a single report view, then run it across multiple clients within your account.
Multi-client reporting is very useful for giving either a snapshot or regular data about all clients in your account. You can use the resultant reports for comparison, analysis, or really anything else. This type of report can also be used in conjunction with client tags, which are similar to dimensions in the sense that you can use them to tag and segment clients within your account.
Let's find out more about multi-client reporting, and how you can use it to gain extra insight into your account.
How To
Setting up a multi-client report is actually very easy, especially if you're familiar with setting up other types of reports in MarinOne.
- Prior to creating your report, we recommend getting the grid set up to your liking by adjusting your date range, adding or removing columns, and applying any filters that may be needed.
- When adjusting your date range, keep in mind that the calendar selector has several customizable date range selections that will carry over into your reporting, including:
- Setting a date range into the future. This is beneficial for recurring reports, especially web queries, so that your new report will simply fill in with additional data each time it runs.
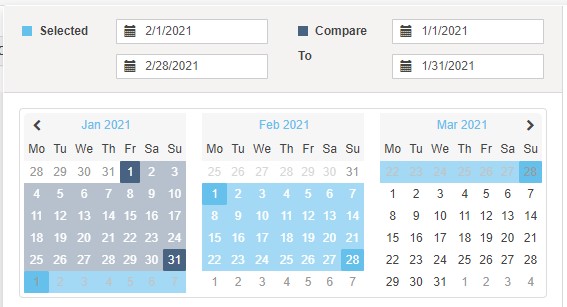
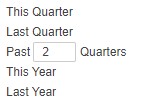
- Last N Days, Weeks, or Quarters allows you to customize your date range to suit your needs. If included in a report, this will always be a rolling number. So, if your report runs daily, it will always run with the last 7 days, 2 months, etc. based on your needs.

- Quarterly and yearly pre-sets, available from the available choices on the right-hand side of the calendar selector.
- Setting a date range into the future. This is beneficial for recurring reports, especially web queries, so that your new report will simply fill in with additional data each time it runs.
- Click on the Export button, located in the top-right corner of the grid.

- In the Type section, choose between a CSV or Web Query report.

- In the Run in section, use the Client Name radio button to individually select the client accounts where your report will run. By default, it will run in the client account you're currently using, but you can select different client accounts from the drop-down.
To add additional client accounts, simply select them from the drop-down. No need to hold Control or Shift on your keyboard. You can even use the Search functionality to find additional client accounts from the list. At the top of the list, highlighted in blue, you will see the client accounts that have already been added.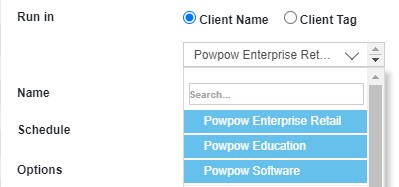
- You can also use the Client Tag radio button to run your report based on Client Tags. Simply select the radio button, then choose your tags from the list.
Just like with client accounts, you can add additional Client Tags to your report by simply selecting them from the drop-down. No need to hold Control or Shift on your keyboard. You can use the Search functionality to find additional Client Tags from the list. At the top of the list, highlighted in blue, you will see the Client Tags that have already been added.
To learn more about using Client Tags, check out our dedicated article.
Note: If you have created a client tag, but not defined its value, it will not appear in the drop-down. Additionally, you must enter the All Clients page from a client account that currently has that tag set. You may not see any custom client tag selections under Reporting if the specific account you are in before entering the All Clients page is blank.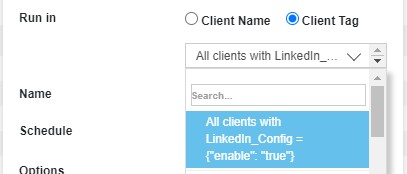
- Select the desired accounts from your list to add to your cross-client reporting. Simply click into the drop-down and browse through the list of MarinOne client accounts. Check the box(es) next to all MarinOne client accounts that you'd like to include in your report. You can use the search functionality to narrow down your list.
- Give your report a name. By default, this report will take on the name of the tab where it runs, for example Campaigns or Keywords. We recommend re-naming your report to make it more easily identifiable. For cross-client reports, it can be beneficial to include 'Cross-Client' in the name of the report, as this nomenclature is not automatically added.

- In the Schedule section, determine whether you'd like this to be a One-time report or a Recurring report.
For now, we'll focus on one-time reports. We'll review the available scheduling options in more detail later in this article.
- In the Email to text box, you can type in any email recipient you would like your report to be sent to. After you have entered a user's email address, press the Space bar on your keyboard to prompt MarinOne to validate the email address.
Note: Your report will not run until a valid email address has been entered. If a valid email address has been entered, but your report is failing to run, simply click Run Report again to force MarinOne to re-validate the email address(es).
- Add a Description (optional). This is a great opportunity to add key details about the report, including date ranges, filters or create a customized message.
Note: Everything that is added in the Description box will be shared with email recipients.
- Once all of your report parameters are set, click Run Report.

- You will see a notification just above the grid letting you know that your report has been created. You can click the link in this notification to be taken directly to your completed reports. We'll talk more about downloading your report later in this article.

How To Use The Feature
Suppose you want to create a report showing all the campaigns across your 10 client accounts, a few key metrics, and the dimension Brand vs Generic.
Using multi-client query reporting, you could set up a grid in the Campaigns tab on one client, then click Create Report, and choose to run the report in All Clients. The report will then be run on the campaigns tab of each of your 10 clients and the results will be included in a single report, located in the All Clients view. If any client had the Brand vs Generic dimension, all results will show in the same column.
Multi-client reports can also be set up through the Report Builder to run on a recurring basis and delivered as a CSV file via e-mail or through Web Query.
You can also run a multi-client report on your custom client tags by selecting them from the drop-down menu.
Note: If you have created a client tag, but not defined its value, it will not appear in the drop-down. Additionally, you must enter the All Clients page from a client account that currently has that tag set. You may not see any custom client tag selections under Reporting if the specific account you are in before entering the All Clients page is blank.
Multi-Client Row Limitation For Reports
You may sometimes encounter the situation that the data from some publisher or publisher accounts is not included in reports. That's because there is a row limit for All Clients reports. This limit is derived from the greater of either:
- 300,000 rows divided evenly across the number of clients being reported on. For example, a cross-client creatives report for four clients would have a maximum of 75,000 rows each.
In this instance above, all four client accounts will only have 75k maximum rows available each. So if any client has less than 75k creatives in the report, then we can assume that all data would be present. But if any client account has more than 75k rows of creatives, then those remaining creatives will not show in this report.
- 1000 rows per client (this is used for any instance where over 100 clients are included in the All Clients report).
Workarounds For Row Limitation
You can try the following to work around this:
- Decrease the number days (if reporting by day) shown in the report or use any of the available filters to limit row count.
- Create a standard report for each client account individually.
- If only a select portion of client accounts are needed for the report you may try to create a new user and give this user access to the accounts only needed in the report. Then run the report (you will of course still be limited by 300k rows, but by limiting the amount of client accounts shown you will allow more rows to be shown per account).
- You can use the Client Tags feature (if available) to run the report on just a subset of clients and hence ensure that the row totals fall well under the 300,000 row limitation.
Frequently Asked Questions
What Does The Multi-Client Query Output Look Like? Are Filters And Sort Order Preserved? What About Dimensions?
The results look very similar to any other CSV report you would generate in the grid with the following exceptions:
- The report header will indicate that the report was run in All Clients or All Clients in Advertiser and will indicate the number of clients it was run on (e.x. 125 clients).
- The first column will indicate the name of the client that the row is from.
- The second column will indicate the currency of the client in that row.
- The remaining columns will be normal CSV output.
- There will not be a Totals row.
- Filters and the sort order from the original grid will be preserved.
If you included a dimension or custom column in the original grid, then the multi-client query will look for that dimension and custom column in the other clients it is running on and include them in the results. If a client does not have a dimension/custom column of the same name, that particular cell will be empty in the report output.
What Are The Current Functionalities Of This Feature?
The following are the current functionalities of this feature:
- CSV and Web Query formats are available. PDF format reports are not yet available.
- There is no Totals row in the report.
- Multi-client query is not available on the Dimensions tab.
- If you run a multi-client query across clients with different currencies, they will display in their native currency, which will be indicated in the Currency column. The headers will indicate one currency (the currency of the client that it was run from), however no currency conversion will be done.
What Does The "Run In Advertiser" Option Mean?
This option will only show if a client has created an Advertiser tag and filled out a value for the current client.
If you select this option, the query will execute on all clients that have the same Advertiser tag value as the client you are kicking the query off from.
The other Run in options are:
- This Client: Report runs only on the current client, like a normal report.
- All Clients: Report only runs in all clients that share the customer ID of the current client.
How Are User Permissions Factored Into This Feature?
If the user who created the report has their permissions removed for any of the Marin Client Accounts contained within the report, those accounts will no longer appear within the report.
Where Can I Download The Multi-Client Query Output?
Multi-Client query results are located in the Reports section of the All Clients view.
On What Tabs Can I Run A Multi-Client Query?
Multi-client query can run on the following tabs: History, Channels, Campaigns, Groups, Keywords, Creatives, Placements, and Bidding.
The feature is not yet supported on the Dimensions tab. It is also not supported if you are drilled into a specific group/campaign/account. You must be at the top level tab.
Please also note that while the app will allow you to run a cross-client report from the History tab, we do not officially support this type of reporting and the data may be inaccurate.
Does Multi-Client Query Support Date Of Click / Conversion?
We do not currently support filtering on Date of Click vs Date of Conversion in the All Clients view. We are looking at implementing this feature in a future release.
Can I Run An All Clients Report By Device?
This feature is not currently supported.
What Time Will My Multi-Client Report Run?
Multi-client reports will automatically run when the parent account where the report was originally created from has received cost information from the publishers.
When including revenue data in your report, if other clients have not received revenue, then there can be a discrepancy in the report.
To change when your report runs, you will need to adjust the time under the Parent account’s Report Templates page. At the top left there is an option to Do not run reports until. But note that this option affects all reports within that account.
Why Is My Report Missing Data?
Please see the section above on multi-client row limitations.
How Can I Edit My Multi-Client Query?
You can only edit the multi-client query report in the parent client account in which the report was made.
Important Information
- Please note that all users for a given client have access to any reports created within that client – even if the report extends to other clients. For this reason, we recommend that any cross-client report containing data that shouldn't be shared be deleted. Alternatively you can create an Internal client to be used for cross-client reporting that only specific users have access to.
- Despite the option, negative keyword reports cannot be run across clients at this time.
- While you cannot run a cross-client report from the Dimensions tab, you can run a cross-client report from a top-level tab that includes the Dimension column. If your account does not have that dimension, you will simply see blanks in the Dimension name column.
- If reports are created in the All Clients view, please note that the filters will carry over settings from the last client visited. To remove these filters, such as the Publishers filter, you can edit a report component, click on Select Filters, uncheck the values, and Save. Removing this filter will select all possible values.
