Organizing your publisher accounts can be time-consuming, especially if you have keywords, product groups, and ads ranging into the tens or even hundreds of thousands.
That's why dimensions are so useful. By tagging your objects with dimensions, you can segment and categorize them in all-new ways. Want to filter by color, model, product line, brand, or promotion messaging? A dimension can help you do this and so much more. Think of a dimension as a label maker that will let you label, manage, track, and report on your objects better than ever before.
The powerful dimensions feature is built into Marin, so you can get started using dimensions right away -- and below we'll show you how to do just that.
Why Use Dimensions?
As you get comfortable working in the platform, you'll find that dimensions have a ton of handy uses, but here are some of our favorites.
- Easily view and analyze data on an aggregate level, outside of your account structure.
- Create reports based on a dimension tag or a set of dimension tags.
- Keep a record of when optimizations were performed in order to measure lift.
- Test ad copy variations across accounts, campaigns, and ad groups.
- Create social rules based on a dimension tag or set of dimension tags. For example, create a rule to tag values to a dimension based on performance, or create rules that run based on dimension values.
Creating Dimensions
- Navigate to the grid where you would like to create and tag your dimensions. For example, if you'd like to create a dimension at the campaign level, click on the Campaigns.
- On the right-hand side above the grid, click on the Column Selector button.
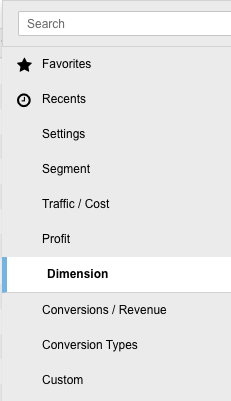
- From here, select the Dimension category on the left-hand side of the Column Selector pane.
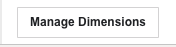
- At the bottom of the pane, click the Manage Dimensions button.
- From here, you'll see a list of existing dimensions. To create a new dimension, click the + New button.

- Give your new dimension a name (required) and a description (optional), then click Save.
Tagging Dimensions
Single-Edit And Multi-Edit
Follow these steps to tag your objects one at a time (single-edit) or several at a time (multi-edit). This method is perfect for making quick ad hoc changes.
Note: Using this method, you can only add one tag at a time. For example, you can tag multiple objects with your Weekend Flash Sale dimension, however, everything you've selected will need the same tag (either 20% Off or 30% Off).
- Navigate to the relevant grid where you would like to tag dimensions, for example, the Keywords or Ads grid.
- Use the check-boxes in the grid to select the object or objects you wish to tag, then click Edit button at the top of the grid.
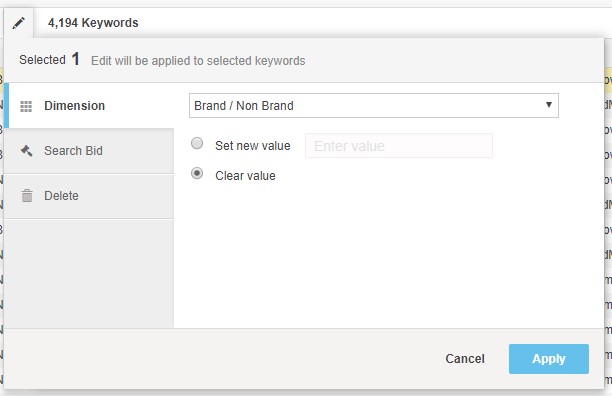
- Within the edit overlay, select Dimension from the left-hand navigation.
- Next, choose the desired dimension from the drop-down at the top of the bubble..
- After that, you'll need to toggle the radio button next to Set new value in order to tag your dimensions. You will use the Clear radio button if you wish to remove a dimension tag that was set previously.
- Enter your desired tag in the text box to the right of the pop-up bubble. You'll want to enter a value that makes sense within the context of your top-level dimension. For example, if your dimension is called Brand vs. Non-Brand, your dimension tags might be either Brand or Non-Brand. If your top-level dimension is called Weekend Flash Sale, you might tag your objects with 20% Off or 30% Off. It is essential that you enter a value into the text box prior to saving your changes, otherwise, your objects will remain untagged.
- Finally, click Apply. If you do not see your new dimension tags applied, you will need to refresh the page.
Please note that for the Marin Social module, you may see a delay of up to ten minutes before your changes appear.
- To view the dimension tag you've applied to any given object, simply add the corresponding dimension column to the grid using your Column Selector. Your dimension column will then be visible in the grid and your dimension tags will be visible from this column. Once your dimension column is in the grid, you can sort or filter based on the corresponding tags and values.
If your dimension column was added to the grid prior to tagging, simply refresh the page to see your updated tags reflected.
- To check that your dimension tags have been applied successful, click on the Activity Log to monitor the progress of your changes.
Bulk Edit
- First, log into Marin, and navigate to your module of choice (Search, Social, or Ecommerce) in the left-hand navigation.
- Click on the Upload in the top-right.
- From the top-left corner of the Bulk Upload pane, select your upload type (Campaign, Group, etc.).
- In Marin Search, you'll then have the option to determine where you would like your upload to take place. You can specify the publisher account, campaign, and group.
- To include your dimension in your bulksheet, add a column with a name that corresponds with an existing dimension (for example, Brand vs. Non-Brand). Then, within the cells of that column, you can add the tags you'd like for each object.
- Next, you can complete your bulk upload by either copying and pasting in the relevant upload information or by loading in a pre-prepared file.
- For more details about creating a bulk upload in Marin, check out our dedicated article.
Clearing Dimension Tags
To clear a dimension tag using single- or multi-edit, simply select the relevant objects and, from the pop-up bubble, select the relevant dimension, choose the Clear value radio button and click Apply. If you wish to re-tag a dimension on an object that was tagged previously, you can simply add the new tag using the instructions above; there's no need to clear out the dimension tag first, as the new tag will overwrite the existing tag.
Changing Tagged Dimension Values
You can change the tagged dimension value for an object using single edit or multi-edit.
- Go to the main Keywords or Creatives tab depending on how the objects are tagged.
- Follow the Dimension Tagging instructions listed above.
- Filter the Dimension column for the specific dimension value that needs changing.
- Use the check-boxes to select the appropriate rows (or super-select them all), then click Edit ('pencil' icon) to edit the dimension value. Then, simply add your new tag, overwriting the old one.
Filtering Dimensions
Dimensions can be used to quickly and easily filter your grid for any criteria you'd like, allowing you to report, edit, and optimized based on the granularity of your dimensions.
- First, create and tag your objects with dimensions using the instructions listed above.
- Next, navigate to the grid of your choice. For example, Campaigns, Groups, Keywords, etc.
- From the grid of our choice, use the Column Selector to add your dimension column to the grid. For example, if you'd like to filter your objects based on brand on non-brand and have already created a corresponding dimension for this distinction, you can add that column to your grid.

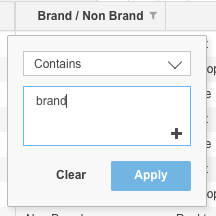
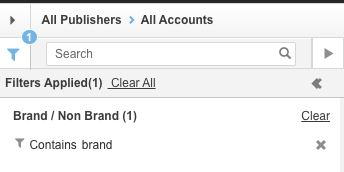
- Click on the filter icon on the dimension column and apply the desired filter. In our brand vs. non-brand example, you might want to filter for objects that contain the word “brand.” Click Apply to save your filter.
- To view all of the filters you have in place, click on the funnel icon to the top-left of the grid. You can remove your filters one at a time or click Clear to remove them all at once.
- You can apply filters based on any dimensions you have tagged, be it based on your lines of business, brand campaigns, product similarities (color, size, etc.) and so much more. From there, you can use your filters to create reports, multi-edit, bulk edit, add your campaigns to Strategies, and more. Get creative!
- To learn more about applying filters in Marin, check out our Applying Filters article.
Analyzing Dimensions
Once your dimensions have been tagged, you can begin analyzing the performance of all tagged objects across publisher accounts.
Please note that we currently offer two different versions of our Dimensions grid, our primary grid that's currently available to all Marin customers, and a beta version with a few added enhancements. We'll mention the differences between the two grids where relevant. You'll see "Beta version" when there are relevant differences to call out.
If you would like to test out the newly-enhanced Dimensions grid beta features, please reach out to your platform representative.
- Navigate to Dimensions in the left Navigation Bar.
- Use the Column Selector to adjust which dimension you're viewing. You can add or remove columns for your dimensions just like you would any other column. You can only view a single dimension at any given time, so if you add the column for a new dimension, it will remove the column for the dimension you were viewing previously. You can also bring in the corresponding metrics columns that are relevant to your dimension.
- When you're using the Roll up by Keyword selection, you can view up to three dimensions at the same time, which can be combined to see different segments of your account. For example, rather than simply looking at Brand vs. Non-Brand data, how about drilling down into Non-Brand, then pivoting by Line of Business, and further segmenting by product type? All you have to do is add three Dimensions columns to your grid using the Column Selector, and you can then deep-dive into your data like never before.
The Device column is also available if you would like to see device-level data in detail. Please note that these are not yet available when rolling up by Creative or Audience. We'll talk more about what these roll-up selections mean in step 4 below.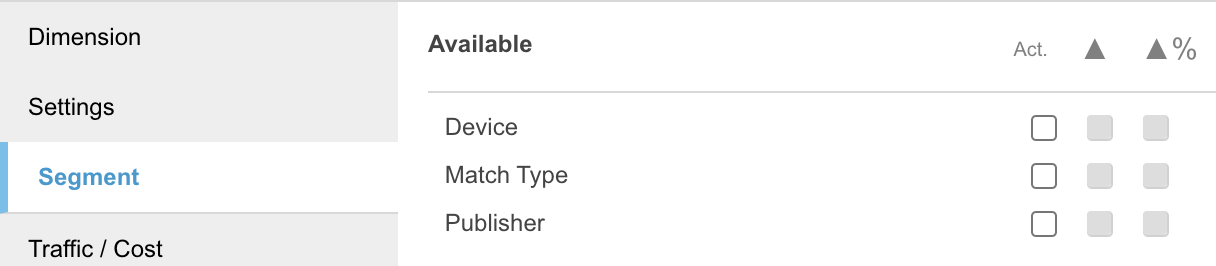
- When you're using the Roll up by Keyword selection, you can view up to three dimensions at the same time, which can be combined to see different segments of your account. For example, rather than simply looking at Brand vs. Non-Brand data, how about drilling down into Non-Brand, then pivoting by Line of Business, and further segmenting by product type? All you have to do is add three Dimensions columns to your grid using the Column Selector, and you can then deep-dive into your data like never before.
- Once you've added the desired dimension columns, you will see a list of all tags that have been rolled up under this dimension. For example, within our Brand vs. Non-Brand dimension, we have tagged our keywords as either Brand or Non-Brand, which means we will see both tags along with all of their corresponding data, rolled up across all tagged objects. This will give you the opportunity to analyze the performance of your Brand and Non-Brand keywords as a whole, on an aggregate level, outside of your account structure.
Please note that within the Social module, not all metrics are currently available to be rolled up under the ns tab. Please keep an eye out for updates to these metric rollups in the near future.
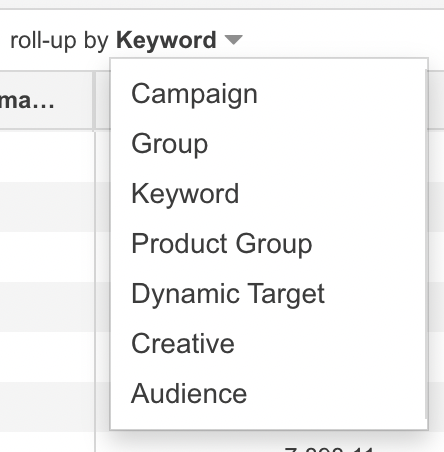
- You can view your dimensions rolled up either by Campaign, Group, Keyword, Product Group, Dynamic Target, Creative, or Audience. You can swap between these using the drop-down just above the grid.
For Dynamic Targets, we currently only support tagging at the campaign and group level.
For campaign-level tagging, this is especially useful for campaign types that have no groups, such as Performanc Max and Smart Campaigns.
- For our Brand vs. Non-Brand dimension, we want to analyze roll-up by keyword, but for our Weekend Flash Sale dimension, we might prefer to roll-up by creative, since our promotion is set at the ad level. If your Dimensions are tagged at the Audience level, you will likely want to also view your roll-up at the Audience level.
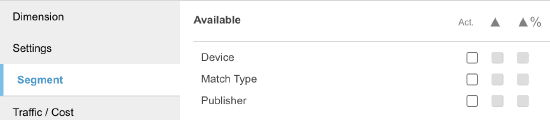
- In the Column Selector, we also offer three additional ways to segment your data:
- Device: This segment helps you see how your tagged objects are performing across devices, so you can view data by Mobile, Tablet, and Desktop, narrowed down based on your dimension tagging. This is supported at all rollup levels except Audience.
- Publisher: This segment helps you see how your tagged objects are performing across publishers, so you can view data by publisher, narrowed down based on your dimension tagging. For example, if you have objects tagged with the same dimension across Google and Microsoft, you can compare performance head-to-head.
- Match Type: This segment helps you see how your tagged objects are performing across match types, so you can view data by match type, narrowed down based on your dimension tagging. This segment is supported only at the keyword level.
- Once you've selected your rollup and applied any additional segmentation you need, you can do any data analysis that you would do from the other grids. You can apply filters, create reports, and more. To create a report, click on the Report button at the top right of the grid. Please review our documentation on Creating Reports for further instruction on reporting from within the Marin.
A Note About Totals
At the bottom of the Dimensions grid, you'll see a Totals row, which operates the same as any other totals row.
In addition to the standard Totals row, you will sometimes see a row called Totals (All Campaigns) when data is being rolled up by campaign. This is to show you total metrics aggregated by campaigns, so you can easily discover if you have more metrics from campaigns. If your Totals (All Campaigns) value is larger than your Totals rolled up by group, this would indicate additional metrics available at the campaign level. For campaign types such as Google's Performance Max, which do not offer ad group-level data, this is an important way to view your data that may not be available at other levels of the hierarchy.
Dimension History
To access dimension history, simply follow the steps below.
Note: Dimension history is currently a beta feature in Marin. If dimension history has not yet been enabled for your accout, please reach out to your account representative.
- From there, navigate to Dimensions tab in the left navigation.
- From the Dimensions tab, click on the Column Selector and add columns for the dimensions you'd like to review. You can add columns for up to three dimensions at once.
Once your columns have been added, click Apply to save your changes.
- Next, be sure you set your dimension roll-up so you're viewing data properly. Choose from campaign, group, keyword, product group, dynamic target, creative, or audience-level data.
You'll want to set your roll-up based on where the dimension was tagged. For example, it's like you set AB testing dimensions at the creative level, while Match Type dimensions were most likely set at the keyword level. Keep this in mind as you set your roll-up.
- Once your columns have been added and your roll-up has been set, hover over the columns until you see the three dots icon appear. This will appear next to the dimension value on any of the dimension columns you have added to the grid. Once it's visible, click the three dots icon and select History.
Take note! If you chose to add more than one dimension column to your grid, the column from which you select the three dots icon will determine the history that's visible.
If you click the Three dots from the first dimension column, you'll see history for only that dimension value. However, when you click on history on the second dimension column, this allows you to see a history of a cross-section of the two dimension values combined, allowing you do in-depth analysis and reporting. Lastly, if you click the Three dots icon for the third dimension in your grid, you'll be able to view the combined history for all three dimension values side by side, narrowed down to the values for that row.
If you would like to see the history for a different set of dimensions or tags, try clicking the three dots icon from a few different locations to see the impact that this location will have. - Next, go ahead and review your history. You can see your dimension history across the dimensions and values you selected on the previous page. You can also create saved views, reports, dashboard widgets and more.
That's all there is to it!
Dimension Use Cases
There are a number of ways that you can use dimensions. Following are explanations of each different use case:
Bulk Edits: Tagging objects with a dimension allows for easy editing across campaigns and publishers.
If an advertiser launches new creatives to promote an upcoming sale, tagging these creatives with a dimension will enable the advertiser to make edits in the future. This can be accomplished in a few steps:
- Create a Sale dimension and tag all applicable creatives with the date of the sale.
- Once the creatives have been tagged, the Sale dimension column can be brought into the grid via the View Builder.
- Filter on the Sale dimension column for the date of sale tag. This will bring up only the creatives that were tagged with this dimension.
- Super select these creatives and then click the Edit button to make changes.
Reporting: Metrics for objects tagged with a dimension are rolled-up and reported on within the Dimensions tab. To view performance by dimension:
- Navigate to the Dimensions tab.
- Click on the specific dimension that you wish to view.
- Select to view metrics at the Keyword or Creative level.
- Bring in the desired columns from the View Builder.
- Create a one-time, re-occurring, or web query report.
Budgeting: Dimensions can be used to keep track and report on spend across campaigns.
If an advertiser wants to monitor spend by product line, a Product Line dimension can be created and all applicable campaigns can be tagged by product. Within the Dimensions tab, the advertiser will be able to bring in Publisher Cost from the View Builder to see spend rolled by each product tag. The advertiser can create a report or alert based on this view.
Tracking lift: Dimensions can be used to measure performance changes based on specific optimizations.
If an advertiser adds new keywords to a campaign, a dimension can be used to track performance of these new keywords vs the other keywords within the campaign:
- Create a Keyword dimension and tag the new keywords with the date that they were launched.
- Tag the other keywords within the campaign with control (or leave them as unassigned).
- Navigate to the Dimension tab to view the performance of the new keywords vs the control keywords.
A Note About Publisher Labels
Some publishers, such as Google Ads, offer a feature that's similar to dimensions to allow you to organize your account into meaningful groups for filtering and reporting.
Marin offers the ability to sync in Google's ads labels for reporting purposes using the Publisher Labels column. Given that these labels are not cross-channel, we recommend using them as inspiration, then applying dimensions based on similar groupings across publishers.
Best Practices
- Measuring Performance by Keyword Type: Dimensions can be used to track performance by keyword type. For example, an advertiser can track and view performance rolled-up by Brand vs Non-Brand or Broad, Exact vs Phrase vs Content.
- Product Categories: Dimensions can be used to monitor performance across lines of business. To see performance by business unit, create a Business Unit dimension and tag objects to view overall performance by business unit (Home, Electronics, Apparel, etc.).
- Record Keeping: Since dimensions reside solely within the application (and will never be pushed to the publisher nor interfere with campaign structure), they can be used as a way of keeping notes. For example, if many Marketing Managers work on different campaigns within a single account, create a Marketing Manager dimension to tag campaigns with the name of the corresponding Marketing Manager.
- Creative Testing: Dimensions can be used to monitor performance of new ad copy variations or specific promotions. For example, an advertiser just launched new 'Buy 3, Get 1 Free' and '25% Off Sale' ad copies. The advertiser can create a Creative dimension and then tag their ad copies with the promotion name. This will allow them to track performance rolled-up by promotion, within the Dimension tab.
Important Notes
- If you are part of the Audiences beta, please check out our dedicated article for information on managing Audience dimensions.
- Support for tagging dimensions at the publisher account level or at the Marin Client Account level (Client Tags) will be added in a future release.
- Dimensions are currently available in Marin Search and Marin Social, however, they do not currently have cross-channel functionality. In other words, if you tag your objects with dimensions in both Marin Search and Marin Social, you will not yet be able to see a roll-up of this data cross-channel.
- You can also manage and automate dimension tagging via FTP. To do so, please follow the instructions in our Help article.
- If a dimension tag is applied at the campaign level, the groups, creatives, and keywords within that campaign will inherit that dimension tag. Child objects will inherit the parent dimension tag (never vice versa), but tags can be overwritten at the child object level.
- Currently, analytics on dimension tags does not support "special" or non-alphanumeric characters such as '&' and '+' when filtering on the History sub-tab. If you are using non-alphanumeric characters in your tags, please use hexadecimal ASCII encoded characters when filtering on the History sub-tab. When filtering on other tabs, the characters can be used as normal.
For reference, a URL encoder/decoder can be found here and a table of ASCII codes here.
- The platform does not keep a record of changes made to dimension settings.
- When requesting a Dimension Synchronization or Dimension Refresh, please note these points:
- This refreshes all of the data in the account.
- Processing time is proportional to the size of the account.
- For reporting purposes, we also offer the ability to tag dimensions on deleted objects via a multi-edit.
