A Strategy in Marin is a collection of campaigns that share a business goal (e.g. Cost-per-Lead Target or Awareness Targeting) and a shared budget. In this article, we'll explain how to create, structure, and assign your Strategies. So let's begin!
How To Create A Strategy
To create a new Strategy in Marin, follow the steps below.
- Click on Optimize, then Strategies from the left-hand navigation.
- Click on the Create button ('+' icon) above the grid.
- Name the Strategy
- Next, select the targeting for the Strategy:
- Maximize Conversions uses a target Cost per Lead, to maximize your conversions. You can also include an optional Spend Target for this strategy. See Maximize Conversions / Conversion Value Strategy Goals for additional details.
- Maximize Conversion Value uses a target ROAS to maximize your revenue. You can also include an optional Spend Target for this strategy.
- Target Spend Adjusts campaign daily budgets to hit a spend target
- Target Impression Share / Rate uses a target impression rate % or position target to maximize traffic.
- Enter the target(s) for the strategy. You will have a chance to update your target before any calculations run. Note: If you enter a target that doesn't match the strategy's potential, a warning will appear showing the likely range of performance for the strategy.
- Then, click Create.
- We'll learn how to assign campaigns to your new Strategy in the next section.
Want to create multiple Strategies at once? You can use the bulk upload feature.
Mapping Campaigns to a Strategy
Mapping campaigns to a Strategy happens on the Campaigns Grid. You can also use the bulk upload feature to map to multiple Strategies at once.
- Navigate to Accounts > Campaigns in the left navigation.
- Select the check-boxes next to the campaigns to assign to your Strategy. You can use filters to help narrow down what's visible in the grid.
- Select the Edit button ('pencil' icon) above the grid.
- Select the Strategy Management tab in the Edit Bubble
- Select the Map to Existing Strategy and then the name of the Strategy and click Apply.
Posting
When you create a new Strategy, it will be in Preview which means Marin will calculate budgets, campaign targets and bids, but they will not be sent to the publisher. To send results to the Ad Platforms, you need to specify which settings you want to Send to Publisher. If using publisher, you should generally send budget and targets. If using Marin bidding, also send Bids. If a strategy includes a mix of campaigns, Marin will not send bids for those using publisher bidding.
Note: For social publishers, we only send the Daily Budgets as this is the primary control used by these platforms to manage spend.
Conversion Value Settings
You can optimize to the Total Revenue in the account or Specify Conversion Types lets you bid adjust the value for different conversion types. To learn more about Specify Conversion Types bidding here.
Additional Settings
See this article for information on Advanced Options and Setting History.
Strategy-specific Columns
Many Strategy settings can be viewed as columns in the Strategies grid; see Additional Settings above for details. There are a few additional Settings that merit additional description:
Daily Budget Cap: Marin will not exceed this budget cap for any campaigns in the Strategy.
Episode Context: This shows if there have been any changes to the campaign mapping or to the Strategy target during the current episode. Note that changes may take up to 1 hour to appear.
Recommended CPA/ROAS cap and floor: Based on the historical performance of each Strategy, we calculate the range of possible target values with quality forecasts available. The cap and floor are the highest and lowest values in that range.
Target: Shows the current target for the Strategy, which may be Spend, CPA or ROAS. If a Strategy is using dual targets, the spend target appears in this column.
Editing Strategies
On the Strategies grid, double-click on the Strategy you would like to edit to launch the Side Panel. You can also use the Edit button to change Posting Options and Boosts for multiple strategies.
The More Menu
The 'More' menu in Marin can be used to access various details related to a specific object and to quickly navigate Marin.
Within Strategies, specifically, the 'More' menu can be used to apply filters to the objects housed within an individual Strategy, including Campaigns, Groups, Keywords, Product Groups, and Dynamic Targets.
If you hover over the 'Three Dots' icon and select Jump To, and you can quickly navigate to the objects housed within a specific Strategy.
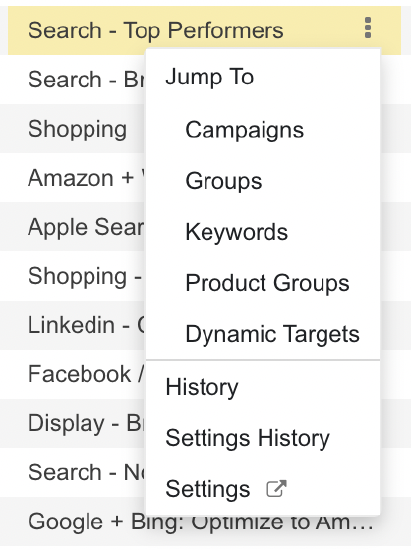
Additionally, the 'More' menu can also be used to view a Strategy's History, Settings History, and Settings.
How To Structure Your Strategies
Now that you know how to create Strategies, it's a good idea to understand how best to structure them.
The key to a successful Strategy structure is alignment with your business goals while also ensuring that each Strategy has a statistically significant amount of monthly conversion volume. 100 conversions per month is ideal and 11 conversions all-time is a requirement, but anything over 40 conversions per month may still work for your business.
If your Strategy has fewer than 100 conversions per month (but greater than 40 conversions per month) and you've used Marin's automated bidding successfully in the past, you do not need to discontinue using Strategies, but keep in mind that you might see better performance if your Strategy is able to reach the 100 conversion threshold.
Below we'll outline some best practices for structuring your Strategy.
- Many marketers choose to use our Awareness Targeting to maintain an impression rate % or average position for Brand campaigns. In this case, we recommend that you create separate Brand and Non-Brand Strategies to leverage Awareness Targeting bidding against brand terms, and financial bidding for non-brand terms.
- Create a separate Strategy for each of your business goals. For example:
- If you want to maintain a certain position or impression rate % for brand terms and achieve a specific Cost-per-Lead for non-brand terms, create a Strategy for each.
- A retail marketer has different Cost-per-Lead goals for different product lines, and should therefore create a Strategy for each product line.
- Make sure that your Strategies align with your budgets. For example:
- An education marketer has different budgets for targeting undergraduate students and graduate students, and should therefore create a Strategy for each corresponding set of campaigns.
- A marketer has a separate budget for traditional search ads and shopping ads, and should therefore create two Strategies accordingly.
- For advanced segmentation of performance-based Strategies, consider segmenting high-volume Strategies by an attribute with a large variance in performance.
Note: Do not do this if the resulting Strategies will have less than 100 conversions per week.
For example:
- A travel marketer has a single ROI goal for all non-brand campaigns, but the conversion rate is significantly different between Flight and Hotel campaigns. They can choose to create separate Strategies so that the data shared for low-volume keywords is more relevant.
Handy Tip
It's important to know that keywords with very little historical data will borrow data from similar keywords within the same Strategy.
A Note On Segmenting Non-Brand Strategies
If you have just one consistent goal across all Non-Brand Search campaigns, we recommend keeping all of these Non-Brand Search campaigns in just one Strategy.
If you have varying business goals or products, it is possible to create separate Strategies if each segment averages more than 40 conversions per month. Having more available conversions per Strategy improves performance, since the statistical confidence of the bid calculations is increased with the amount of sample data.
If each segment will maintain 40 conversions, we'd recommend that you consider the following approaches:
- Segment by bidding goal, including Awareness Targeting, conversion (lead)-based bidding or revenue-based bidding.
- If you have a large portion of spend on low-volume keywords, consider segmenting by product lines.
- Generally, we recommend against segmenting by publisher.
Device Bidding
To set up device bidding, from the Side Panel, click into the Traffic to Publisher section and check the box for Device Bidding. Then click Save to finalize your changes.
You can learn more about device bidding from our dedicated article.
Important Notes
Below are a few things to bear in mind when working with Strategies:
- Campaigns can also be assigned to a Strategy by using the platform's Multi-Edit or Bulk Upload features.
- By default, all campaigns will be assigned to the Unassigned Strategy. To remove a campaign from a Strategy you created, you can re-assign it to the Unassigned Strategy using the steps listed above.
- For reporting purposes, we also offer the ability to update your Strategy for deleted objects via a multi-edit.
