Automated Search Intent is a Marin-exclusive cross-channel feature that combines the power and specificity of Search campaigns with the reach of Social ones. By aligning your Search and Social campaigns with Automated Search Intent, you can see benefits in terms of cost-per-conversion, total volume, and of course, plenty of saved time.
In a nutshell, Automated Search Intent uses Marin's Dimensions to categorize Search campaigns that are driving traffic to your website based on user intent. It then uses this information to generate both remarketing and prospecting campaigns, along with Website Custom Audiences (WCAs) and related Lookalike Audiences (LAL) in Marin Social/Marin Social. The final step is for Automated Search Intent to create new Social campaigns, targeting the relevant audience (WCA or LAL), using ad copy from your Search campaign ads and images sourced from your landing pages. In this way, Automated Search Intent allows you to seamlessly and effortlessly retarget (and prospect) users on Facebook using a universal brand experience.
Want to get started with Automated Search Intent right away? This article will guide you through the essential steps necessary to get the ball rolling on your cross-channel strategy.
Handy Tip
Automated Search Intent allows you to leverage the intent of your Search visitors, along with your Marin Search ad text and landing page images to auto-create remarketing and prospecting campaigns in Marin Social.
1. Pre-Requisites
Before you can begin setting up Automated Search Intent, you'll first need to check a few figurative boxes. Be sure that you meet the following criteria, then head to step two to continue with the setup process.
- Before anything else, reach out to your Marin account representative or our Customer Support team and ask them to enable Automated Search Intent for your account.
- The API should be enabled for your Social account at the Agency level. Again, our Customer Support team can do this for you, so please just reach out.
- The standard Meta, previously known as Facebook, pixel should be deployed on your website.
2. Search: Creating And Tagging Dimensions
This is where the fun begins. For your new Social campaigns to be created and properly targeted, you'll use a Marin dimension called Search Intent Classifier. This dimension is used to define the intent of the user when clicking your ad. This intent is entirely definable by you, but could potentially encompass different keyword themes and strategies such as:
- Brand vs. non-brand
- Product categories (e.g. “Shoes”, "SUV", promotional items, etc.)
- Product value (e.g. high-value vs. on-sale products, etc.)
Bear in mind that the visitors who click on your Search ads will form the seed audience for your Search campaigns, forming both the remarketing and prospecting audiences. This means that for every different Search Intent Classifier, two audiences will be created in Marin Social/Marin Social.
Creating Dimensions
The Search Intent Classifier dimension will be tagged to all objects (i.e. campaigns or groups) that you'd like to include in the Automated Search Intent process. To enable this, you'll first need to create the relevant dimensions by following these steps:
- Navigate to the grid where you would like to create and tag your dimensions. For example, if you'd like to create a dimension at the campaign level, click on Campaigns.
- On the right-hand side above the grid, click on the Column Selector button.
- From here, select the Dimension category on the left-hand side of the Column Selector pane.
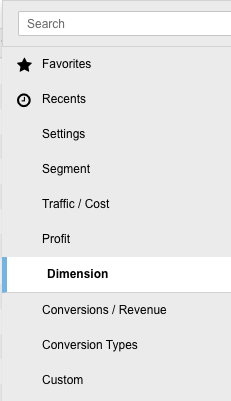
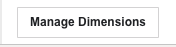
- At the bottom of the pane, click the Manage Dimensions button.
- From here, you'll see a list of existing dimensions. To create a new dimension, click the + New button.

- Give your new dimension a name (required) and a description (optional), then click Save.
Tagging Objects With Your New Dimensions
Now that you have the necessary dimensions for Automated Search Intent available, it's time to get tagging. By tagging your campaigns or groups with these dimensions, you're enabling Automated Search Intent to track the intent you define to accurately create audiences for Marin Social/Marin Social.
To start the tagging process, navigate to the relevant grid where you would like to tag dimensions, for example, the Keywords or Ads grid.
- Use the check-boxes in the grid to select the object or objects you wish to tag, then click Edit button ('pencil' icon) at the top of the grid.
- Within the edit overlay, select Dimension from the left-hand navigation.
- Next, choose the desired dimension from the drop-down. You'll want to look for your Search Intent Classifier dimension here.
- After that, you'll need to toggle the radio button next to Set new value in order to tag your dimensions. Simply enter your chosen value that represents the search intent for this campaign or group. This value is entirely up to you and will depend on your particular goals and strategy.
- Then, click Apply.
Note: We recommend testing and reviewing your click volume before defining your classifier value. The reason for this is that, for Automated Search Intent to work correctly, each classifier needs at least 10,000 clicks in the last 30 days. This may help you think differently about how to segment your paid search into classifiers by volume.
Handy Tip
You can also use the bulk upload functionality to set dimension values for Search Intent Classifier in large volumes. For more information about bulk uploads, please read our help center article.
3. Search: Tagging Your URLs
With dimensions all done and dusted, you'll now need to ensure that the intent values are included in your URLs. To do this, you'll need to update your Tracking Templates via the URL Templates. So let's get cracking!
Note: The process outlined below will work for Google and Microsoft. For other publishers, please reach out to your platform representative.
- Click on the Settings ('gear' icon) in the top-right corner of the platform.
- Then, click on Revenue & Tracking.
- From here, click on the Custom Parameters sub-tab.
You'll need to ensure that within your list of Custom Parameters, you have a parameter which is set up to refer to the Search Intent Classifier dimension, tagged at either the campaign or group level. This will look something like this:
Name: {_intent}
Value: [Search Intent Classifier] - If you need to create this Custom Parameter from scratch, you can do so by clicking on the + button and filling in the name and value pairing. Remember that dimension values must always be referenced in square brackets.
- The next step is to ensure that your Tracking Template properly refers to the {_intent} Custom Parameter. To do so, click on the URL Templates sub-tab and simply click on the desired Tracking Template.
Assuming there are no character count considerations, just add a reference to the newly created intent parameter to the end of your Tracking Template. If you set everything up as suggested above, this would look like: &intent={_intent}. - Once you've finished making edits to your Tracking Template, have applied your changes, and are happy with the Final URL at the bottom of the page, click Save in the bottom right-hand corner of the page.
Now that you've set up your URL tagging, you'll need to push your updated Tracking Template to the publisher. To do this, just follow these steps:
- Click on the level of the Tracking Template you wish to apply. For example, if you'd like to apply an account-level Tracking Template, click on Account > Publishers. If you'd like to apply a campaign-level Tracking Template, click on Account > Campaigns, etc.
- Next, select the check boxes next to one or more Google objects where you wish to apply your Tracking Template.
- Click on the Edit button and kick off any single or multi-edit you wish. This could be a small adjustment to the Search Bid or Daily Budget -- any single or multi-edit on the selected objects will do the trick.
Note: It is not currently possible to edit your Tracking Template directly from a single or multi-edit, however, kicking off any single or multi-edit on the objects where you wish to apply your Tracking Template will trigger the URL Templates to run and the Tracking Template to be applied. - Then, hit Apply.
- Once you've applied your changes, check the Activity Log, find and select the corresponding activity, and post the Tracking Template to Google. If you do not manually post this activity to the publisher, not to worry -- it will post automatically during the nightly sync.
4. Social: Create Media Plan And Retrieve Media Plan ID
Time to get a little cross-channel. For this step, you'll need to head over to the Marin Social platform. From here, you'll be setting up a Media Plan to host your newly ported campaigns, then retrieving its ID. If that sounds complex, don't worry -- just follow these steps.
Creating A New Media Plan
If you're a seasoned Marin Social user, you may already be familiar with setting up a new Media Plan. If not, you can learn more in our help center article. In order for Automated Search Intent to work correctly, you'll just need to be sure you set up your Media Plan in the following way:
- The Default Objective should be set to Conversions. This is also the default setting for your Client Tag (which we'll look at in step 5), but you can choose different objectives per-campaign by adding a parameter in your Client Tag. Currently, three objectives are supported: Website Conversions, Lead Gen, and Outside Traffic.
- In the Tracking section, you should ensure that the default pixel is enabled.
- (Optional) At this point, you can also add your Social tracking tags and/or URL parameters to the Tag Manager in the Media Plan. Doing so will ensure that your new campaigns are generated with these settings already applied.
Retrieving The Media Plan ID
Once your new Media Plan is created, you'll need to retrieve its Media Plan to use in the Client Tag in the next step. We'll use this ID to ensure that your new Social campaigns are created in the right place. To find it, follow these incredibly simple steps:
- Click into the freshly created Media Plan.
- Look to the address bar in your browser and locate the numeric value which follows "/datagrid/". For example, the URL below shows a Media Plan ID of 445702:
http://social.marinsoftware.com/datagrid/445702?_redirect_uri=%2Fajax%2FgetCampaignData%2F445702%3FshowPaused%3D1%26showCompleted%3D1%26showDeleted%3D0%26nestedAllowed%3D1
Make a note of this Media Plan ID for the next step -- and that's it!
(Optional) Retrieving The Facebook Page ID
If you have more than one Page in your Facebook ad account, you'll need to retrieve the Page ID for the specific Page you'd like to use Automated Search Intent with. You can then use this Page ID during step 5. To retrieve the ID, follow these steps:
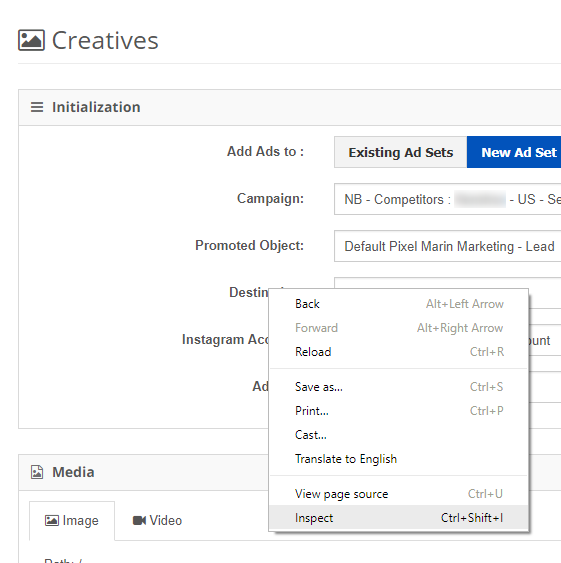
- First, navigate to any Social campaign which is assigned to the relevant Facebook Page.
- In the Options column of the grid, click Add Ads.
- On the Creatives screen, look for the Destination drop-down, then right-click on the name of the field: Destination. This will bring up the standard browser contextual menu.
- Click Inspect to bring up the inspector (in Google Chrome) for the source code of the page. You'll need to do a little digging here.
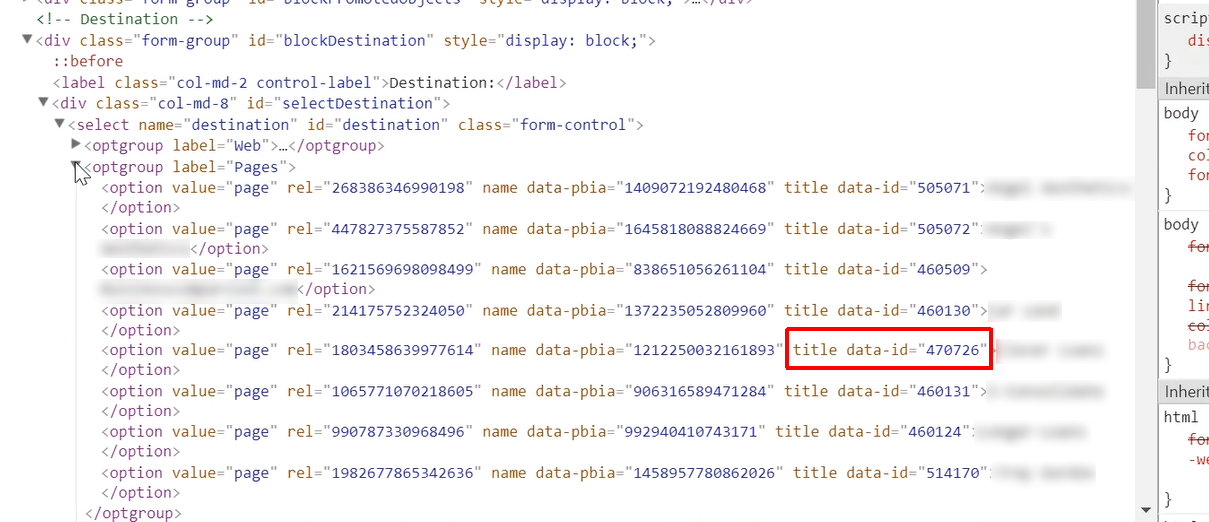
- A certain section of the code should be highlighted, and in this area you should see a string that looks like class="col-md-8" id="Select Destination". Click the arrow to the left of this line of code and a new one should open up below it which contains name="destination". Once again, click the arrow to the left of this one and you should see a line with label="Pages" in it. Click the left arrow on this one and you should see a list of your available Facebook Pages in code form. Each one will have a string called title data-id="XXXXXX". Find the name the Facebook Page you're looking for, then take note of the Page ID, which is the numbers following title data-id=.
5. Search: Set Up Your Client Tag
Now that you've got your hands on the relevant Media Plan ID, it's time to drop this into the Marin platform. Doing this will enable the system to create your new Social campaigns in the right place, and allows Automated Search Intent to work its cross-channel magic.
To set up a Client Tag in the platform. Just follow these steps:
- Navigate to the Settings ('gear' icon) in the top-right corner of the platform.
- You should land on the Clients & Users tab and Clients sub-tab by default, but if you don't, you can navigate there directly.
- Select the client account where you would like to apply client tags. Once you've decided, double-click on the name of the client to launch the Side Panel.
Note: You'll need Admin permissions in the Marin Search platform to access or edit Client Tags. - From the Side Panel, navigate to the Client Tags tab.

- In this list of tags, you should see a text box with the description "SocialIntent_Config". It's here that you'll need to insert the relevant client tag and the Media Plan ID you retrieved earlier.
- To get started as quickly as possible, the basic client tag you'll need to use Automated Search Intent with a US-based account is as follows (where "XXXXXX" is your Media Plan ID:
{ "enable": "true", "media_plan_id": XXXXXX, "soc_cst_id":"XXXXX", "ctry": "US", "objective":"website_conv" }
However, please note that there are a number of customization options you can include in this tag which will influence the way in which your Social campaigns will be set up. For example, you can use the parameter "objective":"XXXXX" to set the campaign objective; currently, three objectives are supported: Website Conversions, Lead Gen, and Outside Traffic. To learn more about these customization options, please reach out to your platform representative.
You'll also notice a parameter called "soc_cst_id":"XXXXX"; you'll need to reach out to our Customer Support team, who will be able to retrieve this for you to insert into your Client Tag.
As described above, if you have more than one Facebook Page in your ad account, you'll also need to include thePage IDfor that Page and include it in your Client Tag via the pageid parameter. See above for a step-by-step on how to retrieve your Page ID. Once added, your Client Tag will look something like this:
{ "enable": "true", "media_plan_id": XXXXXX, "pageid": XXXXXX, "soc_cst_id":"XXXXX", "ctry": "US", "objective":"website_conv" }
Once you've inserted the Client Tag, click Save and you'll be ready for the next step.
Handy Tip
If you'd like to use Automated Search Intent with multiple Media Plans, you can update the Media Plan ID in this client tag, then run the Automated Search Intent process again.
6. Search: Kick Off Automated Search Intent
The time has finally come to give Automated Search Intent the green light and actually kick off the process. To do this, you'll need to edit a dimension value, just as you did in step 2 above.
- The value you'll need to tag in order to kick off Automated Search Intent is the Search Intent Status dimension. Again, follow the process outlined in step 2 above, but instead add the value "ENABLED" for each of the objects you've already tagged, then Save each one.
Note: It's a good idea to enable just one of your campaigns to start. This way, you can troubleshoot any issues and quickly identify the newly created campaigns. Once you're sure everything's worked as expected, you can return to this step for the remainder of your campaigns.
- Once you've tagged your objects, and assuming you're opted in for Automated Search Intent correctly, you'll soon see the Search Intent Status column updated in Marin. The Automated Search Intent process runs regularly in the background, so you should see the value "COMPLETED" within the Search Intent Status column for each of your tagged objects, signifying that Automated Search Intent is set up correctly.
Note: If your Search Intent Status shows as "FAILED", please double-check the above steps and, if necessary, reach out to our Support team for assistance.
7. Social: Checking The Output
With the Automated Search Intent background process kicked off, the finish line is in sight. Now you'll need to double-check that the process completed successfully by checking the output. To begin this step, first head back to Marin Social/Marin Social.
To check that everything has gone to plan, you'll need to double-check three specific aspects of the output within Marin Social:
- Your newly created Social campaigns. You'll need to check the targeting settings for each one. Please note that you'll have two campaigns for every one Search campaign: One for remarketing, one for prospecting.
- Your new carousel ads. These ads should be using the copy and images migrated from your Search campaigns. Automated Search Intent uses a proprietary tool that grabs images from your landing pages. Of course, if you don't like the images the system selects, you can replace them with your own in the final step below.
- Your new audiences. You should have two audiences per imported Search campaign: remarketing and prospecting (also known as 'lookalike').
Let's go ahead and check each of these in order. Just follow these steps:
- First, navigate to the Marin Social Media Plan that you created in step 4 above.
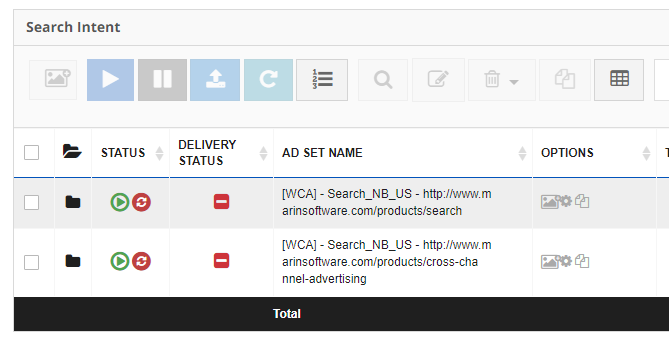
- Assuming that everything went according to plan with the Automated Search Intent process, and you're seeing "COMPLETED" across the board in the relevant dimension, you should now see a selection of new campaigns in this Media Plan. Each one will be named as per the Search Intent Classifier that created it.
- If you click into a few of your campaigns, you'll see that the ad sets within them have a naming convention relating to the audience they're targeting: Either a "WCA" prefix for remarketing campaigns, or "LOOKALIKE" for prospecting campaigns.
- To spot-check specific ads that have been ported from Search, you can also click into any of your ad sets to review the individual carousel ads within it. For more info about making changes to your new carousel ads, please see step 8 below.
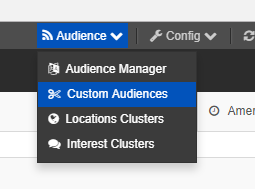
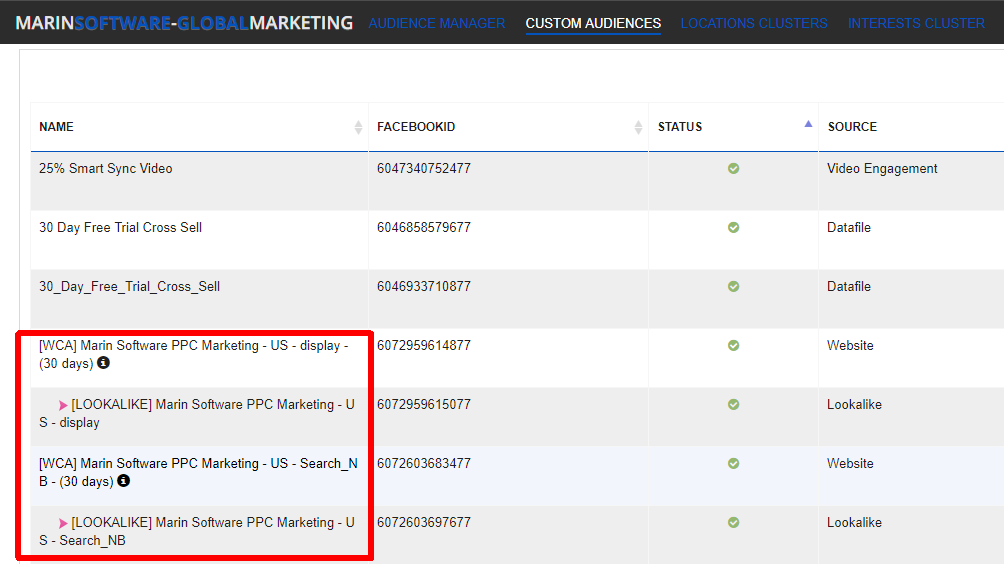
- Finally, let's check on your newly created audiences. In the upper-right corner of Marin Social, click Audiences, then Custom Audiences.
- On the Custom Audiences grid, you should quickly be able to spot your newly created website custom audiences, as each will have the prefixes mention above -- either "WCA" or "LOOKALIKE". Note that you can also use these Custom Audiences in other campaigns within Marin Social; they're not restricted to your ported Automated Search Intent campaigns.
8. Social: Customize And Sync Your Ported Social Campaigns
At this point, you should now have a set of freshly pressed Social campaigns which mirror your Search campaigns in Marin Social/Marin Social. With your final checks complete, you should also have a good idea of whether or not these campaigns were ported from Search without a hitch, or whether they need a little tweaking here or there.
Below we'll offer a few tips for making changes to your new campaigns. If you'd prefer, you can jump straight to the second sub-section where we'll explain the very last step in the process -- syncing your campaigns to Facebook.
Customizing Your Ported Campaigns
Because Automated Search Intent is, well, automated, there can be times when text, images, or both are ported from their Search counterparts with small discrepancies.
Handy Tip
Before you sync your new campaigns, we strongly recommend reviewing your new campaigns and making edits wherever necessary. You should check your ad text copy, images, tracking parameters, targeting settings, budgets, bidding, and any other fields you usually make changes to when creating campaigns.
In order to make changes to your ported campaigns, simply navigate to the relevant Media Plan, use the checkboxes to select the object, then click the Mass Editor button above the grid to reveal a grid containing your new carousel ads. Of course, you can also click directly into campaigns, to ad sets, then to specific ads to explore (and edit) your new campaigns that way too.
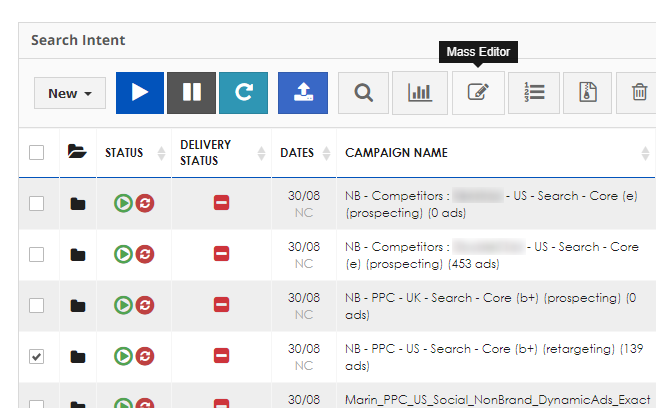
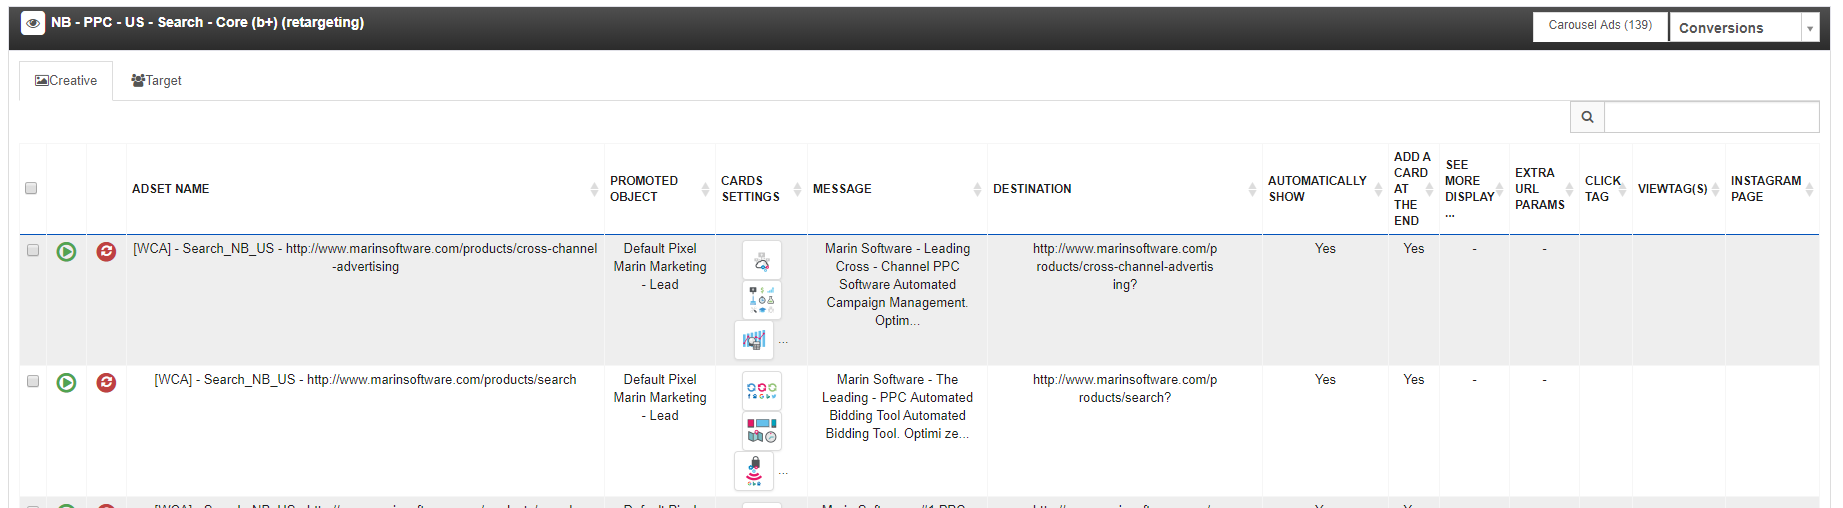
If you use the Mass Editor, you'll first land on the Creative tab, where you can make any number of changes to your new ported carousel ads. Just as you normally would with the Mass Editor, simply click on any of the fields, (including Message, Destination, or any other field), and manually make changes. If the images in your carousel ads aren't optimal, you can also click into the Card Settings field to replace any of the carousel images, either by uploading them or choosing from your library.
Once this is completed, you should also review the Target tab where you can double-check your targeting settings. If required, you can update age, geographical targeting, interests, and more.
Syncing Your Ported Campaigns
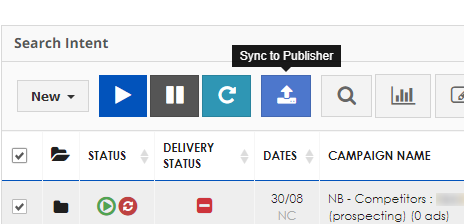
Once you're happy with your ported campaigns, the final step is to sync them to Facebook. To sync all of your campaigns at once, just follow these steps:
- Navigate to the top level of your Media Plan, so you're looking at the grid containing all of your ported campaigns.
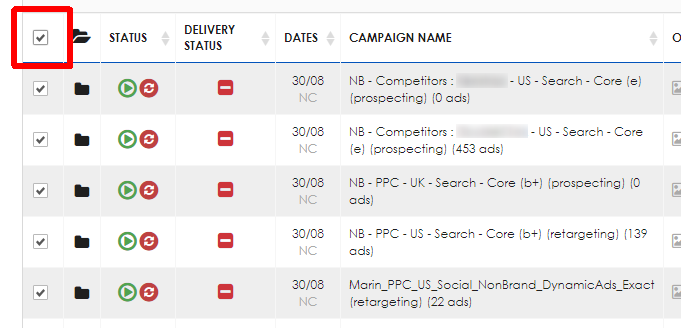
- Click the super-select checkbox at the top of the far-left column in the grid. This will select all campaigns within this Media Plan.
- Finally, click the Sync to Publisher button above the grid to send your updated campaigns to Facebook.
And that's it! You're all done. Automated Search Intent has taken your Marin Search campaigns and ported them to Marin Social using mirrored ad copy and custom targeting settings based on intent. Pretty smart stuff. If you have any more questions about using Automated Search Intent, please reach out to your platform representative or our Customer Support team.
