Introduction
The Scheduled Actions feature enables you to pause or resume campaigns, groups, or ads at a specified date and time in the future. This is useful for making changes in advance for delivery to publishers, allowing you to prepare for upcoming promotional or seasonal changes instead of having to push them during off-hours. For example, Scheduled Actions could be used to launch new campaigns on a schedule or activate promotional ads to coincide with a sale period.
You can have multiple scheduled actions applied to an ad.
In this article, we'll walk you through what Scheduled Actions are, how they work, and how to add/edit/delete them.
Ready to get started?
What Are Scheduled Actions?
Scheduled Actions allow you to pause or resume your campaigns, groups, or ads at a specific time in the future. This can come in very handy if you want to launch new campaigns on a schedule or coincide specific ads with a promotional period like Black Friday.

Marin provides a host of different options to help you set up your Scheduled Actions in a way that will make managing your campaigns easier than ever before. Whether you want to set your objects to pause or resume while you're away from your computer, this is the way to do it.
Scheduled actions are available for Google, Microsoft, Amazon, LinkedIn, and Apple Search Ads.
Handy Tip
Scheduled Actions are based on your account's time zone. To double-check your time zone, click Admin in the bottom-right, then click the Clients tab. Find the specific Marin client acocunt in question, then use the Time Zone column to find the information you need. See the Want to Know More? section below for more info.
How To Create A Scheduled Action
Scheduling an action for one of your campaigns, groups or ads is easy. Just follow these simple steps:
- The first step, as always, is to log into Marin.
- Then, select the Search or Ecommerce module from the left-hand navigation.
- Once you're in a specific module, navigate to the Campaigns, Groups, or Ads tab.
- Use the check-boxes to the left of the grid to select the specific objects for which you'd like to add a scheduled action.
- Click the Edit button ('pencil' icon) above the grid.
- From the left-hand side of the edit pane, select Scheduled Actions.
- Select the Add radio button, if it's not selected by default.
- Then, you can choose whether you would like to pause or resume your object(s) and enter the precise date and time when you'd like this action to take place.
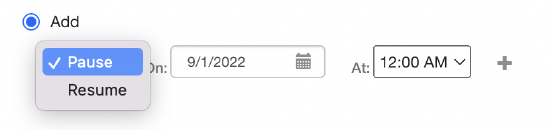
- If you would like to add additional actions -- for example, resuming then pausing ads for a promotion -- simply click the + ('plus sign' icon) to add additional actions, then fill out the corresponding date and time details.
- If you accidentally added an action that isn't needed, simply slick the - ('minus sign' icon) next to the corresponding action.
- When you're ready to save your changes, click Apply.
How To View A Scheduled Action
From The Grid
- From the Search or Ecommerce module, head to the grid that contains the object(s) where you've set up scheduled actions. For example, the Ads tab.
- Click on the Column Selector to the top-right of the grid.
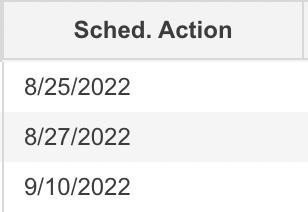
- Use the search bar to identify the column and add it to the grid. You're looking for the Sched. Action column. Once it has been added, you can drag and drop it into the desired order before you click Apply in your Column Selector.

- Once the Sched. Action column has been added to your grid, you can view the next scheduled action that's in place for a given object.
- Click the Filter ('funnel' icon) next to the column name to apply a filter to the Sched. Action column for On (a specific date), On or after (a specific date), On or before (a specific date), or Between (two specific dates).

Use the calendar to input a date, then type in a time. Click the + ('plus sign' icon) to add your date selection to your filter.
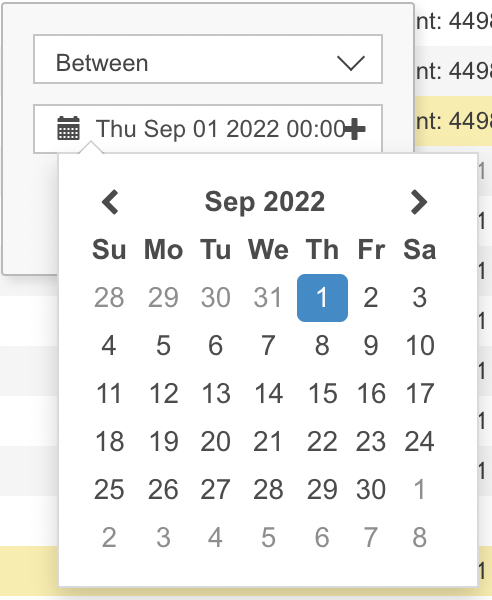
- To apply additional date selections to your filter, simply repeat step 5 above. For example, if you'd like to filter for actions on Sep. 1 as well as actions between Sep. 10 and Sept 18, simply add these as two separate filters using the + ('plus sign' icon).
- Click Apply to view your filtered grid. You can then create reports, alterts, dashboards, or do any management needed.
- To remove your filter, click the Filter ('funnel' icon) next to the column name and select Clear or simply click the X icon next to the specific filter, in the instances of multiple filters. Alternatively, you can click on the Filter ('funnel' icon) on the left-hand side of your grid to manage all filters that have been applied.
For A Particular Object
- From the Search or Ecommerce, navigate to the Campaigns, Groups, or Ads tab.
- Use the check-boxes to the left of the grid to select the specific objects for which you'd like to view scheduled actions.
- Click the Edit button ('pencil' icon) above the grid.
- From the left-hand side of the edit pane, select Scheduled Actions.
- Select the Edit radio button to see the scheduled actions that have already been applied for this object. In the next section, we'll review how to edit or delete these, should you wish to do so.
How To Edit Or Delete A Scheduled Action
So what happens if you create a Scheduled Action then change your mind later, or need to alter it? No problem, just follow these steps:
- From the Search or Ecommerce, navigate to the Campaigns, Groups, or Ads tab.
- Use the check-boxes to the left of the grid to select the specific objects for which you'd like to edit or a delete a scheduled action.
- Click the Edit button ('pencil' icon) above the grid.
- From the left-hand side of the edit pane, select Scheduled Actions.
- Select the Edit radio button to see the scheduled actions that have already been applied for this object. You can adjust these as needed.
Note: If you attempt to edit multiple objects with different scheduled actions, the Edit radio button will not appear. You will need to edit these one at a time or simply clear them out and re-add them.
- Select the Clear radio button if you'd like to delete all scheduled actions for this object.
- Once you're finished with your edits or deletions, click Apply to save your changes.
Understanding Items In Held Status
If an action is scheduled on an item that is Held in the Activity Log, the change will be made at the Publisher (overriding the Held status). You can find Held activities by filtering the status column. It is best to either cancel or post these jobs before scheduling any actions.
To exclude individual held items when creating a Scheduled Action, you can add a filter to the Operation Status ('flag icon') column.
In order to be sure that the changes resulting from yourscheduled action went through on time, we recommend setting up an alert for confirmation. You can set up an alert quickly and easily by following the our Alerts article.
Important Information About Timing
- You should check the time zone of your account to ensure it is set correctly before scheduling any actions. This is especially important if you work across multiple time zones in the publisher accounts that are linked to Marin.
- Scheduled Actions are a useful feature to trigger status changes at a future date and time. However, the time chosen is not precise (down to the minute/second) and you should be aware of this when you decide to use this feature. If the action is for an event with a short timeframe such as a lunch hour or has a definite deadline such as the end of a competition, then it would be advisable to manage this action manually.
- For any actions scheduled, Marin will trigger the action to happen on the hour that you set. However, this does not mean it will happen immediately on the publisher side.
- If an item is being edited or synced, Marin will be unable to edit the status until this first action is completed. A Scheduled Action that does not succeed will be resent multiple times until it is successful, which could cause a delay from the time set by the user.
- If the Publisher has any API issues at the time of the action, Marin will be unable to send the change, but it will be re-sent once the issues with the Publisher have been resolved.
- If Marin has scheduled maintenance during an hour when you have set an action then it will be sent once the work is completed.
- A scheduled action will not override a campaign's end date, so if a campaign is already completed when a scheduled action is due, the action will not take place. This is expected behavior.
- In order for Scheduled Actions to work most effectively, the proper status settings need to be synced at the time the scheduled action is to occur. For example, if an ad has a scheduled action to be paused on March 15th at 1:00 a.m., but as of that time Marin is showing the status as Paused already (even though the publisher shows the status as active), Marin will not push the change as it believes that the ad is already in the Paused status. For this reason, it is recommended to make all edits within Marin to ensure the status of objects are in sync with the publisher.
- If objects included in the scheduled action are in the Sync Error status due to a publisher-related error, this may cause the complete scheduled action to fail. For example, a Google ad headline that exceeds the character policy limit.
