Marin's built-in reporting functionality allows you to not only do one-time and recurring data analysis, but to also filter for certain conditions for continued, long-term analysis of the data you need to understand most in your account.
For example, using an alert, you'll be able to receive a notification letting you know about:
- Sudden changes, such ads that have seen a substantial drop in Click Through Rate
- Low performers, such as keywords that are driving substantial publisher cost without driving conversions
- Keywords with lower-than-normal conversions when compared with prior weeks
- Common mistakes, such as groups with no active ads
- Commonly overlooked problems, such as groups with disapproved ads
This powerful feature is built right into Marin and can be leveraged simply by applying additional filter criteria to the reports you use in Marin every single day. It's as easy as that!
Note: Since alerts are built using reports, we recommend checking out our dedicated reporting article prior to setting up your first alert. You can learn more here.
Handy Tip
It can be helpful to include columns in your alert that are needed for a bulk upload, such as Account, Campaign, etc. This way, after reviewing your alert, you can take action quickly and easily.
Creating Alerts
- Head to where you'd like to generate your alert, such as Campaigns or Keywords.
- Set up your grid to your liking using the Account Navigator, Column Selector, and Calendar Selector to set up your publisher accounts, columns, and date range, respectively. Because this alert will run on a recurring cadence, we recommend using a rolling date range in your Calendar Selector, such as Past 30 Days or Yesterday rather than a static date range, such as February 1st – March 1st.
- Next, use the Filter button ('funnel' icon) on your columns to apply any filters you need. This will establish the criteria your alert will use in order to determine when an email should be sent. For example, to filter for low performing keywords, you might apply filters to the Conversions and Publisher Cost columns. Use filters here that make sense for your business, based on your past performance.
Set up all conditions that you'd like to be alerted to in this specific report. Applied filters are in place, just above the grid. As you are applying filters, if there aren't any objects that currently match this filter criteria, you can still set up your alert. This way, if Marin identifies anything in the future that matches this filter criteria, you will receive an email alert.
- Once all of your filters have been applied and your grid is ready, click Export. From here, you can set how often your alert will run and who it will be sent to, among other key details.
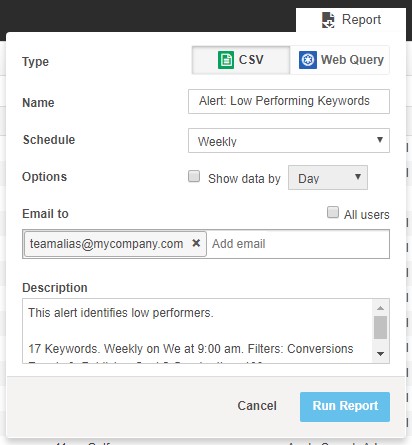
- For alerts, we recommend using the CSV format. This allows you to make actionable updates when necessary changes have been identified.
- Give your alert a relevant name. We recommend using something eye catching, as this name will be the subject line used in the email that is sent to your inbox. Try names that begin with "Alert" or "Attention."
- Set your alert to run on a recurring cadence. Whether this runs Daily, Weekly, Monthly, or Intraday is up to you, but keep in mind that Marin will only email you when something has been identified that needs your attention, so don't hesitate to set your alert to run regularly. To learn more about the scheduling options available in Marin reports, check out the Scheduling Options section of our reporting article.
For alerts that don't run Daily or Intraday, it can be helpful to set a designated alert day, so that your alerts don't get lost in the shuffle of all of your standard weekly and monthly reporting. For example, if your weekly reports typically run on Mondays, perhaps you might like for your alerts to run on Wednesdays or Thursdays. Or if your monthly reporting takes place on the 1st of the month, perhaps your alerts can run on the 3rd of the monthly. Test out different options to see what works best for your team.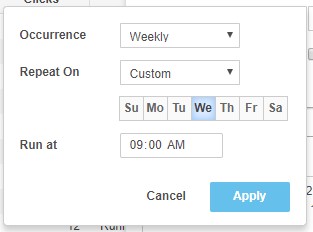
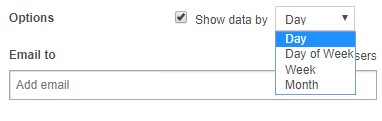
- If you'd like to see your data broken out by day, day of week, week, or month, check the box for Show data by and select the relevant option from the drop-down.
-
Important: Set your alert to email to any required users by entering specific user email addresses.
You might also try adding team email aliases to be sure these alerts are seen by all of the necessary stakeholders. You can even send your alerts to users who don't have access to Marin!
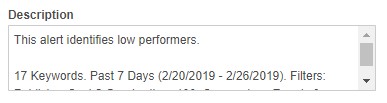
- (Optional) Add text to the Description text box if you'd like your colleagues to know how this alert should be used. This text box will automatically include details about the date range used and the filters that were applied, but you can add any additional information that might be relevant to your team.
- When your alert has been set up to your liking, click Run Report.
- Marin will check for the filter criteria on the cadence specified (daily, weekly, monthly, etc.). When Marin identifies that something has fallen into this criteria -- and only when something has fallen into this criteria -- an email will be sent to the addresses specified.
- To view your scheduled alert, click on the Reports in the left navigation, then click on the sub-tab for Scheduled. You can use the Search bar to find the specific alert in question.
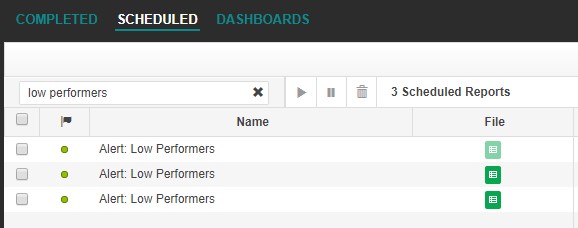
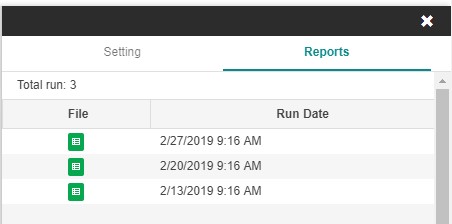
- Click the green File icon to download the latest alert or double click on the name of your alert to open the side-panel and see more information about your alert. From here, click on the Reports sub-tab to see each time this alert has run and download corresponding files from a specified run date.
- Lastly, watch your email! Marin will alert you when it has identified objects that meet your filter criteria, such as low performing keywords or campaigns that have had a drop in Conversion Rate. From your email, you can download the CSV file, make any changes to it that you'd like to make (such as status or bid changes) and bulk upload your updates into Marin. That's all there is to it!
Best Practices
Performance-Based Alerts
Performance-based alerts are great for helping you identify elements of your account that can be further optimized. An example would be identifying low CTR keywords by creating an alert that looks for keywords with high impressions and low CTR. Based on this alert, you may want to consider breaking these keywords out into new groups or changing the ad copy.
Another example would be identifying large changes in campaign spend using an absolute value percentage to include both increases and decreases in spend. These large swings in cost would warrant investigation. Some further examples:
- Keyword conversion rate increases or decreases by more than 30%. This could indicate a significant change in landing page, ad copy, or user behavior.
- Keyword average position decreases by more than 3. This could indicate a competitor has entered the marketplace.
- Keywords with high spend and no conversions. This could indicate underperforming keywords you should pause or re-evaluate.
Account Maintenance Alerts
Account maintenance alerts help you ensure their accounts are structured properly, tracking has been implemented correctly, and all objects are in sync with the publishers. All of these alerts are actionable because they identify a structural issue in your account.
For example, if you are using keyword-level tracking in Microsoft; you’ll want to create an alert for all Microsoft creatives to make sure they are using {param1} as their destination URL. Another alert should be created at all object levels (Campaign, Group, Creative, Keyword) and identifies sync errors. These affected objects should be re-pushed to the publisher, or a manual synchronization performed to pull in data from the publisher. Some further examples:
- Keywords and creatives with a disapproved status. These objects may require an exemption from the publisher.
- Destination URLs missing tracking parameters.
- Ad groups with no active creatives or no active keywords.
- Creatives tagged with a promotional dimension that is set to Active outside of that promotion's valid date range.
Bidding-Related Alerts
Bidding-related alerts can help you identify reasons to change Strategy-level settings. For example, identifying keywords at the bid cap (i.e. keywords where the current bid is within 10% of the maximum bid for that Strategy). If these keywords are performing well, you should consider raising the bid cap. Please keep in mind that Strategy-level settings should not be changed before thoroughly investigating the potential impact. Some further examples:
- Keywords in a performance Strategy that are set to bid override. These keywords are not being optimized against performance and you should remove the bid override setting.
- Ad groups whose performance far exceeds the Strategy's performance targets. These Strategies may need to be remapped to a more appropriate Strategy.
Important Notes
- Your alert will only be emailed if Marin has identified that there are objects that match the filter criteria. For example, if you've applied a filter for keywords with Clicks < 10, if there are no keywords that meet this criteria, an email will not be sent. Marin will still run the alert, but will only email you when something has been identified.
- When an alert is emailed, the email contents will show a short preview of the report. Attached will be the report itself with all associated data.
- Additional alerting features, such as multi-component alerts, will be coming to Marin in a future release.
- You can run a scheduled report ad hoc by clicking the Run Now button. This can be found by going to Reports, clicking on the Scheduled sub-tab, and selecting Run Now above the grid.
- Recurring, scheduled alerts need at least one hour to begin processing. Alerts created for the same hour will begin processing the next day. For example, if it's 10:30am and you schedule an alert to run daily at:
- 11:00am, it will not start processing until the next day.
- 11:30am, it will start processing the same day.
- Please be aware that reporting times are based on when a report will be processed. For larger reports, it's possible the reporting time may take more than a few minutes, so please be patient.
- The time of day used for your alerts will be based on the time zone of your Marin Client Account, which may or may not be the same as the time zone where you are physically located.
