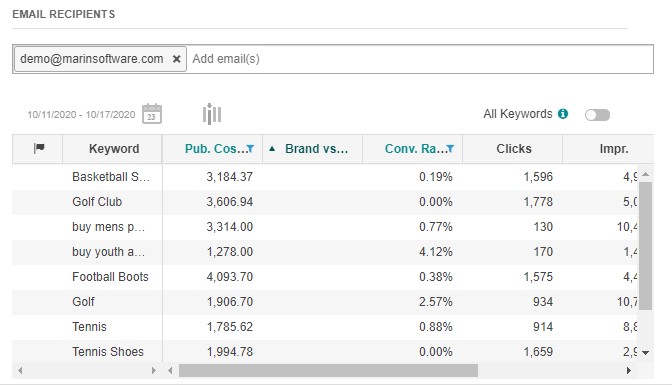
The Marin platforms have been built to offer complete control over your data at all times, including a variety of different reporting options.
We recommend using the Table of Contents at right to skip around between the sections that are most relevant to your workflow.
Note: Reports created in Marin Search won't automatically be carried over to MarinOne and vice versa.
Types Of Reports
There are two main types of reports available in both MarinOne.
- One-Time Reports
- Scheduled Reports (sometimes referred to as Recurring Reports)
We'll walk through both of these in this article.
Creating One-Time Reports
- Prior to creating your report, we recommend getting the grid set up to your liking by adjusting your date range, adding or removing columns, and applying any filters that may be needed.
- When adjusting your date range, keep in mind that the calendar selector has several customizable date range selections that will carry over into your reporting, including:
- Setting a date range into the future. This is beneficial for recurring reports, especially web queries, so that your new report will simply fill in with additional data each time it runs.
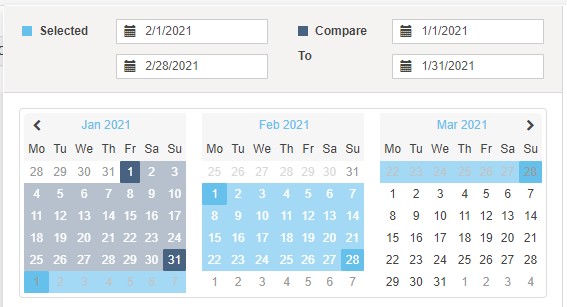
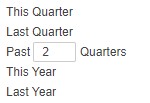
- Last N Days, Weeks, or Quarters allows you to customize your date range to suit your needs. If included in a report, this will always be a rolling number. So, if your report runs daily, it will always run with the last 7 days, 2 months, etc. based on your needs.
- Quarterly and yearly pre-sets, available from the available choices on the right-hand side of the calendar selector.
- Setting a date range into the future. This is beneficial for recurring reports, especially web queries, so that your new report will simply fill in with additional data each time it runs.
- Click on the Export button, located in the top-right corner of the grid.
- In the Type section, choose between a CSV or Web Query report.
- In the Run in section, use the Client Name radio button to individually select the client accounts where your report will run. By default, it will run in the client account you're currently using, but you can select different client accounts from the drop-down.
To add additional client accounts, simply select them from the drop-down. No need to hold Control or Shift on your keyboard. You can even use the Search functionality to find additional client accounts from the list. At the top of the list, highlighted in blue, you will see the client accounts that have already been added.
To learn more about multi-client reporting, check out our dedicated article. - You can also use the Client Tag radio button to run your report based on Client Tags. Simply select the radio button, then choose your tags from the list.
Just like with client accounts, you can add additional Client Tags to your report by simply selecting them from the drop-down. No need to hold Control or Shift on your keyboard. You can use the Search functionality to find additional Client Tags from the list. At the top of the list, highlighted in blue, you will see the Client Tags that have already been added.
To learn more about using Client Tags, check out our dedicated article.
Note: If you have created a client tag, but not defined its value, it will not appear in the drop-down. Additionally, you must enter the All Clients page from a client account that currently has that tag set. You may not see any custom client tag selections under Reporting if the specific account you are in before entering the All Clients page is blank. - Select the desired accounts from your list to add to your cross-client reporting. Simply click into the drop-down and browse through the list of MarinOne client accounts. Check the box(es) next to all MarinOne client accounts that you'd like to include in your report. You can use the search functionality to narrow down your list.
- Give your report a name. By default, this report will take on the name of the tab where it runs, for example Campaigns or Keywords. We recommend re-naming your report to make it more easily identifiable. For cross-client reports, it can be beneficial to include 'Cross-Client' in the name of the report, as this nomenclature is not automatically added.
- In the Schedule section, determine whether you'd like this to be a One-time report or a Recurring report.
For now, we'll focus on one-time reports. We'll review the available scheduling options in more detail later in this article. - In the Email to text box, you can type in any email recipient you would like your report to be sent to. After you have entered a user's email address, press the Space bar on your keyboard to prompt MarinOne to validate the email address.
Note: Your report will not run until a valid email address has been entered. If a valid email address has been entered, but your report is failing to run, simply click Run Report again to force MarinOne to re-validate the email address(es). - Add a Description (optional). This is a great opportunity to add key details about the report, including date ranges, filters or create a customized message.
Note: Everything that is added in the Description box will be shared with email recipients.
- Once all of your report parameters are set, click Run Report.
- You will see a notification just above the grid letting you know that your report has been created. You can click the link in this notification to be taken directly to your completed reports. We'll talk more about downloading your report later in this article.
Scheduled/Recurring Reports
Creating scheduled reports begins in much the same way as creating one-time reports. We'd recommend familiarizing yourself with that process first, then you can pick up with the scheduling options from there.
- Prior to creating your report, we recommend getting the grid set up to your liking by adjusting your date range, adding or removing columns, and applying any filters that may be needed.
- When adjusting your date range, keep in mind that the calendar selector has several customizable date range selections that will carry over into your reporting, including:
- Setting a date range into the future. This is beneficial for recurring reports, especially web queries, so that your new report will simply fill in with additional data each time it runs.
- Last N Days, Weeks, or Quarters allows you to customize your date range to suit your needs. If included in a report, this will always be a rolling number. So, if your report runs daily, it will always run with the last 7 days, 2 months, etc. based on your needs.
- Quarterly and yearly pre-sets, available from the available choices on the right-hand side of the calendar selector.
- Setting a date range into the future. This is beneficial for recurring reports, especially web queries, so that your new report will simply fill in with additional data each time it runs.
- From the Reports overlay, in the Schedule section, set this to be a Recurring report.
- Broadly speaking, you'll be able to choose between Daily, Weekly, Monthly, and Intraday scheduling. We'll outline more of the specifics in the Scheduling Options section next.
- When your schedule has been set, click Apply to add your schedule to your new report.
- From here, you can complete your report just like you would with a one-time report (see the Creating One-Time Reports section, the In MarinOne sub-section of this article). Be sure to set your report criteria, emailing options, and more. When you're ready, click Run Report to save your new scheduled report.
Scheduling Options
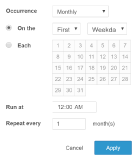
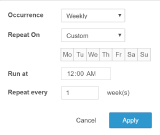
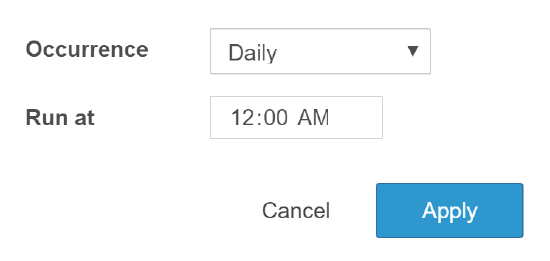
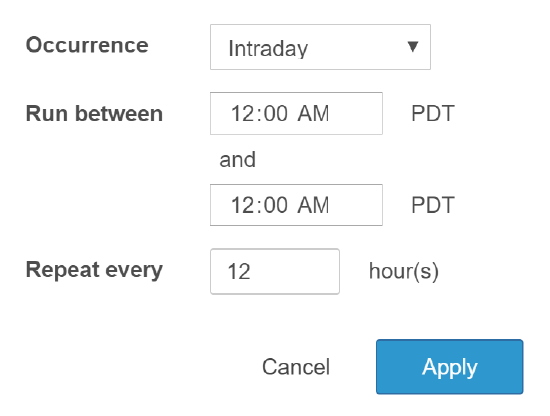
There are four main Recurring report options available in MarinOne: Monthly, Weekly, Daily, and Intraday. We have outlined the menu options below along with some important information about each
Monthly Reports ![]() |
Weekly Reports ![]() |
Daily Reports ![]() |
Intraday Reports ![]() |
|
|
|
|
Editing Scheduled Reports
Once your scheduled report has been created, you can follow these instructions to edit your report template.
- Navigate to the Reports section of MarinOne on bottom left-hand side of the screen.
- Click Scheduled to see all reports that are currently scheduled to run. This is where you'll find all reports that have been set to run on a specific cadence -- monthly, weekly, daily, or intraday.
- Double-click on a report name to open the Side Panel, where you'll be able to edit the report criteria.
In the top section of the Side Panel, you'll be able to update the name, email recipients, and report frequency.In the bottom section, you'll see a report preview grid where you can change date ranges, add or remove columns, and add sorting or filters.
- The Created By and Channel fields of your scheduled report are static and cannot be edited.
Status cannot be edited in the side-panel, but it can be edited in the grid using the Resume, Pause, and Delete icons above the grid. - To edit a field, simply hover over the field you wish to edit, click the Edit button ('pencil' icon), and make your desired changes. Click Save or Apply to add your changes to the scheduled report (this option varies based on the specific field you've chosen to edit).
- Click Save to apply your changes or Cancel to discard your changes.
Note: Your edited reports will now be available via the FTP server as usual. - Once your scheduled report has been updated, you can run your edited report by selecting the check-box next to the desired report and clicking the Run Now button above the grid.
Downloading Your Reports
- To review and download your reports, navigate to the Reports tab, located in the bottom left-hand corner.
- By default, you'll land on the Completed tab. You can also navigate to the Scheduled tab to take a look at your recurring reports or the Dashboards tab to configure your Dashboards.
Before we navigate away, however, let's take a closer look at what's available from the Completed tab. Here, you'll see two sub-tabs: MarinOne and Marin Search. Both of these tabs serve the same purpose -- to show you all of your completed reports. The MarinOne sub-tab shows you all reports that have run locally in MarinOne, while the Marin Search sub-tab offers a convenient location for you to download reports that were run in Marin Search, without the need to to go back and forth between the two platforms. - From both of these sub-tabs, you can browse through the list in order to find your recent report. These are sorted with the most recent reports on top, but you can also apply filters in order to identify a specific report.
- Download the latest report by clicking on the File icon.
- In place of the green File icon, you might instead see a blue icon, which indicates a web query report. You can learn more about web queries in our dedicated article.
- For cross-client reports, we recommend deleting your report once it has been downloaded, as it may contain sensitive cross-client data. To do so, simply check the box next to your report and click on the Delete button ('trash can' icon).
To learn more about how data is used in cross-client reports, check out the Important Notes section below.
Cross-Channel Unified Reports
In MarinOne, you can see your Search, Social, and eCommerce reporting grids by navigating to the Home ('M') tab and clicking into the Publishers or Campaigns sub-tabs. From here, you can create cross-channel reports from the Reports button, as well as Dashboards, Saved Views, charts, and so much more.
Web Queries
Using a Web Query, with a few simple steps, you can easily import your report data into a spreadsheet editor like Microsoft Excel, then use that spreadsheet as a source of live data. This way, there's no need to drop in and out of the Marin platform, but you still benefit from the in-depth metrics only available from Marin platform.
To learn more about creating web queries from either MarinOne or Marin Search, check out our dedicated article.
Organizing Data By DOC Or DOCL
There may be occasions when you would like to organize the data in one of your reports by Date of Conversion (DOC) rather than Date of Click (DOCL), or vice-versa.
MarinOne
- Navigate to the tab from which you’d like to create your report (e.g. Keywords).
- Click on the Calendar Range button.
- At the bottom of the calendar overlay, you'll a Show By: option where you can select between Date Of Click or Date of Conversion.
- Once you've selected DOC or DOCL, you can run your report like normal.
Important Notes
- Additional reporting features, such as multi-component reports and PDF reports, will be coming in a future release.
- You can run a scheduled report ad hoc by clicking the Run Now button. This can be found by going to Reports, clicking on the Scheduled sub-tab, and selecting Run Now above the grid.
- Recurring, scheduled reports need at least one hour to begin processing. Reports created for the same hour will begin processing the next day. For example, if it's 10:30 a.m. and you schedule a report to run daily at:
- 11:00am, it will not start processing until the next day.
- 11:30am, it will start processing the same day.
- Please be aware that reporting times are based on when a report will begin processing. For larger reports, it's possible the reporting time may take a few minutes, so please be patient.
- The time of day used for your reports will be based on the time zone of your MarinOne Client Account, which may or may not be the same as the time zone where you are physically located.
- Please note that all users who have access to a given MarinOne Client Account will have access to the associated reporting for that client. This is especially important to note for cross-client reporting, as running a cross-client report within a given MarinOne Client Account will mean all users within that client account have access to that report, including its associated cross-client data. For this reason, we recommend that any cross-client report containing data that shouldn't be shared be deleted after download.
- Cross-client reporting is available from the Publishers, Campaigns, Groups, Keywords, Ads, Shopping, and History tabs. Support for cross-client reporting from additional tabs will be coming in a later release.
- Cross-client reports show the currency for each MarinOne Client Account. No currency conversion will take place at the current time. For example, if Account A is in USD and Account B is in EUR, the cross-client report will show each in their respective currencies (Account A in USD and Account B in EUR).
- Cross-client reports do not include Totals rows at the current time. To include totals, we recommend adding the appropriate formulas in Excel or the spreadsheet tool of your choice.
- To see 'All Clients' reports, navigate to the Clients Tab, then click on Reports.