Introduction
URL parameters can help you understand the effectiveness of your ads. For example, you can identify where your traffic is coming from (which ad) or which Facebook audience is driving conversions.
Dynamic Tags allow you to automate your tracking by using macros to populate your parameters based on ad id, audience name, and placements just to name a few. Marin supports both Facebook Dynamic Tags, as well as Marin’s own dynamic macros.
Note that in this article, we only refer to URL Tags applied in “Extra URL Tags” field on Marin and “URL Parameters” field on Facebook (not the tags applied directly in the “URL” or “Website URL” fields.).
Examples
To properly visualize the concept, below we'll provide an example of exactly what Dynamic Tags look like when included in one of your URLs.
Here is the URL of your landing page:
http://www.marinsoftware.fr/
And here's the same URL with a Dynamic Tag in place:
http://www.marinsoftware?utm_source=[audiencename]
In this case, when the ad will be synchronized to the publisher, our platform will populate the parameter with the name of the Saved Audience used to create the ad set in Marin. If a Marin Saved Audience was not used to create the ad set, nothing will be populated.
Where To Add Dynamic Tags
There are a couple of different places that you can add Dynamic Tags, dependding on exactly what you’re aiming to achieve.
Below we'll explain how and where you can add Dynamic Tags to your URLs within the platform:
Apply Tags At The Media Plan Level
Setting URL Tags at the Media Plan level will allow you to fully automate the work around URL building.
When you set URL tags at the Media Plan level, they will be used as a template and pre-filled in the Bulk creator at the ad level. They can also be applied to imported ads via the Mass Editor button's Apply Media Plan URL Tags option. This can save time so you don’t have to manually input your Dynamic URL tags every single time you create or import ads. Once your URL tags have been pre-filled, they can still be removed or edited at the ad level.
Step By Step In Marin
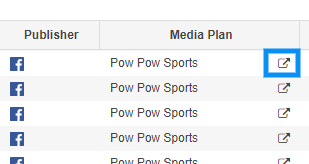
- To apply URL tags at the Media Plan level, you'll first need to navigate to the desired Media Plan Parameters.
From Marin, click on the Settings icon in the Media Plan column of your grid.
Step By Step In Marin Social
- From Marin Social, enter a Media Plan by selecting it in the third drop-down list at the top-left of your dashboard. Click on the Parameters icon from the right-hand menu.

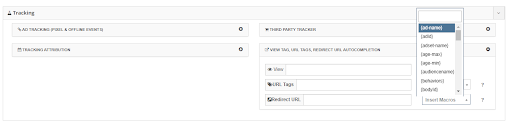
- Next, scroll down to the Tracking section, open the accordion by clicking on the down arrow.
- Click on the VIEW TAG, URL TAGS, REDIRECT URL AUTOCOMPLETION section.
- Input URL Parameters in the field called URL Tags. If you wish to use Dynamic Tags, use the list on the right to choose from among our supported Dynamic Macros. You can use multiple tags by separating each one with a hyphen.
Apply Media Plan Template On Imported Ads
When a campaign, ad set or ad has been imported via any of the Auto Import, the Manual Import, or the Download from Publisher options, the URL tags setting applied on the Facebook Ad Manager in the “URL Parameters“ field will also be imported and appear in the Final URL Tags field in the Mass Editor.
Step By Step
In order to apply imported ads to the URL Tags set up in the Media Plan Parameters, follow these steps:
- Navigate to the Media Plan where the campaigns, ad sets, or ads were imported by selecting it in the third drop-down list at the top-left of your dashboard.
- Select the campaign check-box and click on the Mass Editor button above the grid.
- Within the Mass Editor and the Creative tab, select the check-box for the ads to which you would like to apply the URL Tags.
- Click the Apply Media Plans URL Tags button.
- Then, you'll need to synchronize.
Apply URL Tags At The Ad Level
Applying Dynamic URL tags at ad level, by comparison, allows you more granularity, but does not offer the time-saving strategies offered with applying them at the media plan level.
Step By Step
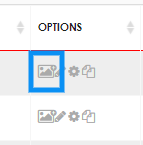
- Once you’ve entered a media plan as mentioned above, access the Bulk Creator by clicking on the Add Ad button from the Option column:
Fill up the Initialization and the Media section as explained in this article. - Scroll to the section called Ads. From here, use the Extra URL Parameters field to enter your tags.
 This field will be pre-populated if you have set up some URL Tags in the Media Plan Parameters. If you edit them here, it will only impact the specific ads you are in the process of creating, it will not impact the template set at the media plan level.
Adding Or Editing URL Tags In An Existing Campaign
- Select the specific campaign(s) where you’d like to apply URL tags or navigate to the ad set or the ad level and select the check-box next to the specific ads where you’d like to apply tags.
- Click on the Mass Editor button.
- Find the column URL Tags Template, then click into the corresponding cell for this column/ad.
- In the Change URL Tags Template overlay, enter your new tags.
- Click Ad.
- Sync the objects to the publisher
Mass Editor Fields: Difference Between The URL Tags Template And The Final URL Tags
URL Tags Template reflects the Media Plan settings. You can edit this field in Mass Editor on ad level for more granular control. Editing this field does not impact the settings applied in the Media Plan settings.
The Final URL Tags column shows the parameters applied on the Facebook side and how they look like in the Final URL that will be served to users. If you are using Facebook Dynamic Macros this field will not show how these parameters are populated, as Facebook populates them on impression.
Applying Publisher Macros
Facebook’s dynamic macros can be used as part of the Media Plan URL Tags Template or at ad level from the Bulk Creator and the Mass Editor.
The list of available macros can be found here.
Note that Facebook macro are using curly brackets while Marin’s ones are using single curly brackets { } or square brackets [ ]
Available Dynamic Tags
Below is a current list of Dynamic Tags that are available for tracking via your URLs in Marin Social:
- {ad-name}: The ad name as it is displayed in Marin Social
- {adId}: A unique ID generated by Marin with a mix of 24 numbers and letters
- {adset-name}: The ad set name as it is displayed in Marin Social
- {age-max}
- {age-min}
- {audiencename}: the name of the Saved Audience created in Marin Social
- {behaviors}: List of the behavior selected from the Demographic Targeting Section
- {bodyId}: A unique ID Marin generate for each message
- {campaign-name}: The campaign name as it is displayed in Marin Social
- {campaign-objective}
- {country}
- {creationdate}
- {creativeId}: A unique ID generated by Marin for each combination of elements making up an ad (Title, Message, Image/Video, URL, Tags, CTA, etc.)
- {device}
- {excludedcustomaudience}: List of Custom Audience selected in the exclusion targeting at ad set level (limit of up to 50 characters)
- [fbadsetid]: The unique ID Facebook generates for an ad set
- [fbcampaignid]: The unique ID Facebook generates for a campaign
- {format}: the Marin ad type you selected in the Bulk Creator
- {gender}
- {imageId}: A unique image ID generated by Marin
- {includedcustomaudience} List of Custom Audience selected in the Inclusion targeting at the ad set level (up to 50 characters)
- {interest}: List of Interest Targeting selected from the Demographics section at the ad set level
- {interest-cluster}: List of Marin’s Interest Clusters selected in the Demographic section at ad set level
- {ioNumber}: Content of the io Number field in the Media Plan parameters
- {language}
- [location]: Location selected in the targeting section at ad set level
- {location-cluster}: List of Marin’s Location Clusters selected in the Demographic section at ad set level
- [marinadid]: A short unique ID generated by Marin. This is the ID that is shown in the grid under ID or Marin ID.
- {office} Content of the Office field in the Media Plan parameters
- {os}: Operation system selected in the targeting section at ad set level
- {page-name}
- {picture}: Name of the picture selected from the Marin Media Library/Asset Manager.
- {placement}
- {post-type}
- {postId}: Unique ID generated by Facebook for each post
- [publisher]: Facebook or Twitter
- {title}
- {titleId}: Unique ID generated by Marin for each title
- {town}: town selected in the Targeting section at ad set level
Important Notes
- The Media Plan URL Template and the Final URL Tags columns in the Mass Editor are a Beta feature. We anticipate this will be available for all customers in the near future.
- It is not possible to edit unsupported objects via the Mass Editor. For these items, all editing should be done on the publisher side.
- For the Bulk Page Post ad type, The Tracking checkbox allows Marin to add automatically in the url tags &pub_id=[adHbaseId] at the end of the URL
- For the Page Post Ads type,when selecting the Activate Social Tracking checkbox in the Ads section of the Bulk Creator, Marin will automatically add at the end of the url the parameter pub_id=[adId]
- The “Marin” checkbox in the Tracking section of Media Plan Parameters must be selected to enable the Marin Tracker and integrations via the Channel Connect.
- Dynamic Macros are not refreshed automatically. For Marin Dynamic Macros (macros using [] or {}), you have to reapply via the Mass Editor if a change in the naming convention has taken place. Facebook Dynamic Macros (those using ) cannot be refreshed, neither from the Marin app nor from Facebook Ads Manager. For more information, take a look at Facebook's help article.
