In mid-2016, Yahoo! Japan introduced Advanced URLs: a similar initiative to Google's Advanced URLs. The benefits for Yahoo! Japan advertisers are similar, allowing your campaigns to scale across large accounts and reduce or remove delays caused by editorial reviews. In this article, we'll walk you through the Yahoo! Japan Advanced URLs migration step-by-step.
If you've not yet discussed this with your platform representative, we'd recommend you'd do so. If you're ready to begin your self-migration, you can get started with step one below.
An Important Note About URL Characters
Note that all Landing Pages, Tracking Templates, and Custom Parameters used in Yahoo! Japan Advanced URLs must be RFC3986 compatible. This means that you cannot use certain special characters in these fields, even though Google does allow these in its URLs. Examples include pipes | and exclamation marks !
With the above in mind, we recommend that you use hyphens - or underscores _ as delimiters in your URLs.
An Important Note About Redirects
With Advanced URLs, Yahoo! Japan will no longer allow third-party redirects in Landing Pages. Therefore, if you are using third-party redirect URLs, you will now need to place redirects into a Tracking Template. If you're using obfuscated redirects, please work with Yahoo! Japan directly to migrate your objects.
The Landing Page may contain internal redirects (i.e. the redirect points to another URL within the same domain). For example, let’s say the advertiser is www.powpowsports.com. Example 2 below will become invalid because trackingredirect.com and powpowsports.com are different domains.
1. Allowed Landing Page (domains are the same, sub-domains can be different):
Landing Page: http://redirect.powpowsports.com?mkwid=a1b2c3d4&device={device}
2. Invalid Landing Page (domains are different):
Landing Page: http://www.trackingredirect.com?mkwid=a1b2c3d4&device={device}
Step-By-Step
1. Prepare For Migration
You should plan to avoid making changes (such as editing, creating, or deleting) to your Yahoo! Japan objects directly on the publisher's side, or using publisher tools, for the duration of your migration. Working in multiple platforms increases the risk of data loss during the migration. We recommend that you perform a hard sync within the platform at the beginning of the migration process to ensure all objects are in sync between the platform and Yahoo! Japan.
To perform a hard sync, just follow these steps:
- First, navigate to the Accounts > Channels tab, then click on Manage Accounts or the + ('plus')button above the grid.
- Next, select the relevant Yahoo! Japan publisher account.
- Click Manage Account Settings.
- Scroll to the bottom and select all campaigns within the given account to sync, then click Synchronize.
Note that the syncing process runs a little longer for accounts with a large number of groups. We recommend starting the hard sync at the end of a work day, or the end of the week for larger accounts. The entire migration process should take around a week for most clients start-to-finish, though this is largely dependent on account size.
2. Check Your Google Advanced URL Tracking Template Level
If you are already using Google Advanced URLs, we recommend checking your current URL Builder configuration to confirm the level where you place the account Tracking Template, as well as the custom parameters. You will most likely want the same or a similar setup for Advanced URLs too.
To do this, go to to Settings in the top left navigation bar, and select Settings > Revenue & Tracking > URL Templates and click Google. To determine Tracking Template level, click the dropdown at the top of the URL Builder and identify the lowest level Tracking Template (i.e. campaign will override the account-level Tracking Template). Please note, if using a Tracking Template that's lower than the account level, the account-level Tracking Template may still exist and be blank; this is expected behavior.
If you are copying your Google URL Builder settings to your Yahoo! Japan URL Builder, please refer to the following table which list the Google parameters that are also supported by Yahoo! Japan, and those that will need to be removed or replaced by another value.
| Macro / Parameter | Course of action |
| {campaignid} | [ext_campaign_id] |
| {adgroupid} | [ext_group_id] |
| [distribution] | Remove (Not supported by Yahoo! Japan) |
| {ifsearch:s}{ifcontent:c} | Remove (Not supported by Yahoo! Japan) |
| {_slid} | Remove (Not supported in the platform) |
| {network} | Remove (Google Only) |
| {adposition} | Remove (Google Only) |
| {product_id} | Remove (Google Only) |
3. Assess URL Structure And Identify Custom Parameters Needed
Review each tracking parameter in the Destination URL to ensure it can work successfully within your new Tracking Template.
Any parameter that is not referencing a Yahoo! Japan ValueTrack parameter, such as mkwid, will need to be replaced by a new Custom Parameter. Custom Parameters can be defined at a given level (except for account), so they do not need to be hard-coded IDs.
Example
http://www.example.com?mkwid=12345&pkw={keyword}&pmt={matchtype}&pdv={device}
- mkwid: This value represents a unique ID for each object. Replace ‘mkwid=12345’ with a Custom Parameter, i.e. {_mkwid} Important: The system will know to re-pull and apply your existing unique ID
- pkw: This value represents the publisher keyword that Yahoo! Japan will dynamically resolve at the time of click. No Custom Parameter is required.
- pmt: This value represents the publisher match type that Yahoo! Japan will dynamically resolve at the time of click. No Custom Parameter is required.
- pdv: This value represents the publisher device value that Yahoo! Japan will dynamically resolve at the time of click. No Customer Parameter is required.
After following the rest of this Self-migration guide, your Final URL structure should look like this basic example:
http://{lpurl}?mkwid={_mkwid}&pkw={keyword}&pmt={matchtype}&pdv={device}
And the served URL on Yahoo! Japan will look like this:
http://www.example.com?mkwid=12345&pkw=shoes&pmt=e&pdv=m
4. Create Bulk Sheets For Objects To Upgrade
The next step is to generate a Yahoo! Japan bulk sheet report for objects that require URL migrations, such as keywords, creatives, and quicklinks. You can do this by creating a report as usual via the platform.
If you're defining any Custom Parameters at the campaign or group level, be sure to create campaign or group bulksheets.
Important note: You must upload your Landing Page with a question mark (?) at the very end of the URL. If you do not do this, the URL may not resolve correctly, or the upload may result in an error.
5. Enable New URL Builder
Note: If you are using Marin Professional, this step may not be required.
Please reach out to Customer Support to enable the Upgraded URL Builder.
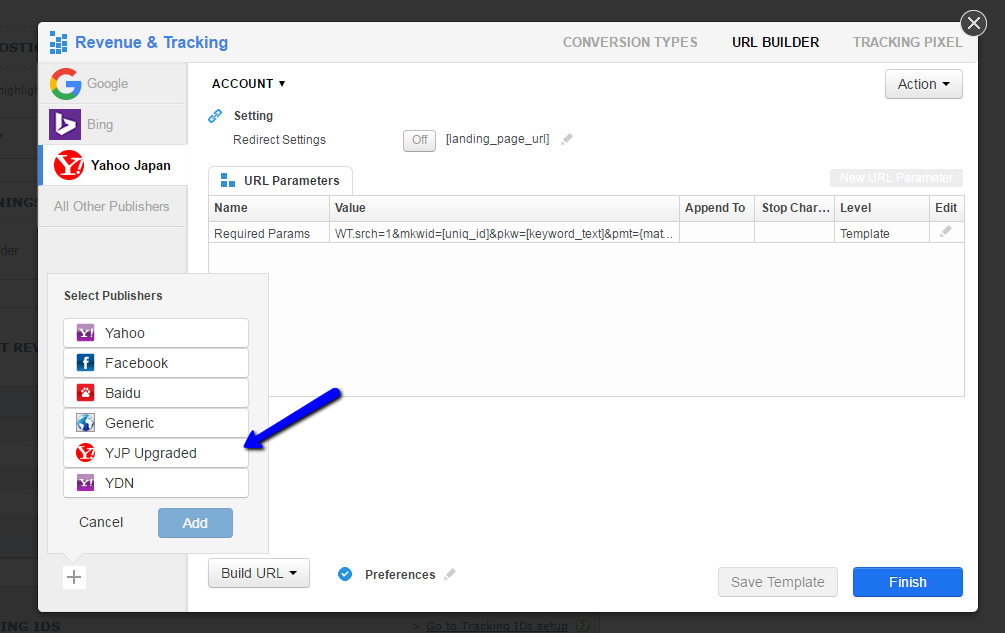
Once ready for use, you'll need to open the URL Builder, then click the + ('plus') button in the lower-left corner and select YJP Advanced.
6. Upgraded URL Builder Review
Familiarize yourself with the new URL Builder in the article below, then continue to follow the steps below to set up your structure.
For more information about the Upgraded URL Builder, please read our dedicated help center article.
7. URL Builder: Tracking Template Setup
Add your Tracking Template structure, including all custom parameters and ValueTrack parameters.
Note that there may be exceptions to this if you have full URL templates that need to live at a lower level in the hierarchy. Just be aware that any templates created at lower levels, such as campaign or keyword will override everything set at the Account template level.
If not using redirects, set the Redirect Level to off.
Example
Redirect Level: Off
Landing Page: {lpurl}&mkwid={_mkwid}&pkw={keyword}&pmt={matchtype}&pdv={device}
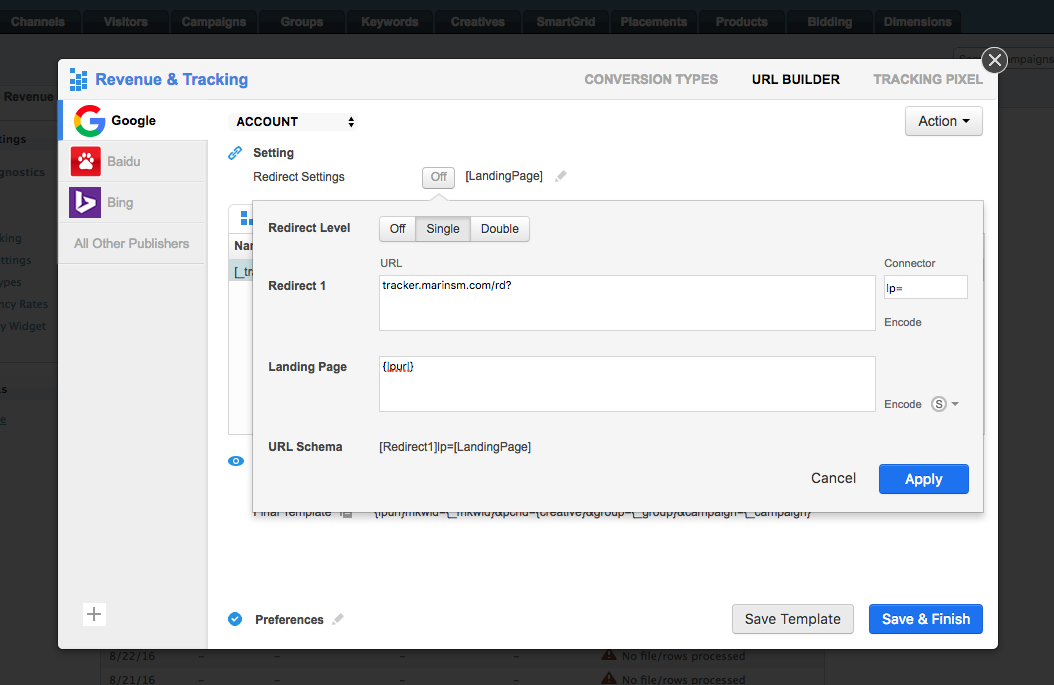
For Redirects, you would set the Redirect Level to single or double and add the redirect snippet into the field and select the level of encoding you would like for the {lpurl} or Landing Page URL.
Examples of Custom Parameters that may need to be replaced in the tracking parameter block are things like {_campaign}, {_group}, {_keyword}, {_dimensionname}. Although these parameters live at other levels, they will need to be referenced at the Account Tracking Template level.
Note: Custom Parameter names must only contain lowercase letters and numbers (i.e. {_mkwid} or {_group} and not {_Mkwid} or {_Group_Name}) to comply with Yahoo! Japan requirements and avoid issues. Custom Parameter value must not exceed 200 characters.
8. URL Builder: Custom Parameter Setup
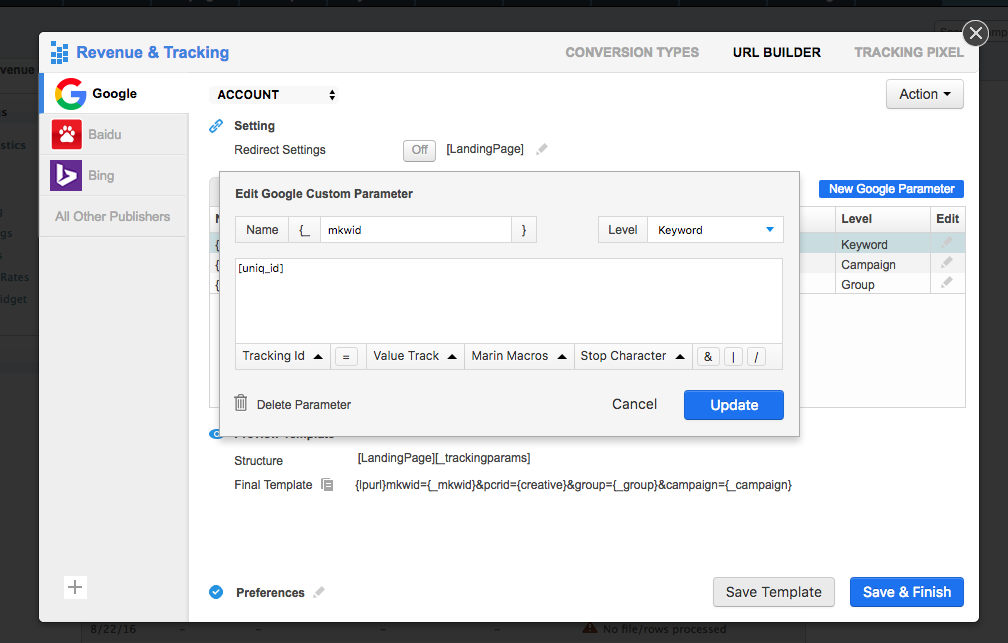
Create the Custom Parameters that you have now referenced in Tracking Template. To create, you will also click on the blue +New button.
Example:
Custom Parameter
Name: {_mkwid}
Level: Keyword
Value (box): [uniq_id]
Notice the value for Custom Parameters is in hard brackets, while the Custom Parameter name is denoted by curly bracket underscore.
Now when the Tracking Template references the {_mkwid}, it knows to grab the unique ID at the Keyword level.
If you want unique IDs for creative objects, you would create additional {_mkwid}=[uniq_id] Custom Parameters and adjust the Level to creative.
Note: The {_slid} custom parameter used for Google is not supported for Yahoo! Japan.
9. Review Your Creative URLs And Post To Publisher
Important:Per Yahoo! Japan’s recommended upgrade method, we strongly advise you migrate your creatives to Advanced URLs before migrating your Keywords and Quicklinks.
How To Re-Create Creatives In The platform
- Reach out to your Yahoo! Japan rep to let them know when you are migrating.
- Create two dimensions to help keep track of old and new creatives. i.e. [yjp_old] [yjp_new_date]
- Tag the [yjp_old] dimension with a value such as 'old' for all creatives you plan to re-create for Advanced URLs.
- Create a bulksheet of all Yahoo! Japan ads: Include all settings used including bid price, etc.
- In the bulksheet, delete the Creative ID column and add a [yjp_new_date] column and populate with today's date.
- Upload your creatives bulksheet to the platform. Your creatives will enter the editorial process. Please confirm with your Yahoo! Japan representative on how long this process will take during the migration.
- Confirm the creatives have completed the editorial process via the publisher's UI.
- Hard sync the active and upgraded creatives into the Marin platform.
- Identify old ads using the dimension value [yjp_old], then delete them.
Important note: When building URLs for keywords and creatives, the Destination / Preview URL will not appear in the grid or keyword settings pages, however, the Tracking ID will still get parsed. Because the creative settings page doesn't display the parsed Tracking ID, there's no way to visually confirm for creatives at the moment. We plan to resolve this in a future update. That said, you can generate the Preview URL yourself either by carrying out a hard sync (also known as manual sync), or by building your URLs then cancelling the job.
10. Review Your Keyword And Quicklinks URLs And Post To Publisher
- Verify that the Landing Page column contains the URL that was originally the Destination URL without tracking.
- Check to see that Custom Parameters have been defined properly (keywords tab, campaigns tab, etc.) in the Custom Parameters column.
- The Destination URL is essentially a 'Preview URL' of all URL parts assembled. Click on a handful of URLs in the Destination URL column to ensure landing pages resolve correctly.
After confirming your updates are accurate, please post your URL changes to Yahoo! Japan by navigating to the Activity Log within the Settings section of the platform, selecting the operation with the checkboxes in the grid, and submitting the Post Now button.
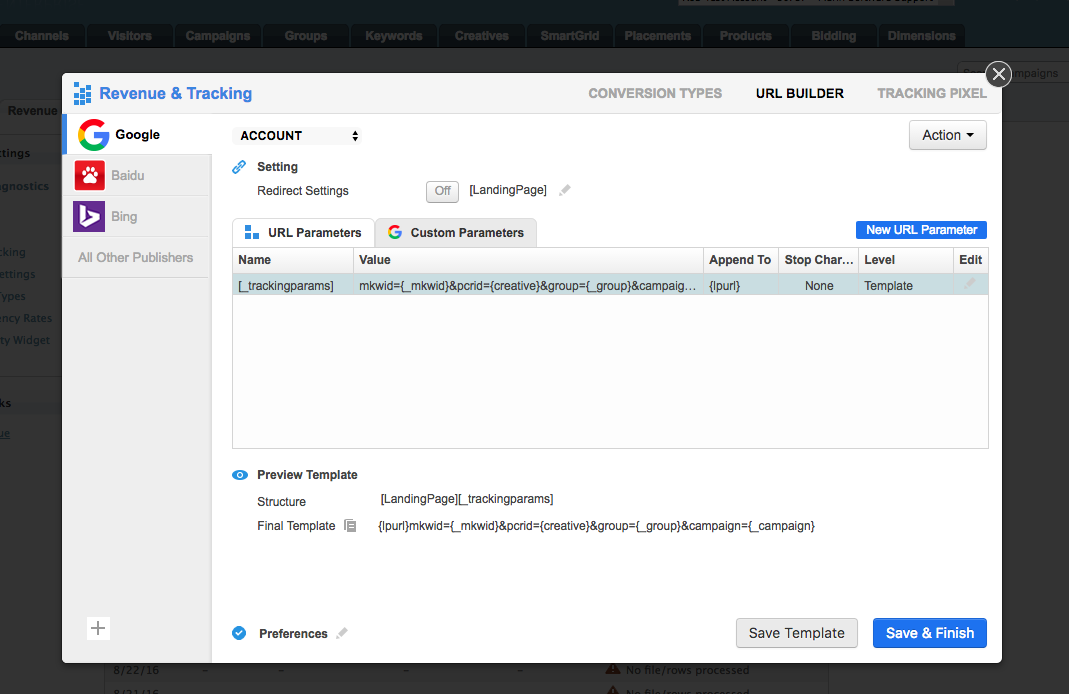
11. Final Template Review
Review the Preview Template section at the bottom of your URL Builder to ensure the Final Template looks as expected and includes all of the Custom Parameters needed in your URLs
Example (Non-redirects)
Example (Redirects)
12. Additional Template Review Steps
It's important to note that saving the URL Builder does not apply the Account Tracking Template to your linked Yahoo! Japan accounts. To apply the saved URL Builder settings to your Yahoo! Japan publisher accounts, you will need to follow the instructions below.
Click on the Accounts > Publishers tab and select the check boxes next to any Yahoo! Japan publisher accounts where you wish to apply your Account Level Tracking Template. From there, click on the Edit button and select URL Settings from the menu on the left. Here you will need to paste the Tracking Template Value into the text box.
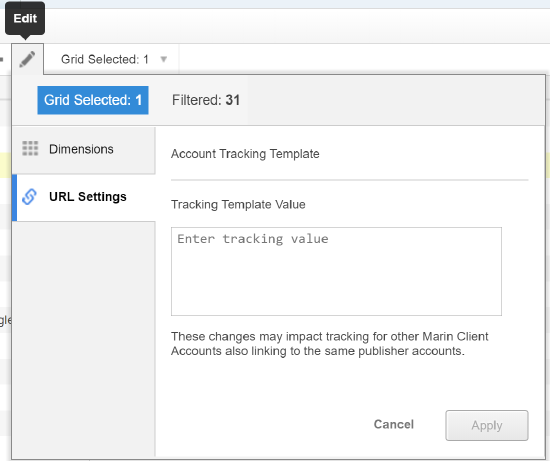
You can then go ahead and hit Save.
Once you Save, check the Activity Log, find and select the corresponding activity and post the Tracking Template to Yahoo! Japan.
13. Confirm Your Migration With Our Support Team
After configuring the URL Builder and posting your final changes to Yahoo! Japan, please reach out to our Customer Support team to inform them that your account is fully migrated to Advanced URLs. This will allow Customer Support to hide the legacy URL Builder and ensure that only Advanced URL fields are used moving forward.
13. Sit Back And Relax
That's it, you're all done!
Now that these steps are completed your Yahoo! Japan Sponsored Search accounts will be upgraded to the new Yahoo! Japan Advanced URLs format. If you have any questions about the process above, or anything else to do with the Advanced URLs migration, please contact your platform representative.
