MarinOne's Audience Hub allows you to easily build audiences based on your own customer data -- email addresses, telephone numbers, physical addresses, and more.
Use the Audience Hub to build audiences from your own customer data, including both Google Customer Match Audiences and Facebook Custom Audiences. You can then create, maintain, and manage your audiences across Search and Social from a single location.
If you're currently collecting data in a Customer Relationship Management (CRM) tool, you can feed this data into an audience in order to use differentiated messaging and bidding for different types of customers and prospects.
Note: The Audience Hub feature is currently offered as an FTP-only solution without a dedicated user interface. We plan to add a user interface at a later date, so please stay tuned for updates.
Handy Tip
If you would like to learn more about using this feature for your MarinOne Client Account, please reach out to your platform representative.
Use Cases
Wondering how you might take advantage of the Audience Hub? Check out the scenarios below for inspiration.
- An advertiser that has email-based logins may choose to exclude their current users from seeing ads on expensive brand terms for a service they already use.
- A B2B company that classifies customers as paid users or unpaid users may choose to target their unpaid prospects and increase bids in an effort to get them to convert to a paying membership.
- A company that has a list of buyers who regularly purchase one type of product (for example: baby clothes) may choose to cross-sell or upsell customers with related products or accessories (such as baby toys).
Benefits
There are a number of benefits to using Google Customer Match Audiences and Facebook Custom Audiences, but among the most significant are the following:
- Increased Click Through Rate
- Decreased CPA
- Improved ROAS
Supported Publishers
The Audience Hub currently supports Google and Facebook.
The Audience Hub allows you to create Google Customer Match Audiences.
Google Customer Match Audiences are supported on the following ad types:
- Search
- Shopping
- YouTube
- Gmail
Google does not currently support Customer Match Audiences on:
- Display
Using Google Customer Match Audiences, you can:
- Create custom segments
- Re-market to existing customers
- Cross-sell or Upsell
- Expand acquisition efforts
- Target Broad match keywords or general keywords related to your business
The Audience Hub allows you to create Facebook Custom Audiences. There are ten different types of Facebook Custom Audiences that can be managed in Marin Social.
To learn more about Facebook Custom Audiences, check out our dedicated article.
Getting Started
If you're interested in using the Audience Hub in MarinOne, please reach out to a platform representative to learn more.
How To Create CRM-Based Audiences
Creating CRM-based Audiences in MarinOne requires three basic steps.
- Create your customer list file in the required file format.
- Hash your customer list file using Marin's easy-to-use hashing tool.
- Upload your file to Marin's secure FTP location. If you've ever used Marin's FTP to bulk upload other objects, this is a similar process.
We'll go into each of these steps in more detail in the following sections.
Creating Your Customer List File
Use the information below to learn about file formats, naming conventions, accepted column headers, and more.
File Name Requirements
The file name must be in the following format:
- <FileName>.CSV
<FileName> can be replaced with whatever name you'd like for the file that is being uploaded. It should not contain spaces or special characters. The only language currently supported is English, though we do plan to support additional languages in the future.
Using the file format of <FileName>.CSV, if a marketer wanted to use the filename "Top100customers," the format would become either Top100customers.CSV or Top100customers.csv.
File Format
When uploading your file, keep the following in mind:
- The file should be in .CSV format only.
- It should be uploaded via FTP in Hashed format only. We'll go into more details on what this means in the next section.
- Different user records must be separated by either a line break or the standard unix character \n
- Data is case insensitive
- Data must be entered in English only. We plan to support additional languages in the future.
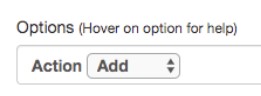
Operation
From the Hashing tool, use the drop-down to select the operation you'd like to use for your upload. This will perform the following operations:
- Add is used to add new users
- Remove is used to remove existing users
- Replace is used to replace an existing set of users
Only one of the above operations -- Add, Remove, Replace -- can be performed in a given upload.
If no operation value is provided, the default operation will be Add. The operation selected will be appended to the file name once the file has been downloaded from the hashing tool. So, the file name of Top100customers.CSV will become Add_Top100customers.CSV. We'll learn more about other details that will be appended to your file name in the Hashing section of this article.
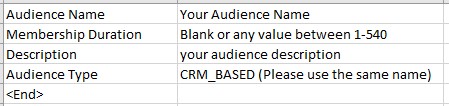
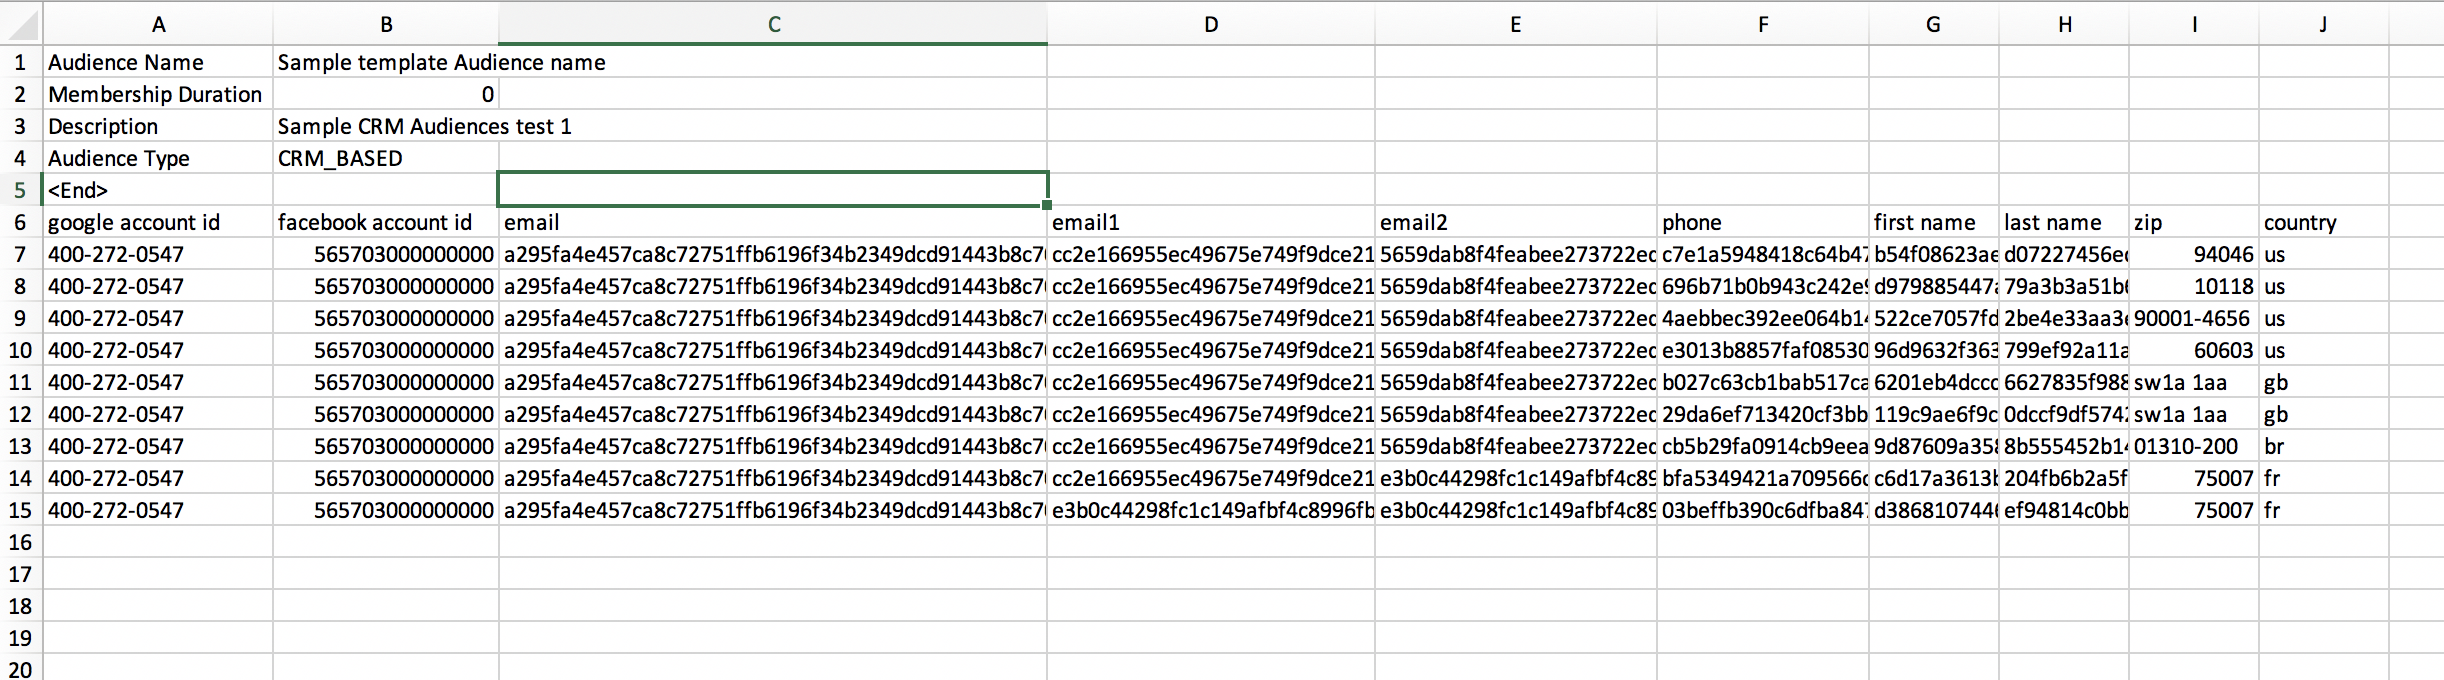
Audience Metadata
The first few rows of your file will contain the Audience Metadata. This can include:
- Audience name (required) - This supports only A - Z, a - z, 0 - 9, underscore, and spaces in English only. Special characters are not supported.
- Description (optional) - This field cannot be split across different cells.
- Membership duration (Google only) (optional) - This controls how long your customers will be kept in a CRM audience, displayed in days. Once membership duration expires, users will be dropped from the audience. Values 1 - 540 are supported.
Note: Though this field is technically optional, if left blank, Google will assign the default value of 10,000 days. - Audience type (required) - Please follow this exact format: CRM_Based
At the end of your Audience Metadata, you will need to include an <END> tag to let Marin know when it has finished processing the metadata and can start processing customer data.
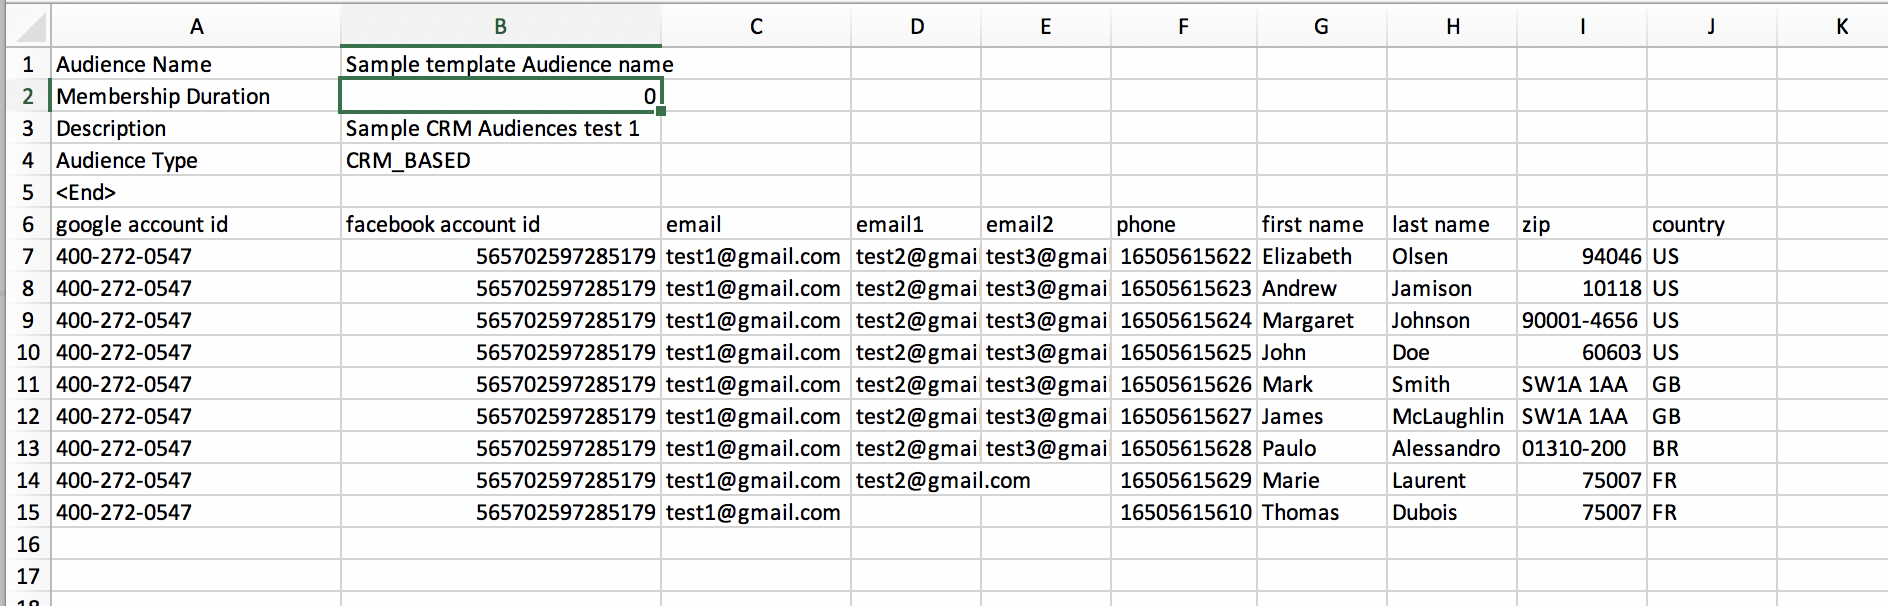
Your Audience Metadata might look something like this:
The row with your column headers should come immediately after the <END> tag, without a blank row in between.
Note: Your Audience Metadata will remain unhashed, even after the rest of the file has gone through the hashing process.
Customer Information
Marin currently supports the following customer information:
- Phone
- First Name
- Last Name
- Country
- Zip Code
The first row of customer information will be made up of your column headers and will remain unhashed, even after the remainder of the file has gone through the hashing process.
The following column combinations are accepted in a file:
- Email only - Up to three Email columns (see accepted column headers in the matrix below), External Account ID, and Publisher. No other columns are required.
- Email, First Name, Last Name, Country, and Zip - If First Name and Last Name are used, then Country and Zip should also be included.
- Email, Phone, First Name, Last Name, Country, and Zip - As with the above, if First Name and Last Name are used, then Country and Zip should also be included.
You can learn more all of the accepted columns and their requirements in the table below. To learn more about the various combinations with which these columns can be used, check out the Valid Column Combinations section of this article.
Please note that after the file has gone through the hashing process, all columns will be displayed. Please leave these added columns in place when uploading your hashed file.
| Column Headers | Required/Optional | Values Hashed (Yes/No) | Description & Notes |
|---|---|---|---|
| Google Account ID | Required (Google only) | No |
Google publisher account(s) to which this Audience list is being uploaded. (ex: 123-408-9076, 234-456-123) If the same audience is uploaded across multiple accounts with the same publisher, provide Account IDs as a comma-separated value. If you have audience names that are not unique but have different External Account IDs, these will need to be edited prior to uploading your file to ensure that the audience name in the metadata of your file is unique and cannot be inadvertently matched to multiple audiences. If an audience name already exists for an account, then the existing audience should be updated with the <operation> provided in the hashing tool. |
| Facebook Account ID | Required (for Facebook Audiences) | No |
Facebook publisher account(s) to which this Audience list is being uploaded. (ex: 1234567890123) If you have audience names that are not unique but have different External Account IDs, these will need to be edited prior to uploading your file to ensure that the audience name in the metadata of your file is unique and cannot be inadvertently matched to multiple audiences. If an audience name already exists for an account, then the existing audience should be updated with the <operation> provided in the hashing tool. |
| Email, Email1, Email2 |
Required One Email column is required, but additional columns are optional. |
Yes |
You can provide up to 3 email columns for a single user. If a user record has more than one email address on file, use separate columns with the headers Email, Email1, and Email2 Include a domain name for all email addresses in order to make certain the publisher can find a suitable match. Note: For Google Customer Match Audiences, only email addresses with the @gmail.com domain will be matched by Google. Other domains can be included in the file upload without causing it to fail, but these will not be matched with known customers. Non-Gmail domain email addresses will not be matched with customers even if a known customer has a Google account using a non-Gmail email address. This is not relevant for Facebook Custom Audiences. |
| Phone | Optional | Yes |
One phone number per record, should include country code. In order to standardize results, convert each phone number to E164 format before hashing. This represents a phone number as a number up to 15 digits in length starting with a '+' ('plus) sign. (e.g. +12125650000, +442070313000) If the phone number is not correctly formatted before hashing, the API will still accept the hashed phone number, but it will not be matched with a customer. |
| First Name | Optional | Yes |
One first name per customer record. This should not include prefixes (e.g. Ms.). Accents are supported. Note: A file cannot be uploaded with only the First Name and Last Name columns. If these columns are used, Country and Zip columns should also be included. |
| Last Name | Optional | Yes |
One last name per customer record. This should not include prefixes (e.g. Ms.). Accents are supported. Note: A file cannot be uploaded with only the First Name and Last Name columns. If these columns are used, Country and Zip columns should also be included. |
| Country | Optional | No | Use the ISO two letter country code (e.g. US, GB) |
| Zip | Optional | No |
Both US and international postal codes are supported. For US zip codes, you can use the 5-digit zip or 5-digit + extension. For international zip codes, no extensions are needed. |
Note: The publishers (Google or Facebook) will not find a match for all customer data that is uploaded. As a result, the number of records you upload may not equal the List Size provided by the publisher. List Size is the number of records successfully matched by the publisher. That said, the more information provided in the file (email, phone, etc.), the higher the likelihood that the publisher will find a match for your customer data.
Sample File
If you're ready to begin creating your Audience Hub file, you can download a sample file at the link below.
Valid Column Combinations
Use the matrix below to determine the best column combinations for your data. If a column has an X present, this represents that the data is present in your file.
| email1 | email2 | phone | first name | last name | country | zip | Valid or Invalid | |
|---|---|---|---|---|---|---|---|---|
| X | Valid | |||||||
| X | X | Valid | ||||||
| X | X | X | Valid | |||||
| X | X | X | Valid | |||||
| X | X | X | X | Valid | ||||
| X | X | X | X | X | X | X | X | Valid |
| X | X | Valid | ||||||
| X | X | X | Invalid | |||||
| X | X | X | X | X | Invalid | |||
| X | X | X | X | X | X | Invalid | ||
| X | X | X | X | X | X | X | Valid | |
| X | X | X | X | X | Valid |
A Note About Excel
You might find that your your CSV file, when opened in Excel, is displaying numbers in an unusual fashion. You can see an example of this in the screenshot below.

If this is happening, you can simply convert the applicable cells to be displayed in number format.
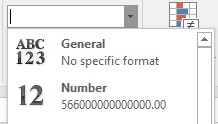
You may also need to remove excess decimal places.
Your cell values should then display correctly.
Hashing Your File
Hashing is a process that is used to transform your upload file into a randomized string of characters in order to ensure data privacy. Once the hashed file has been uploaded, it can be used to create audiences based on your customer data, all while ensuring that client information cannot be matched back to a specific customer or user.
This kind of security is important given the sensitivity of your customer data, which can often include client phone numbers, email addresses, home addresses, and more.
Note: Marin uses SHA-256 hashing, which is supported by both Google and Facebook.
An Important Note About Data Privacy & Security
Marin takes your data privacy seriously. Marin's Hashing Tool is an html file that you will download locally, which means your secure client data will never leave the comfort of your own computer. It will never pass through Marin's servers, which means we will never store your hashed or unhashed customer data.
To learn more about Data Privacy at Marin, check out the Data Privacy page on our company website.
For concerns on how Google handles customer match data, please visit the Google Ads Help site here (external link). Or for concerns on how Facebook handles customer data, please visit the Facebook Ads Help Center here (external link).
Hashed Vs. Unhashed Data
For comparison purposes, let's take a look at both hashed and unhashed data.
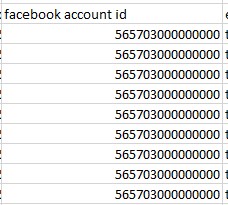
Below you can see an example of unhashed data. It has identifiable client names, email addresses, zip codes, and more.
Note: This screenshot uses the External Account ID column header, but for your upload, you will need to use either the headers Google Account ID or Facebook Account ID.
Once hashed, this data might look like the below screenshot. The identifiable client data has been turned into a randomized string of characters in order to ensure the data remains secure. As we saw in the previous section, a few of your columns, such as Google Account ID, Facebook Account ID, and Publisher, will remain unhashed.
Columns In Hashed Files
When Marin's Hashing tool hashes the file, it will add all supported columns, even if a column is not needed for your upload. Please don't delete these columns prior to uploading your audiences. These columns are required for the file to process, even if all of the cells within that column are left blank. Once a file is hashed, it's ready for upload without any additional changes.
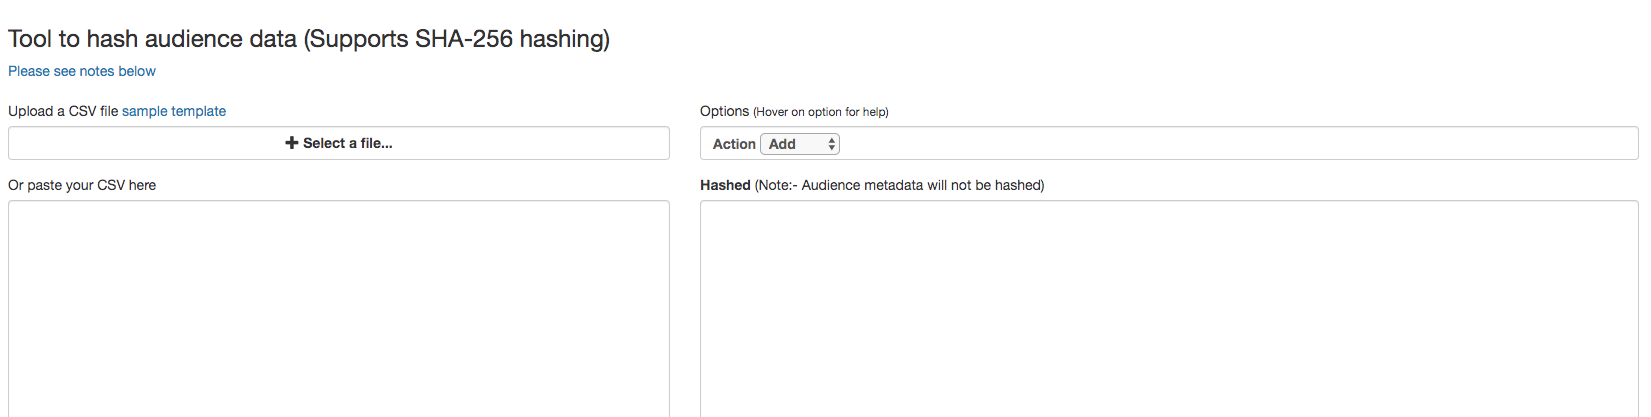
Marin's Hashing Tool
To access Marin's Hashing Tool, follow the instructions below.
- First, click the link below to download the html file for Marin's Hashing Tool. Clicking the link will automatically initiate the download.
Marin Hashing Tool (.html)
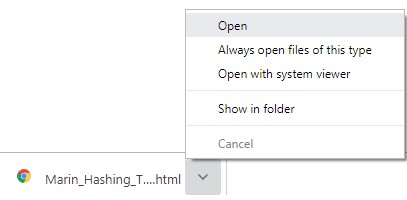
- Once your file has finished downloading, you can click on the download to open it directly from your browser or open the file on your folder that contains this file.
- You will need to open this in a browser window, such as Google Chrome, Safari, Firefox, Internet Explorer or Microsoft Edge.
- Once the file has been opened, you will see a new tab in your browser for Marin's Hashing Tool. We'll learn more about how to use this tool in the next section.
How To Hash Your File
Hashing your file is both simple and secure. You can get started simply by following the instructions below.
- First, go ahead and download Marin's Hashing Utility Tool following the instructions listed in the previous section. You can then open the tool in a new browser tab.

- Next, take the file that you created in the How to Create Customer Match Audiences section of this article and upload it into the Marin Hashing Tool.
You can either upload the entire .CSV file by choosing + Select a file... or you can paste the contents of your file into the available text box.
Note: Make certain that the file name and customer information are in the correct format, based on the information outlined earlier in this article. - Then, click the > Hash button.
- The output window (at right) will only show the first 10,000 rows of your file. To see all of your hashed data, click Download.
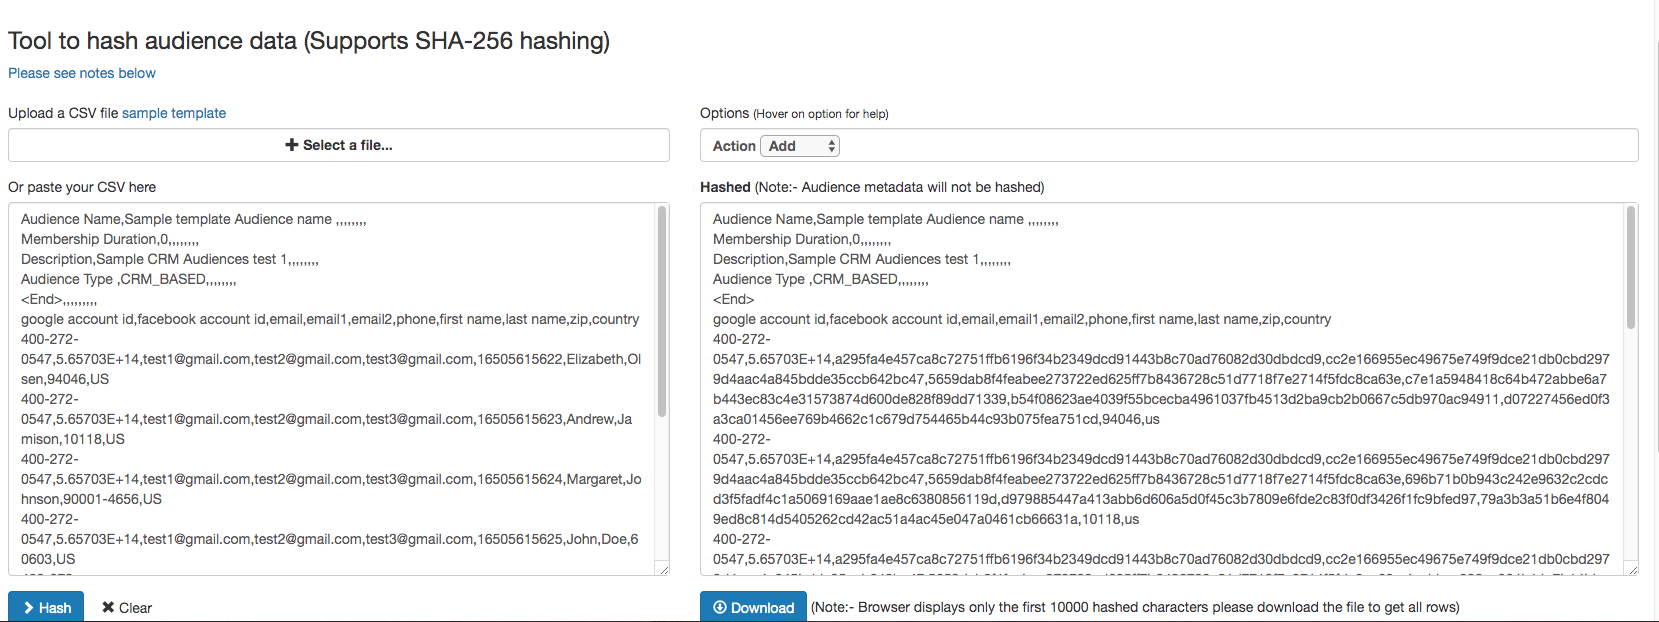
- Above the right-hand output window, you can adjust the Operation as needed. Select Add, Remove, or Replace. You can learn more about the available options in the Operations section of this article.
- The Hashing Tool will add <bulkaudiences> and a unique <unix_date> to your file name along with the Operation (Add, Remove, or Replace). For example, a file name of Top100Customers.CSV before hashing will become Add_Top100Customers_bulkaudiences_1552346736 after hashing, if the Add operation was selected.
In order to upload your file correctly in the next section, please leave these appended to the file name.
Note: Once your file has been hashed, it will still need to be uploaded to the FTP. Check out the next section for instructions.
Uploading Your File Via FTP
One your has been hashed and you've downloaded the hashed file, the next step is to upload the hashed version of the file to the FTP.
If you've used an FTP to upload objects to the FTP, this process will be very similar.
The easiest way to connect to the platform via FTP is to use an FTP program. There are many of these available to download online. One such example is Filezilla, a free, open-source FTP program available for Windows, Mac and Linux.
For more information on Filezilla and help on using the program, please feel free to read their Wiki article here (external link).
To learn more about using the FTP to upload objects to MarinOne, check out our dedicated article.
How To Connect Via FTP
Once you have an FTP program, open it up and enter the following credentials:
Server: integration.marinsoftware.com
Username: Your platform username
Password: Your platform password
Transferring A File
Once you have successfully connected to the FTP client, each Marin Client Account you have access to will be listed as a separate folder represented by its Tracker ID. Files should be transferred to the top level folder (not any of the sub-folders within each client folder) and will begin processing in the Activity Log.
To identify your Tracker ID in MarinOne, follow the instructions below.
- In the left-hand navigation, click on Admin ('gear' icon).
- Click on the Clients & Users tab.
- Click on the Clients sub-tab.
- You will see your Tracker ID listed in the Tracker ID column. You may want to copy this value to your clipboard or paste it somewhere hand so you can easily locate the correct folder in the FTP.
Note: Your Tracker ID can be located in the Admin section of MarinOne.
Important Notes
When uploading to the FTP, keep the following in mind:
- Make sure to upload the hashed file, NOT the unhashed file.
- Make sure the file is in the required format, has been named correctly, and the column headers are in the required format. For more information, check out the Creating Your Customer List File section of this article.
If there were any errors in the file processing, you will see an error status file added to the FTP. If the file was processed successfully, you will see it appear in the MarinOne Activity Log shortly after it has been uploaded.
If the file is successfully parsed, MarinOne will create the Audience object and push this along with any associated user data to the publisher.
Note: For Google Customer Match Audiences, Google requires a match rate of at least 1,000 users in order to build an audience. Marin doesn’t currently alert users when that threshold hasn’t been met, nor does it showcase the total match rate when syncing is complete. We will be introducing these capabilities in a later release.
Similar Audiences (Google)
Similar audiences enable advertisers to target users searching for the same kinds of things as your designated customer match list, for which Google analyzes browsing interests, search queries, and videos watched, on Gmail and YouTube. These will automatically be created if your Customer Match audiences meet the minimum eligibility criteria.
Audience Activity Log
Once your audiences have been uploaded into MarinOne, you can check the status of uploads and edits in the dedicated Audience Activity Log. From here, you can monitor all activity related audience file uploads.
After you've dropped your file to the FTP, you can monitor its status from MarinOne by clicking on the Activity Log button ('bell' icon) in the top right-hand corner.
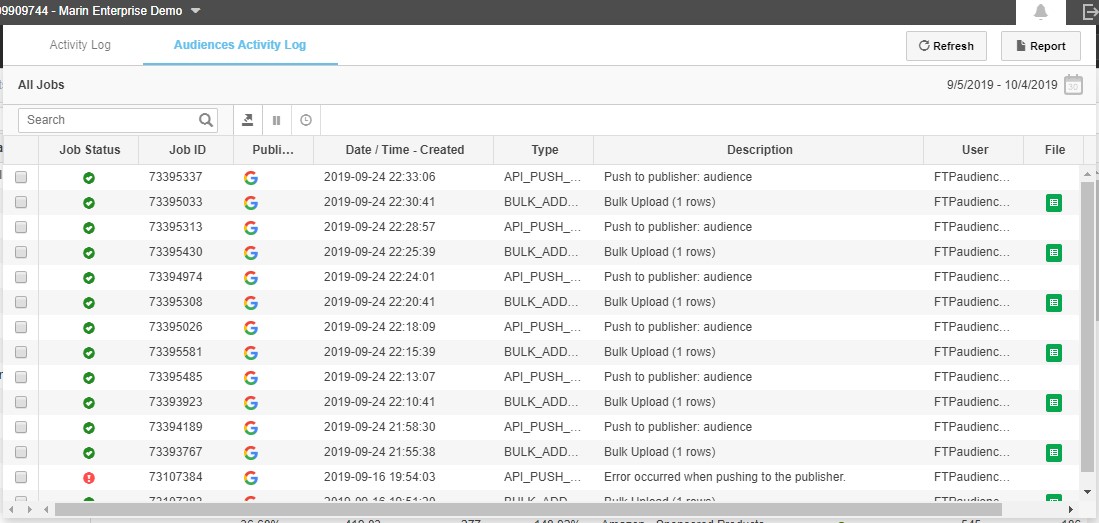
To monitor audience jobs, click on the Audience Activity tab.
For every file that's uploaded to the FTP, there will be two jobs created:
- Bulk upload
- Api_Push_Audience
Once both jobs are completed, you will see the audience created in MarinOne's Audiences tab and in the associated publisher platforms.
Managing Your Customer Match Audience
Once your Customer Match Audience has been created, it can be managed in MarinOne just like any other audience.
To learn more about managing audiences in MarinOne, check out our dedicated article.
